FeedXChange User Guide
Introduction
"FeedXChange is part of the ReactorCX platform and is used to define and orchestrate specific types of batch processes, such as processing partner accruals, enrollments, and bulk changes to members and reference data." The FeedXChange product uses an intuitive interface to define file templates and validation criteria, response file generation rules, and other metadata describing how feed input and outputs work. You can also use it to schedule and run integrations on a recurring basis.
One of the key principles of FeedXChange is that it's designed to adapt RCX to any existing file formats, rather than force every system to convert to a single format. This allows RCX implementations to be quicker, as existing file formats don't need to be redesigned on source systems or converted.
FeedXChange is also an operations manager tool, issuing alerts, providing dashboards for monitoring and reporting, and providing a user interface to investigate issues with individual batch process runs.
Core Concepts
Within FeedXChange you can manage a number of pre-defined common processes, as well as your program-specific activities which can be configured as Custom Activity processes.
RCX Processes
FeedXChange supports the following types of processing within RCX:
| Process Name | Description |
|---|---|
| Accruals | Allows processing of bulk accruals such as partner accrual feeds. |
| Redemptions | Allows processing of bulk redemptions such as point transfers or other expenditures coming in from external sources |
| Enrollments | Allows processing of bulk enrollments of new members with optional duplicate matching by combinations of fields |
| Member Segments | Allows bulk assignment of segments to members based on external segmentation sources |
| Member Preferences | Allows bulk setting of member preferences and member-level Loyalty feature flags |
| Bulk Tier Change | Allows setting Tiers and Tier Expiration dates in bulk for members |
| LoyaltyID | Allows adding the loyalty ID to the members. |
| Profile Update | Allows updating member profile data |
| Custom Activity Processing | Allows modeling any custom activity for a member that isn't one of the above pre-defined processes. |
Note
Any process that's based on an RCX Activity for a member can also auto-enroll the member with just their loyalty ID and receive profile updates as they become available.
Partners
The RCX platform recognizes external partners and their representatives when operating a coalition program. A partner is an external organization that participates in the program—for example, a co-branded credit card partner or an industry partner such as a car rental agency.
In RCX, a Hosting Partner is the organization which owns the program and is responsible for the overall program management.
Integrations
An integration is a scheduled process that runs on a recurring basis. It's defined by a set of rules and criteria that are used to determine when the process must run, what types of files it accepts, and what types of files it produces. An integration run is a single execution of an integration.
Templates
A Template is a way to describe what a file structure in sufficient detail to allow FeedXChange to understand how to validate and process it correctly. Templates include detailed field definitions, validation rules and response file generation rules.
Each Template is associated with an RCX Process and belongs to a Partner.
Connections
A Connection is a way to describe a storage location where files can be downloaded and uploaded. A Connection is associated with a Partner who owns and manages the storage location. FeedXChange supports SFTP and S3 types of storage currently.
Browsing Templates
To browse Templates available in FeedXChange navigate to the Templates tab in the side-panel menu as shown below:
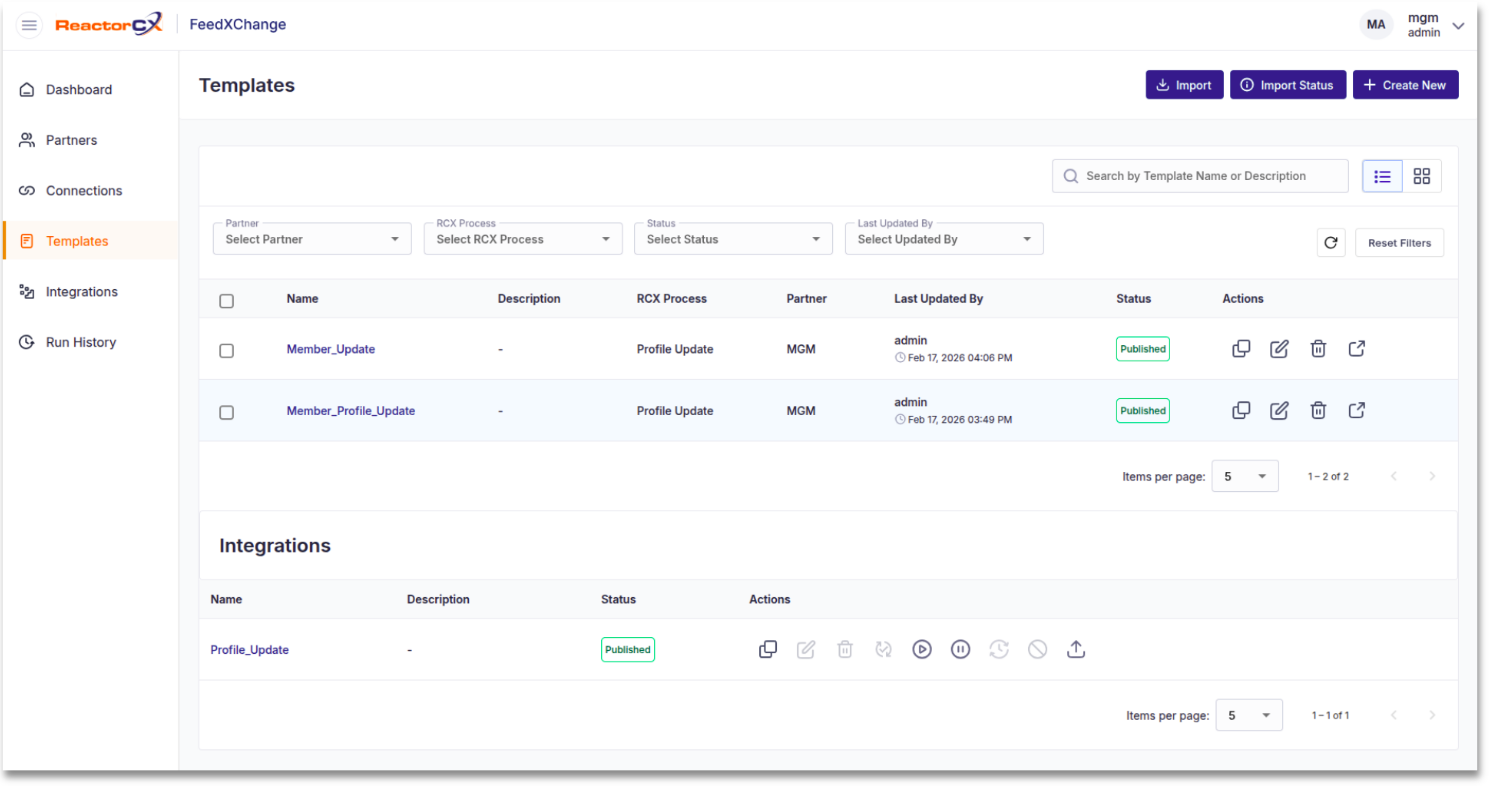 Figure 1. Browsing Templates
You can filter the template list by RCX Process, Partner, and Last Updated By. In addition, you can use the global template search to search template names and descriptions. Use the Reset Filters button to reset the filters and show all templates in the system.
When you select a Template in the list, you can view the integrations associated with that template in the list view at the bottom of the screen. This allows you to gauge the impact of editing a Template on any integrations.
You can use the Create New button at the top right corner to create a new Template.
You can use the following Action Buttons to take action on a specific Template:
| Button | Description |
|---|---|
 |
Copy a template under a new name |
 |
Edit a template |
 |
Delete a template |
 |
Export a template |
Viewing a Template
To view a Template without the risk of changing it, click the title of the template, which is a hyperlink that takes you to a read-only view of the template and all of its details.
Editing Template Configuration
To edit the configuration of a Template, you need to either create a new template, or edit an existing template via the edit Action Button.
The Template Editor has two panes - the structure pane is on the left and the detail pane is on the right as shown below:
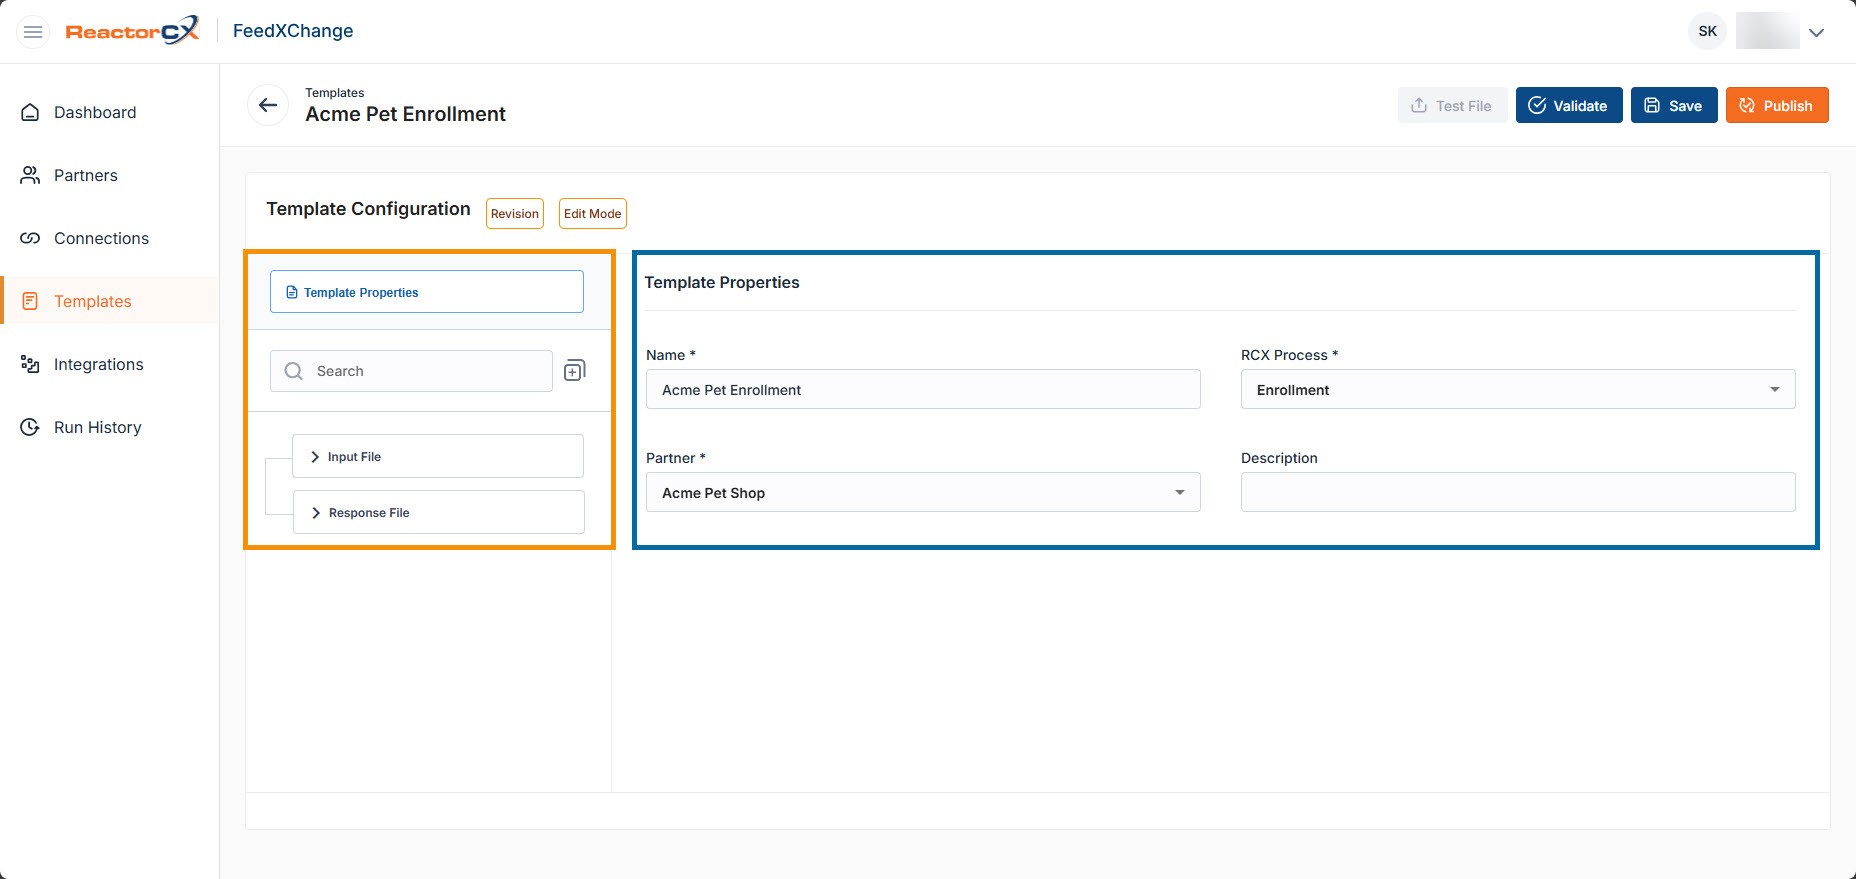 Figure 2. Template Editor
Managing Field Lists
Before we dive into configuration, we covers some basics of how field lists are managed when defining file layouts. This provides the context for later sections that deal with field configuration.
Within a Template, each section of an Input or Response file (for example Header, Footer, Body) has a list of Fields that must be to define the layout of the file. In this section we describe how to add, remove, copy**, and** re-arrange fields in a list.
Below is a screen shot of a list of fields under the Input File Header as an example:
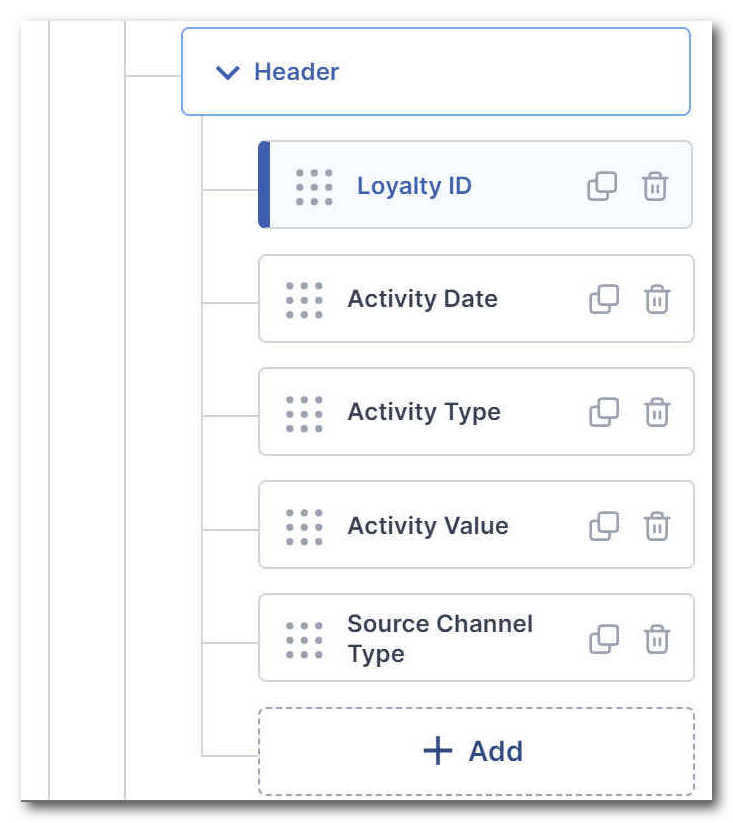
Figure 3. Field List Operations
- To add a field, click the
Addbutton at the bottom of the list. - To configure a field, click the field to make it active. The field details can be edited in the detail pane.
- To remove a field, click the trash can icon at the right-hand side of the field box.
- To copy a field, click the clipboard icon at the right-hand side of the field box.
- To Move a field up or down, drag and drop the field using the gray dot handle at the left-hand side of the field box.
Note
Moving fields changes the sequence in which they're expected when the Input File is Delimited. However, this has no effect on the fields if the input file is fixed.
Template Properties
When you select the Template Properties tab of the Template Editor, you can edit the following properties:
| Property Name | Property Description |
|---|---|
| Name | Template name |
| RCX Process | The type of process this Template is used for |
| Partner | The Partner who is associated with this Template |
| Description | Template description |
Input File Configuration
Input files are posted by Partners to initiate bulk processing for a specific RCX Process.
To define the Input File layout click the Input File box in the structure pane. This allows you to define overall Input File Properties, as well as define the structure of the Header, Body**, and** Footer of the input file..
Input File Properties
Click File Properties under Input File, to configure the overall properties of the file:
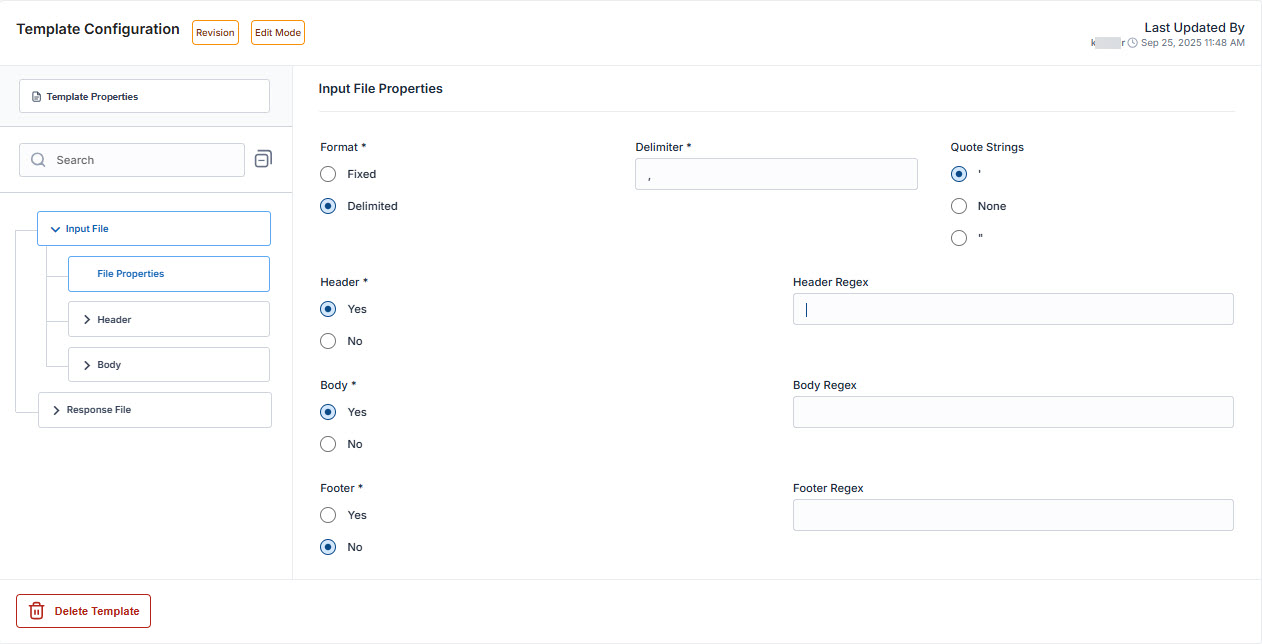 Figure 4. Input File Properties
The following properties can be configured:
| Property Name | Property Description |
|---|---|
| Format | Choose one of Fixed or Delimited. If Delimited is selected, specify the delimiter and string quotation handling. |
| Header | Choose whether your Input file has a header. Optionally, you can specify a regex to identify header lines if they're prefixed. |
| Body | Choose whether your Input file has a body. Optionally, you can specify a regex to identify body lines if they're prefixed. |
| Footer | Choose whether your Input file has a footer. Optionally, you can specify a regex to identify footer lines if they 're prefixed. |
Input Header Fields
To configure the Header fields for the Input File, click the Header box in the structure pane to expand it. Under that box is a list of the Header field definitions that can be configured at the field level:
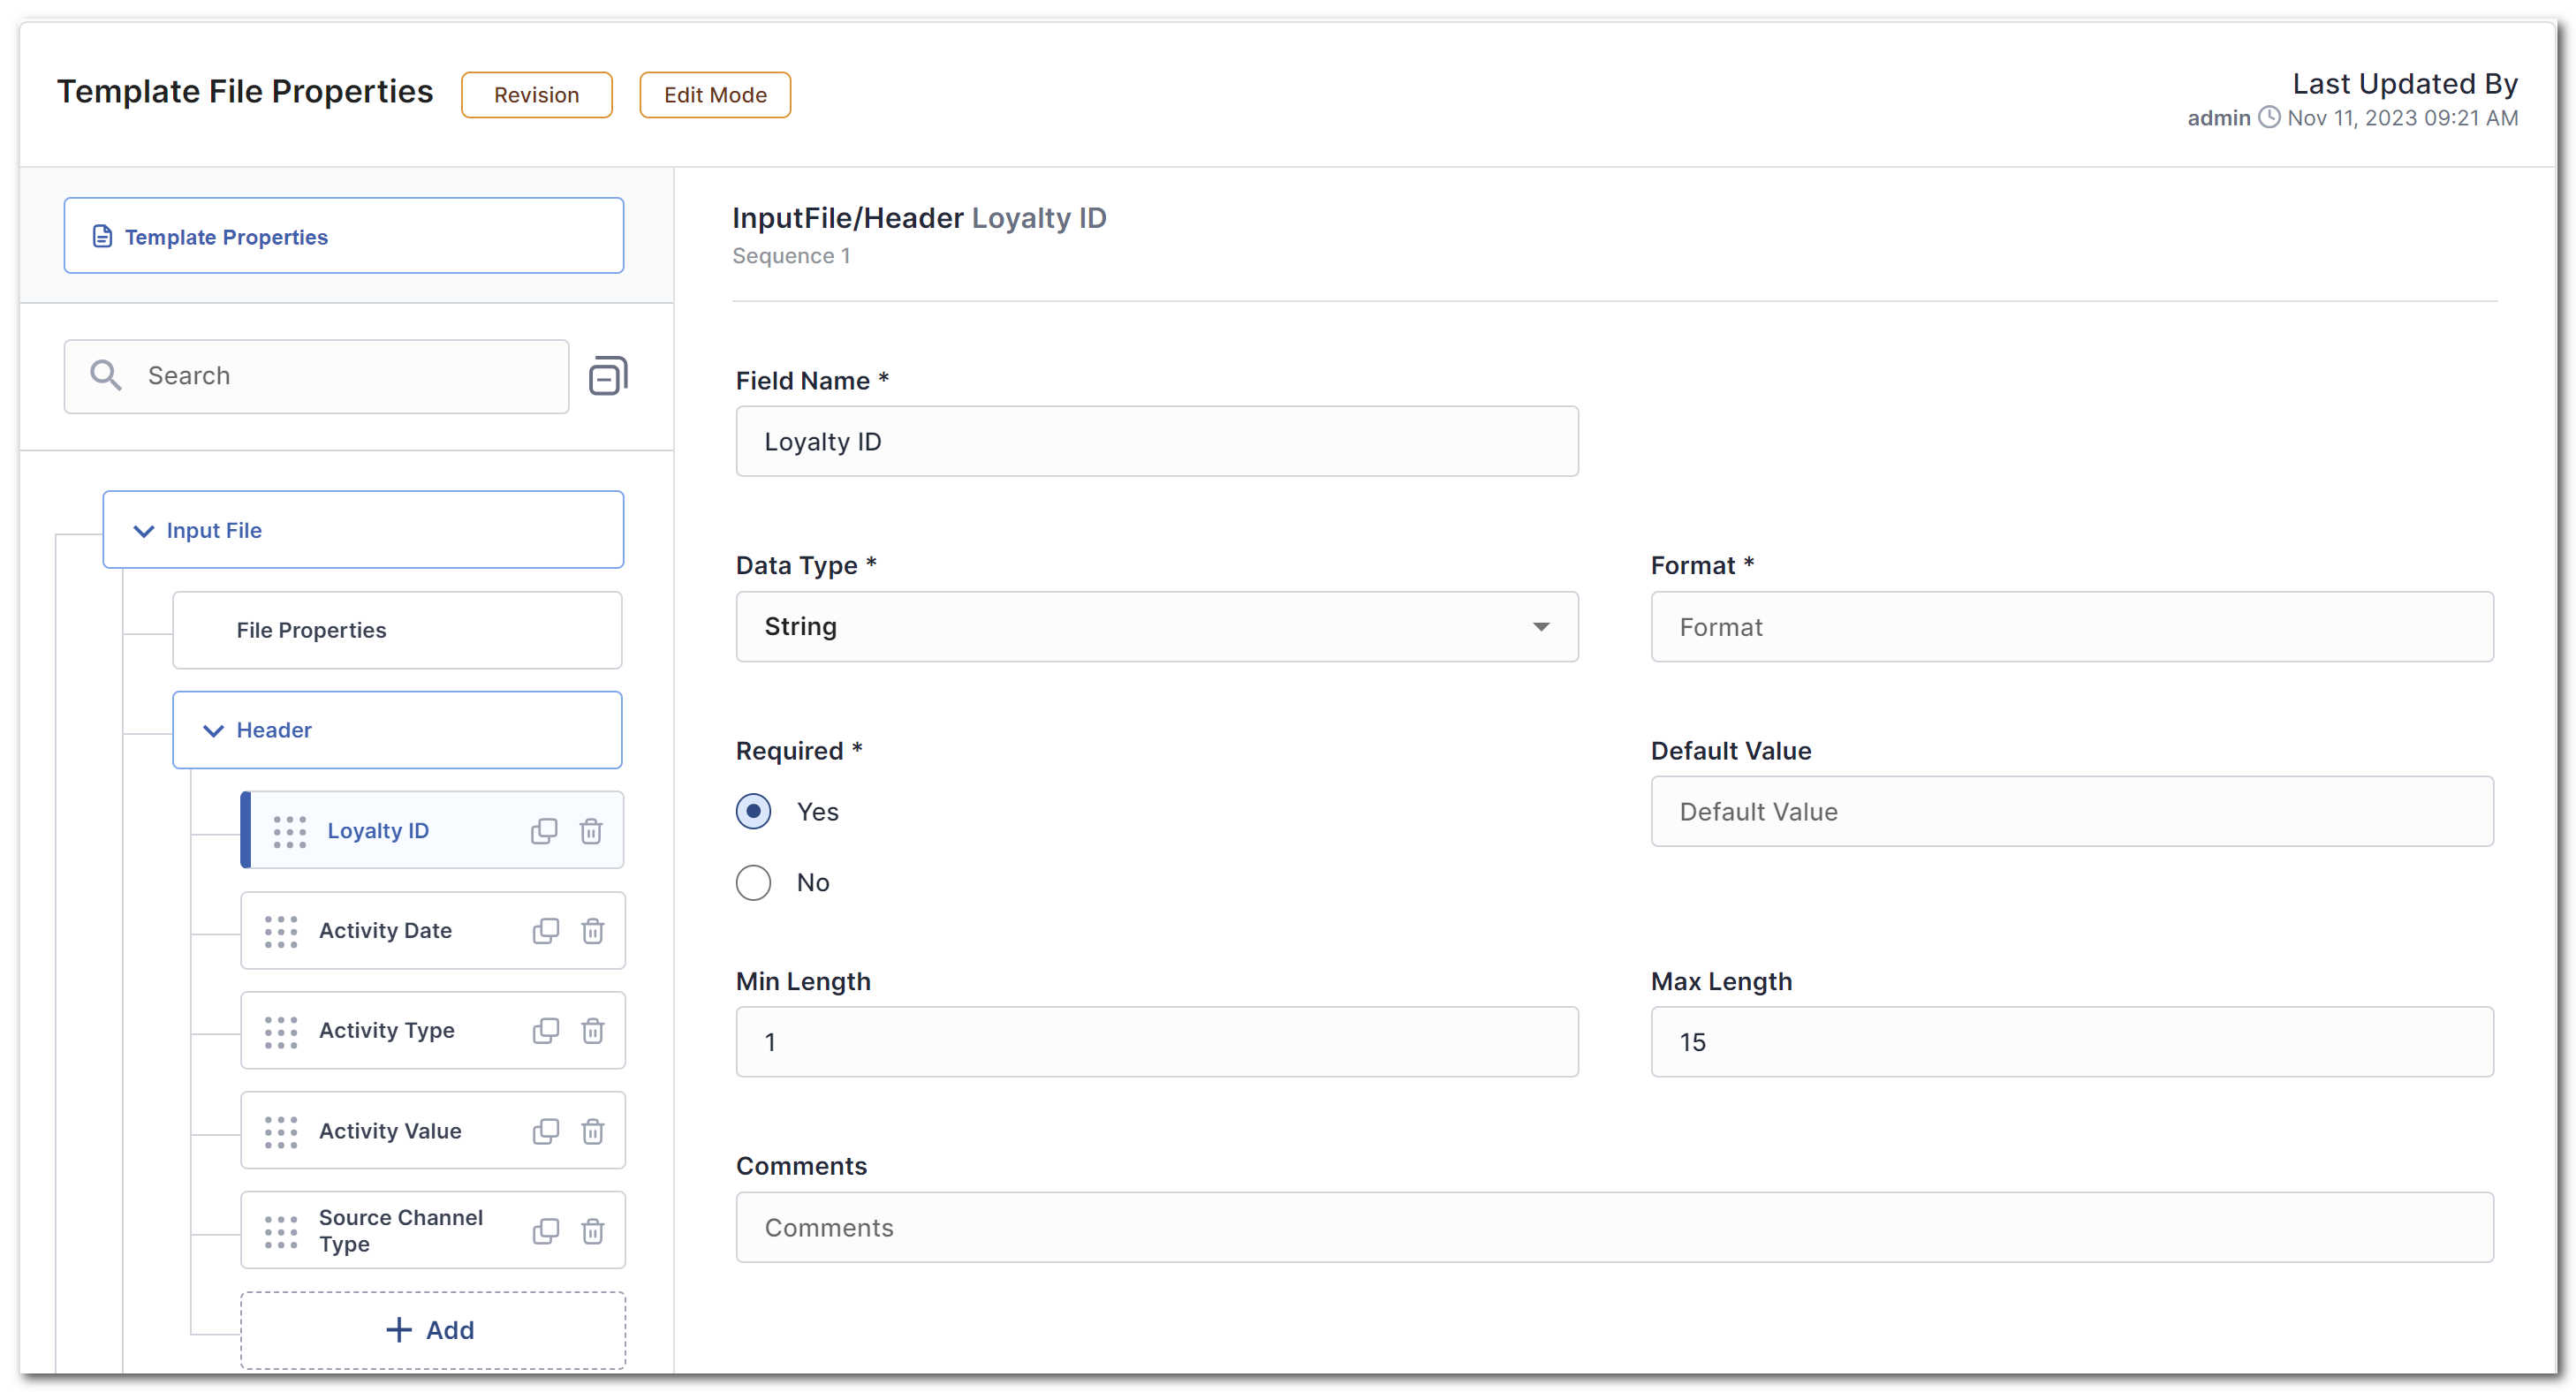 Figure 5. Input File Header Field Configuration
The following properties can be configured:
| Property Name | Property Description |
|---|---|
| Field Name | The name of the field. Has to be unique within the parent object. |
| Data Type | Can be one of String, Date, Boolean, Number. |
| Format | Depending on Data Type, the format can be specified as follows:
|
| Default Value | Optionally specifies a default value. |
| Required | Indicates whether the field is required to have a value. |
| Comments | Further description of the field and any additional information. |
Note
For date formats, the icon next to the Format field provides a legend on how to interpret the date formats.
Input Body Fields
To configure the Body fields for the Input File, click the body box in the structure pane to expand it. Under that box is a list of the Body field definitions that can be configured at the field level:
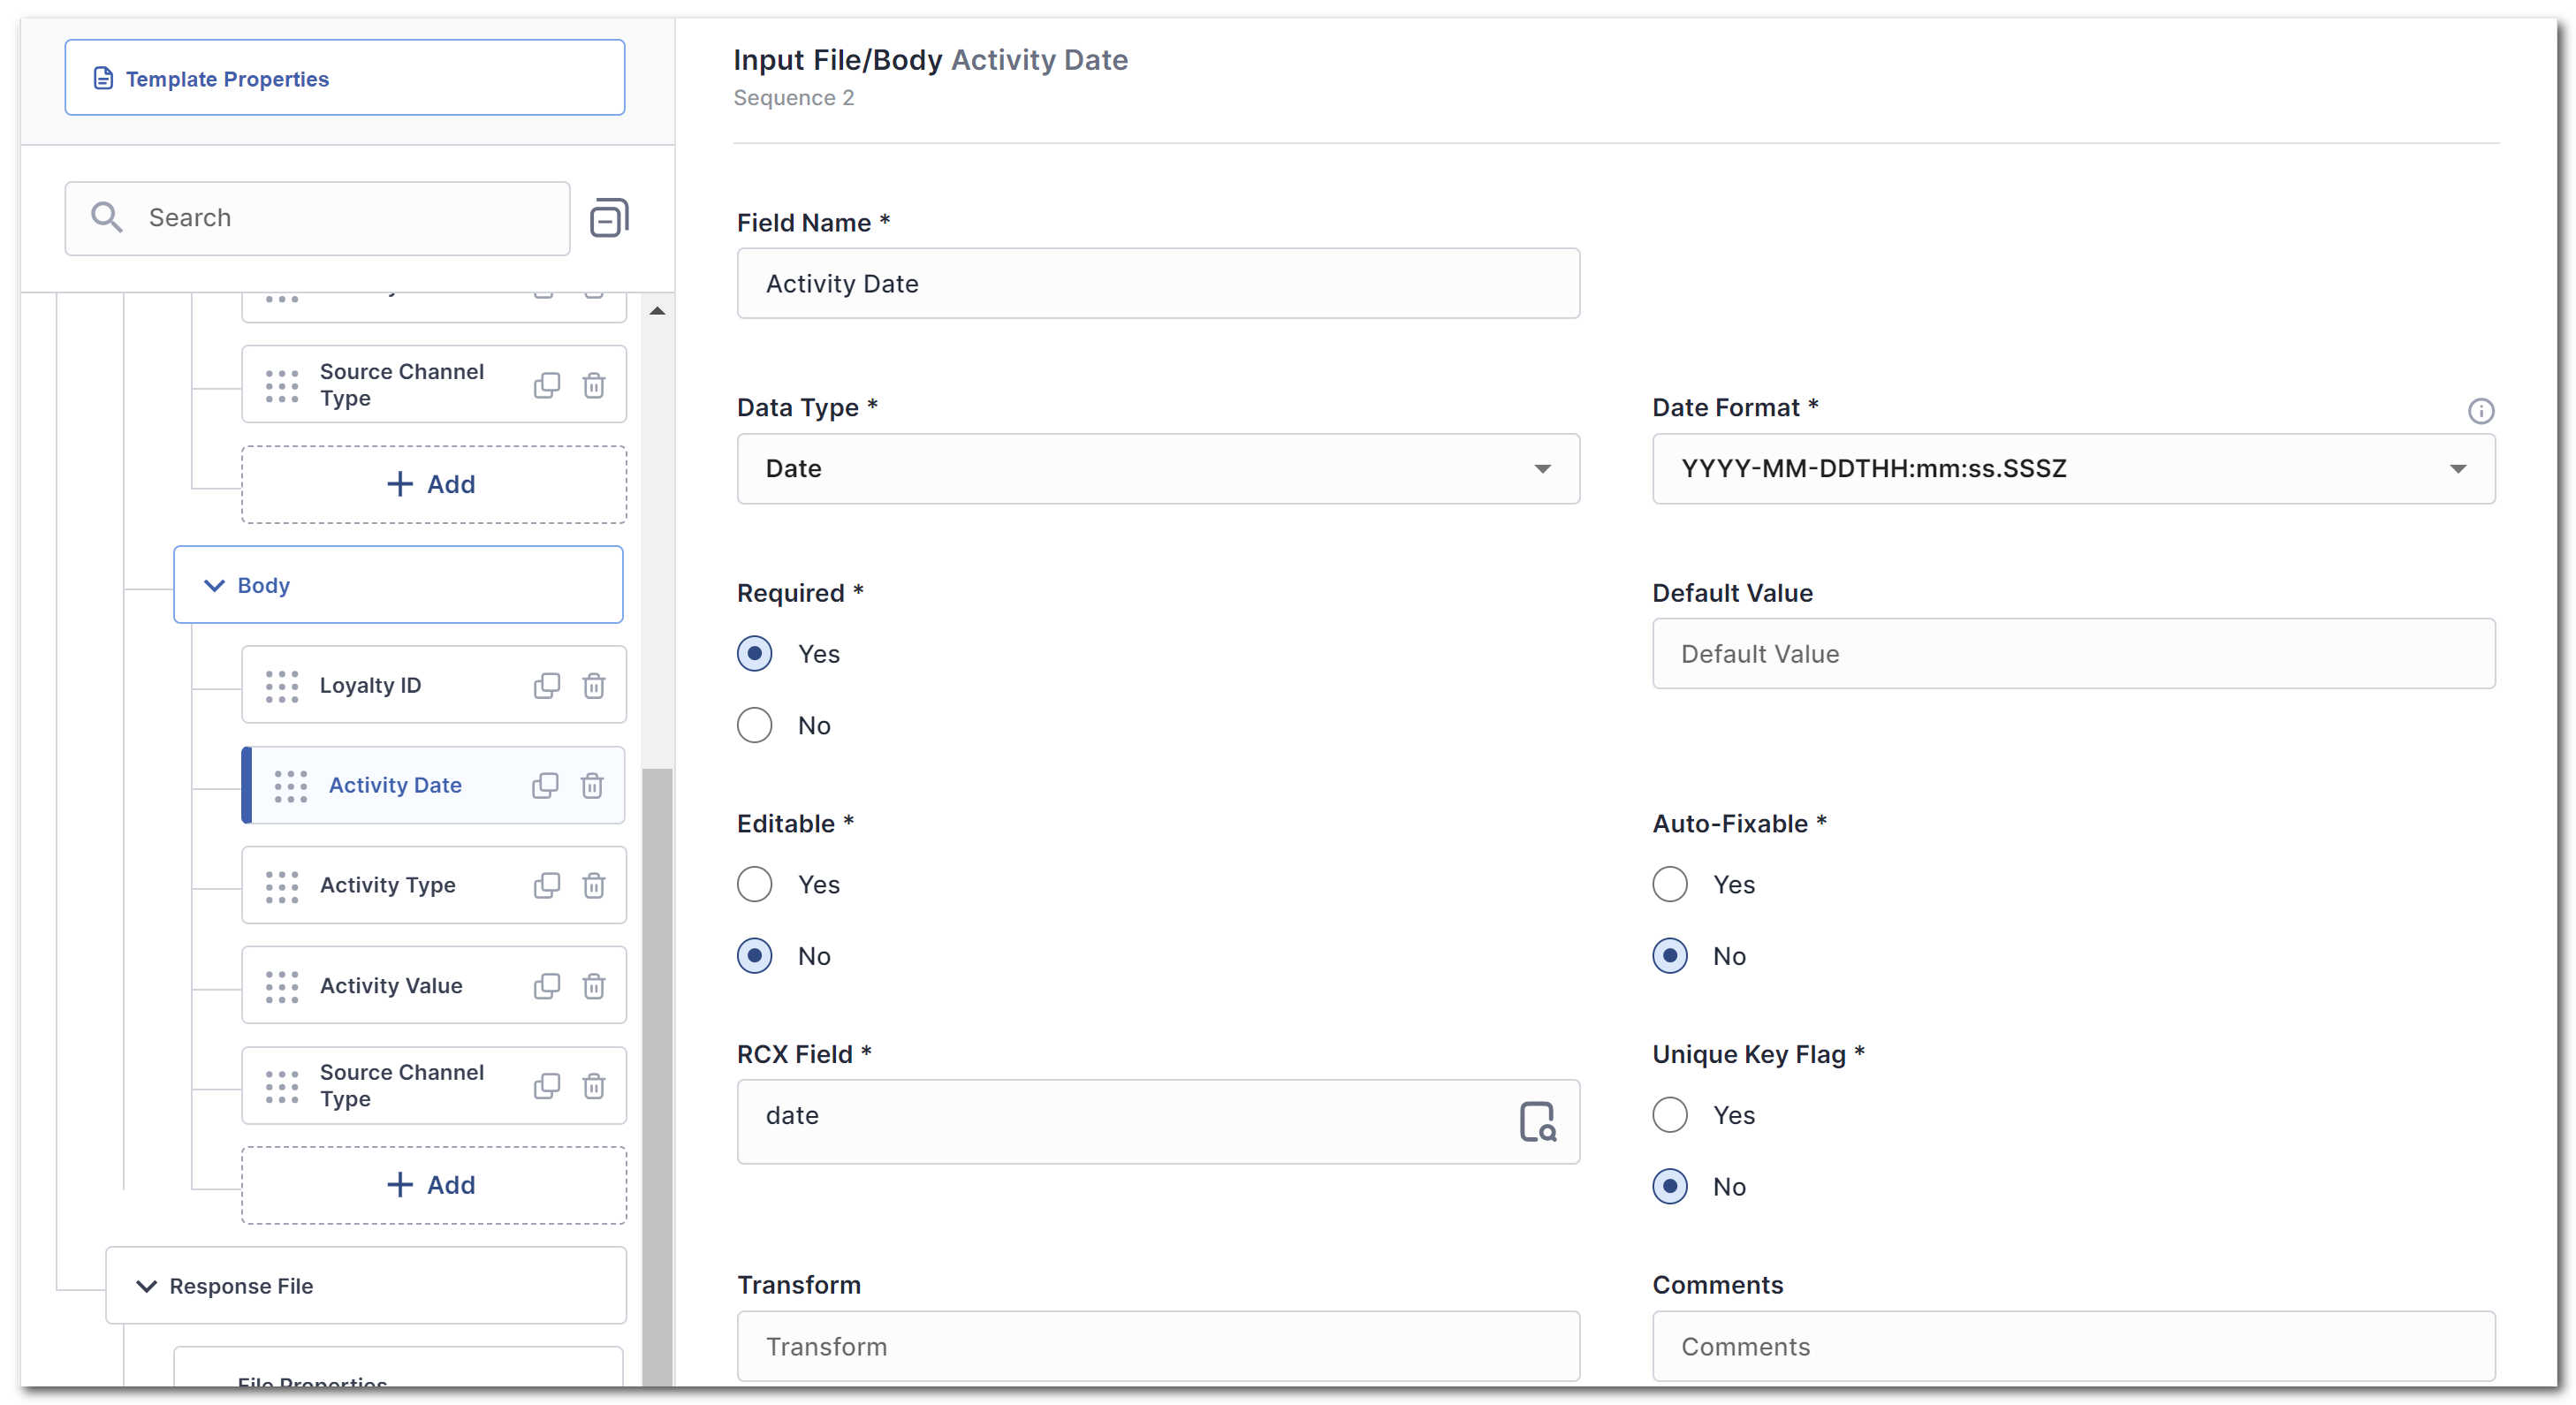 Figure 6. Input File Body Field Configuration
Array Fields
To configure array fields under the Body Fields, select any array field from the RCX-field, and a sub-tree will be generated. The array field definitions can then be configured at the field level, alongside normal fields. Additionally, the Fixed Array Length field must be configured to specify the length of the array.
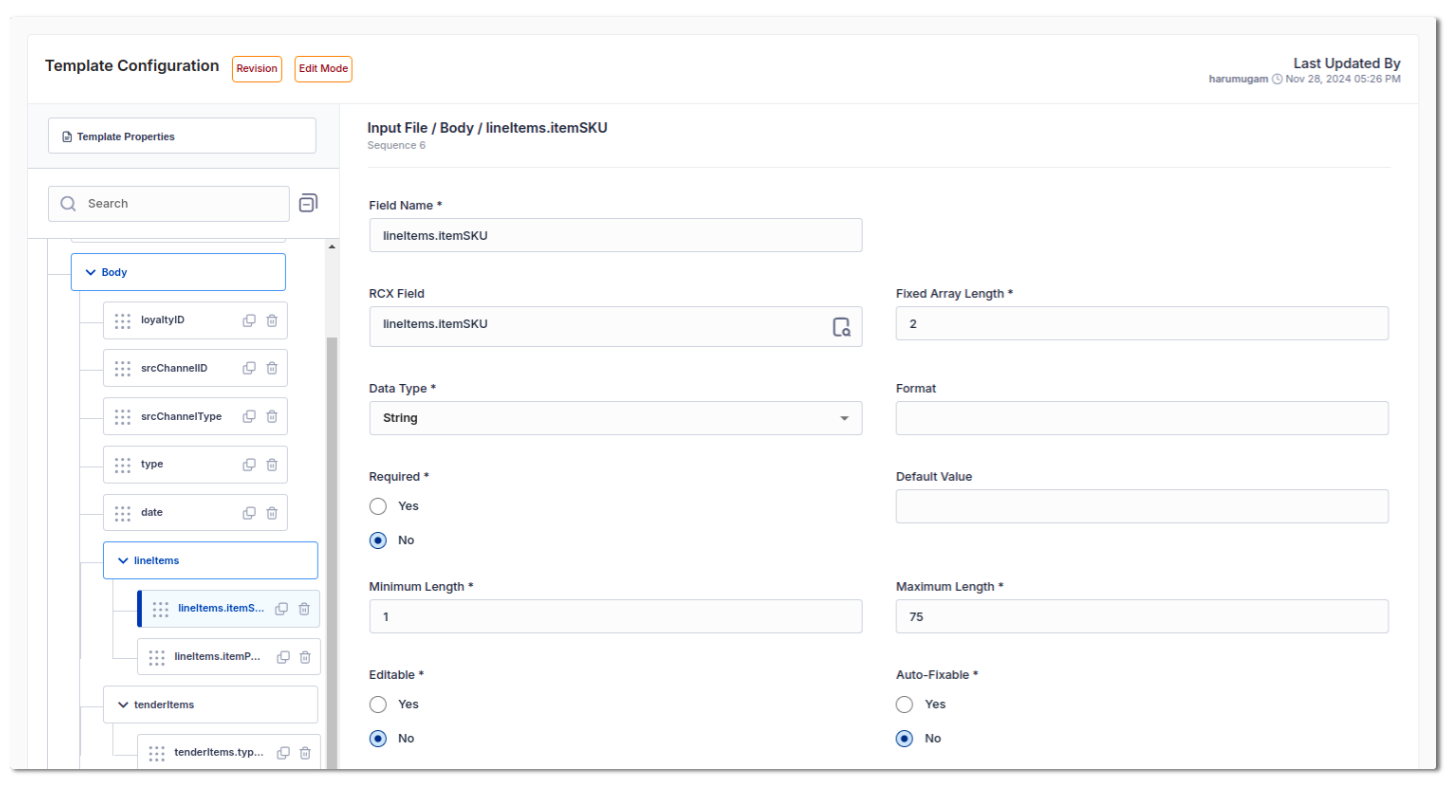 Figure 7. Input File Body Array Field Configuration.
The following properties can be configured:
| Property Name | Property Description |
|---|---|
| Field Name | The name of the field. Has to be unique within the parent object. |
| Data Type | Can be one of String, Date, Boolean, Number. |
| Format | Depending on the data type, the format can be specified as follows:
|
| Default Value | Optionally specifies a default value. |
| Fixed Array Length | The number of elements to be parsed from the file(array length) can be specified. |
| Editable | Indicates whether the field can be manually corrected. |
| Auto Fixable | Indicates whether the field value can be corrected automatically based on a pattern. |
| From File | Indicates whether the data for a field is coming from the file or not. |
| Unique Key Flag | Indicates whether this field is part of the record unique key and is used to duplicate records. |
| Transform | Optionally specifies a transform function to be used on that field. |
| Transform Expression | A custom expression or formula to apply transformations to the field value. |
| Comments | Further description of the field and any additional information. |
Transforms
The Transform field in the Input Body Properties allows you to apply transformations to the data before processing.
Configure the Transform:
-
Select the Transform:
Navigate to the
Transformproperty in the Input Body Field configuration after selecting the appropriate data type for the desired field. From the dropdown menu, select the type of transform you want to apply (for example, Join, Arithmetic, Date, or Mapping). -
Add Transform Details:
For all transforms except Date Transform,Addappears next to the dropdown. Click theAddbutton to open a pop-up dialog box.
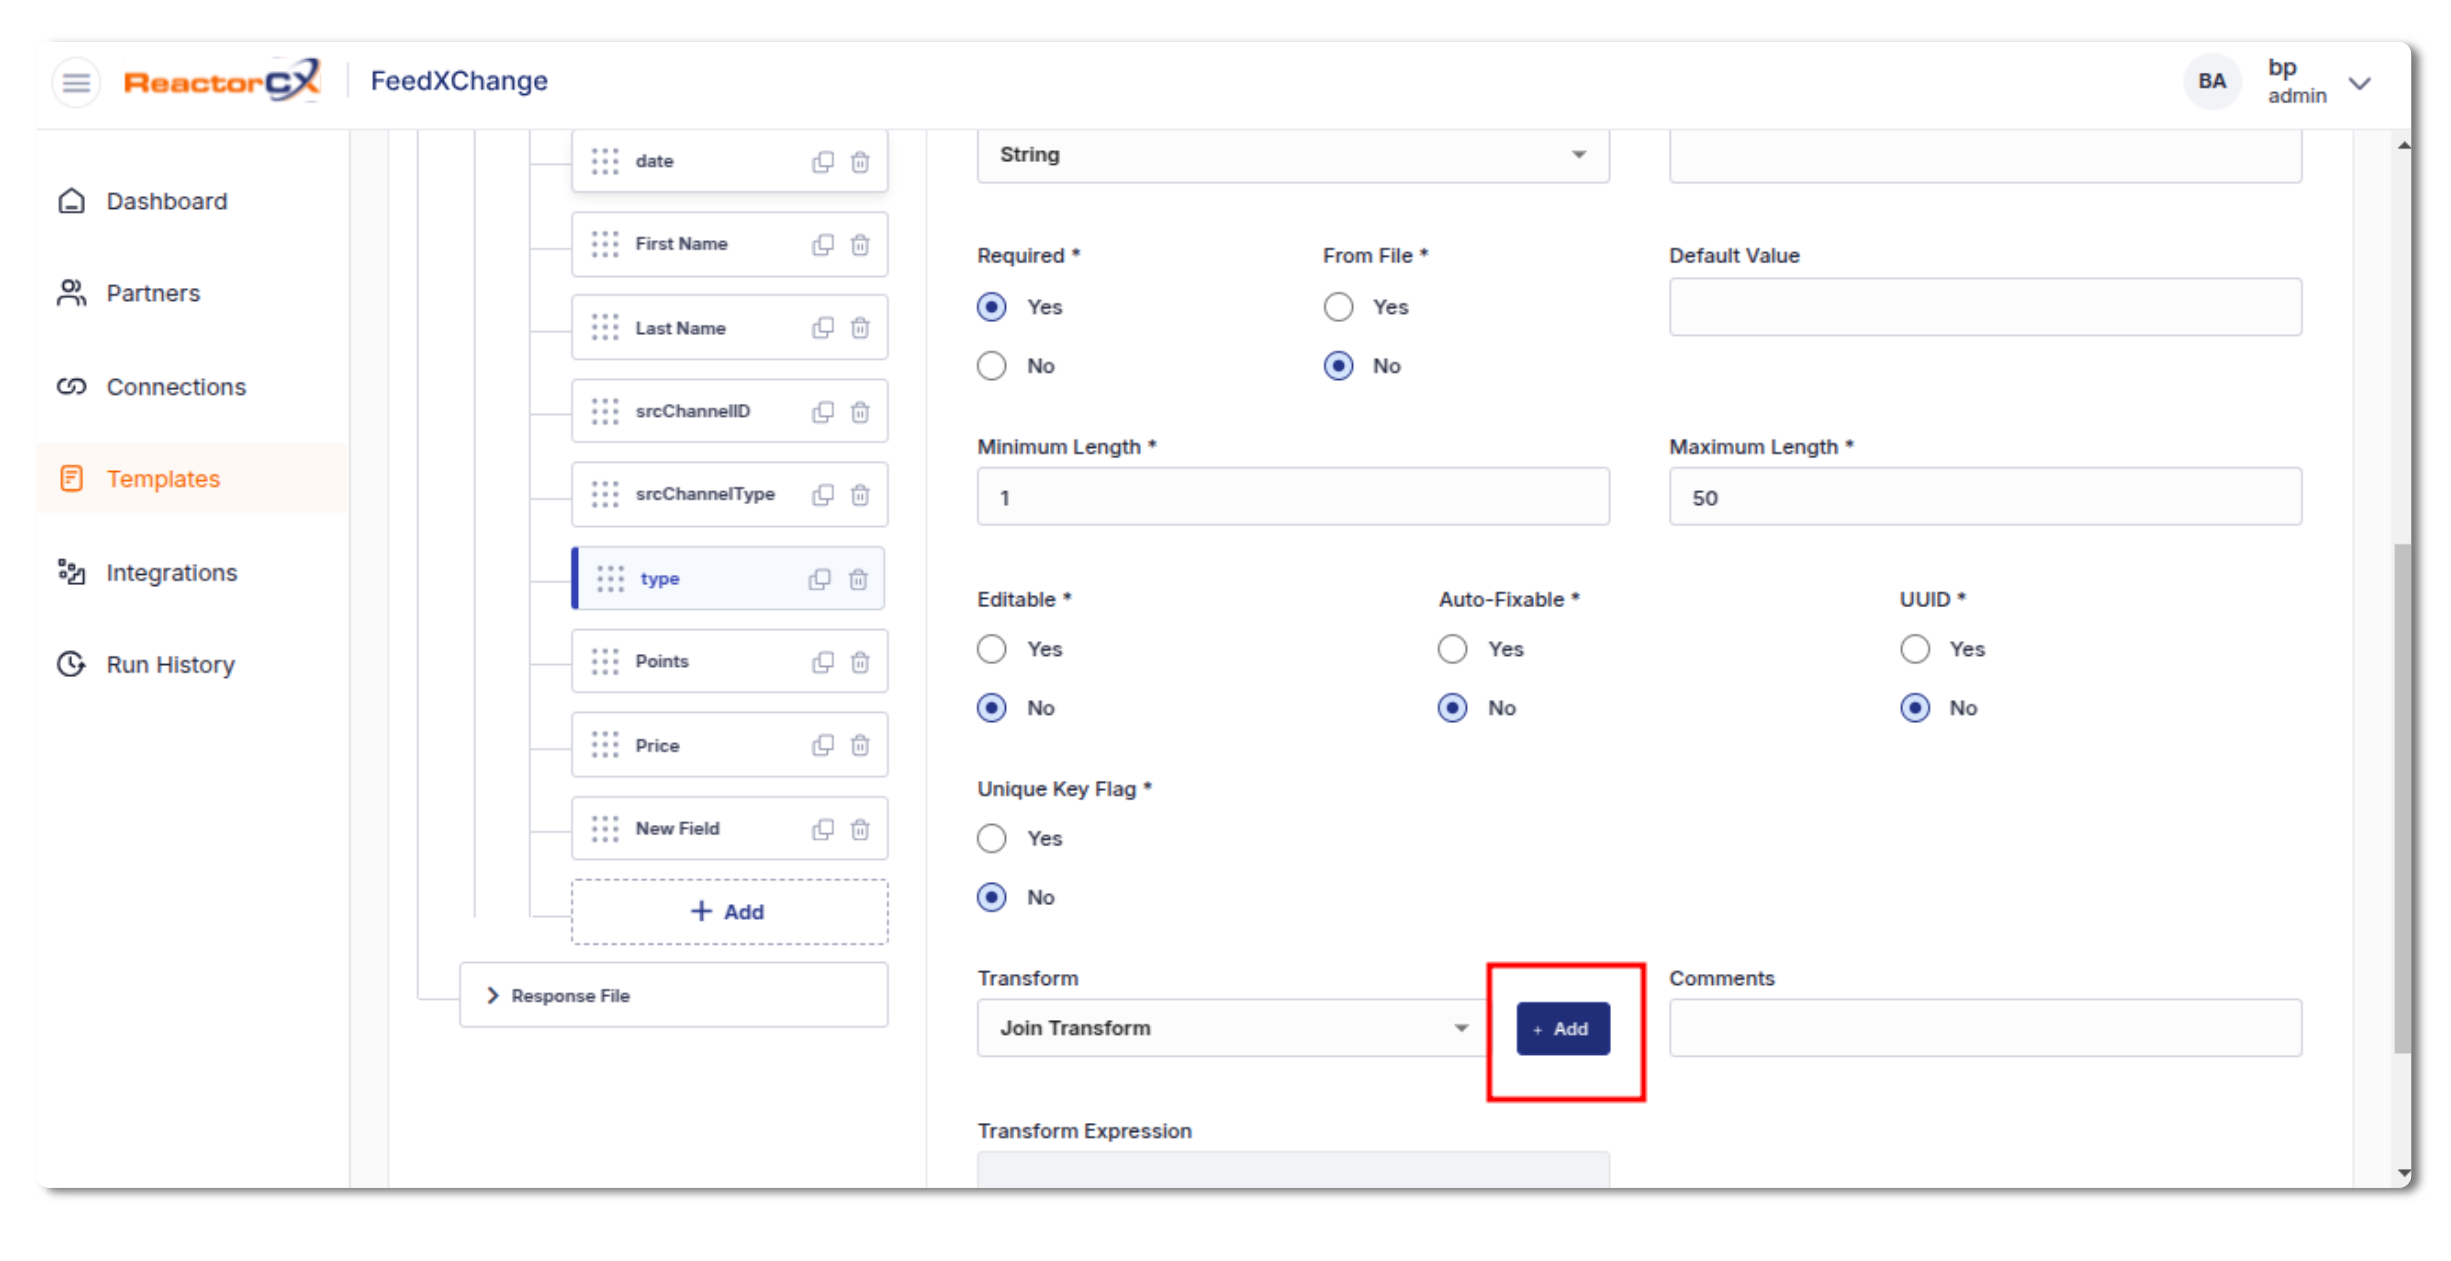
Figure 8. Add Transform.
The following types of transforms are supported:
-
Join Transform:
Joins multiple fields into one.
Example: CombineFirstNameandLastNamewith a separator '-' to assign the resulting value to the current field.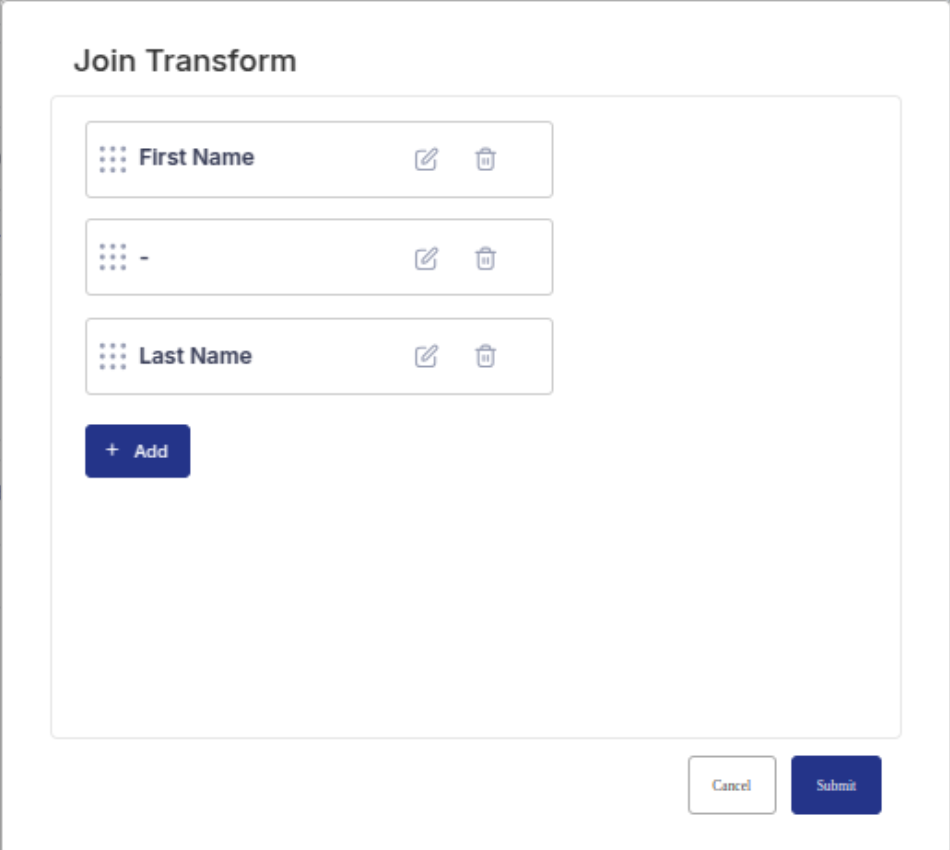
Figure 9. Join Transform. -
Arithmetic Transform:
Performs mathematical operations on numeric fields.
Example: SubtractPointsfromPriceto calculateTotal.
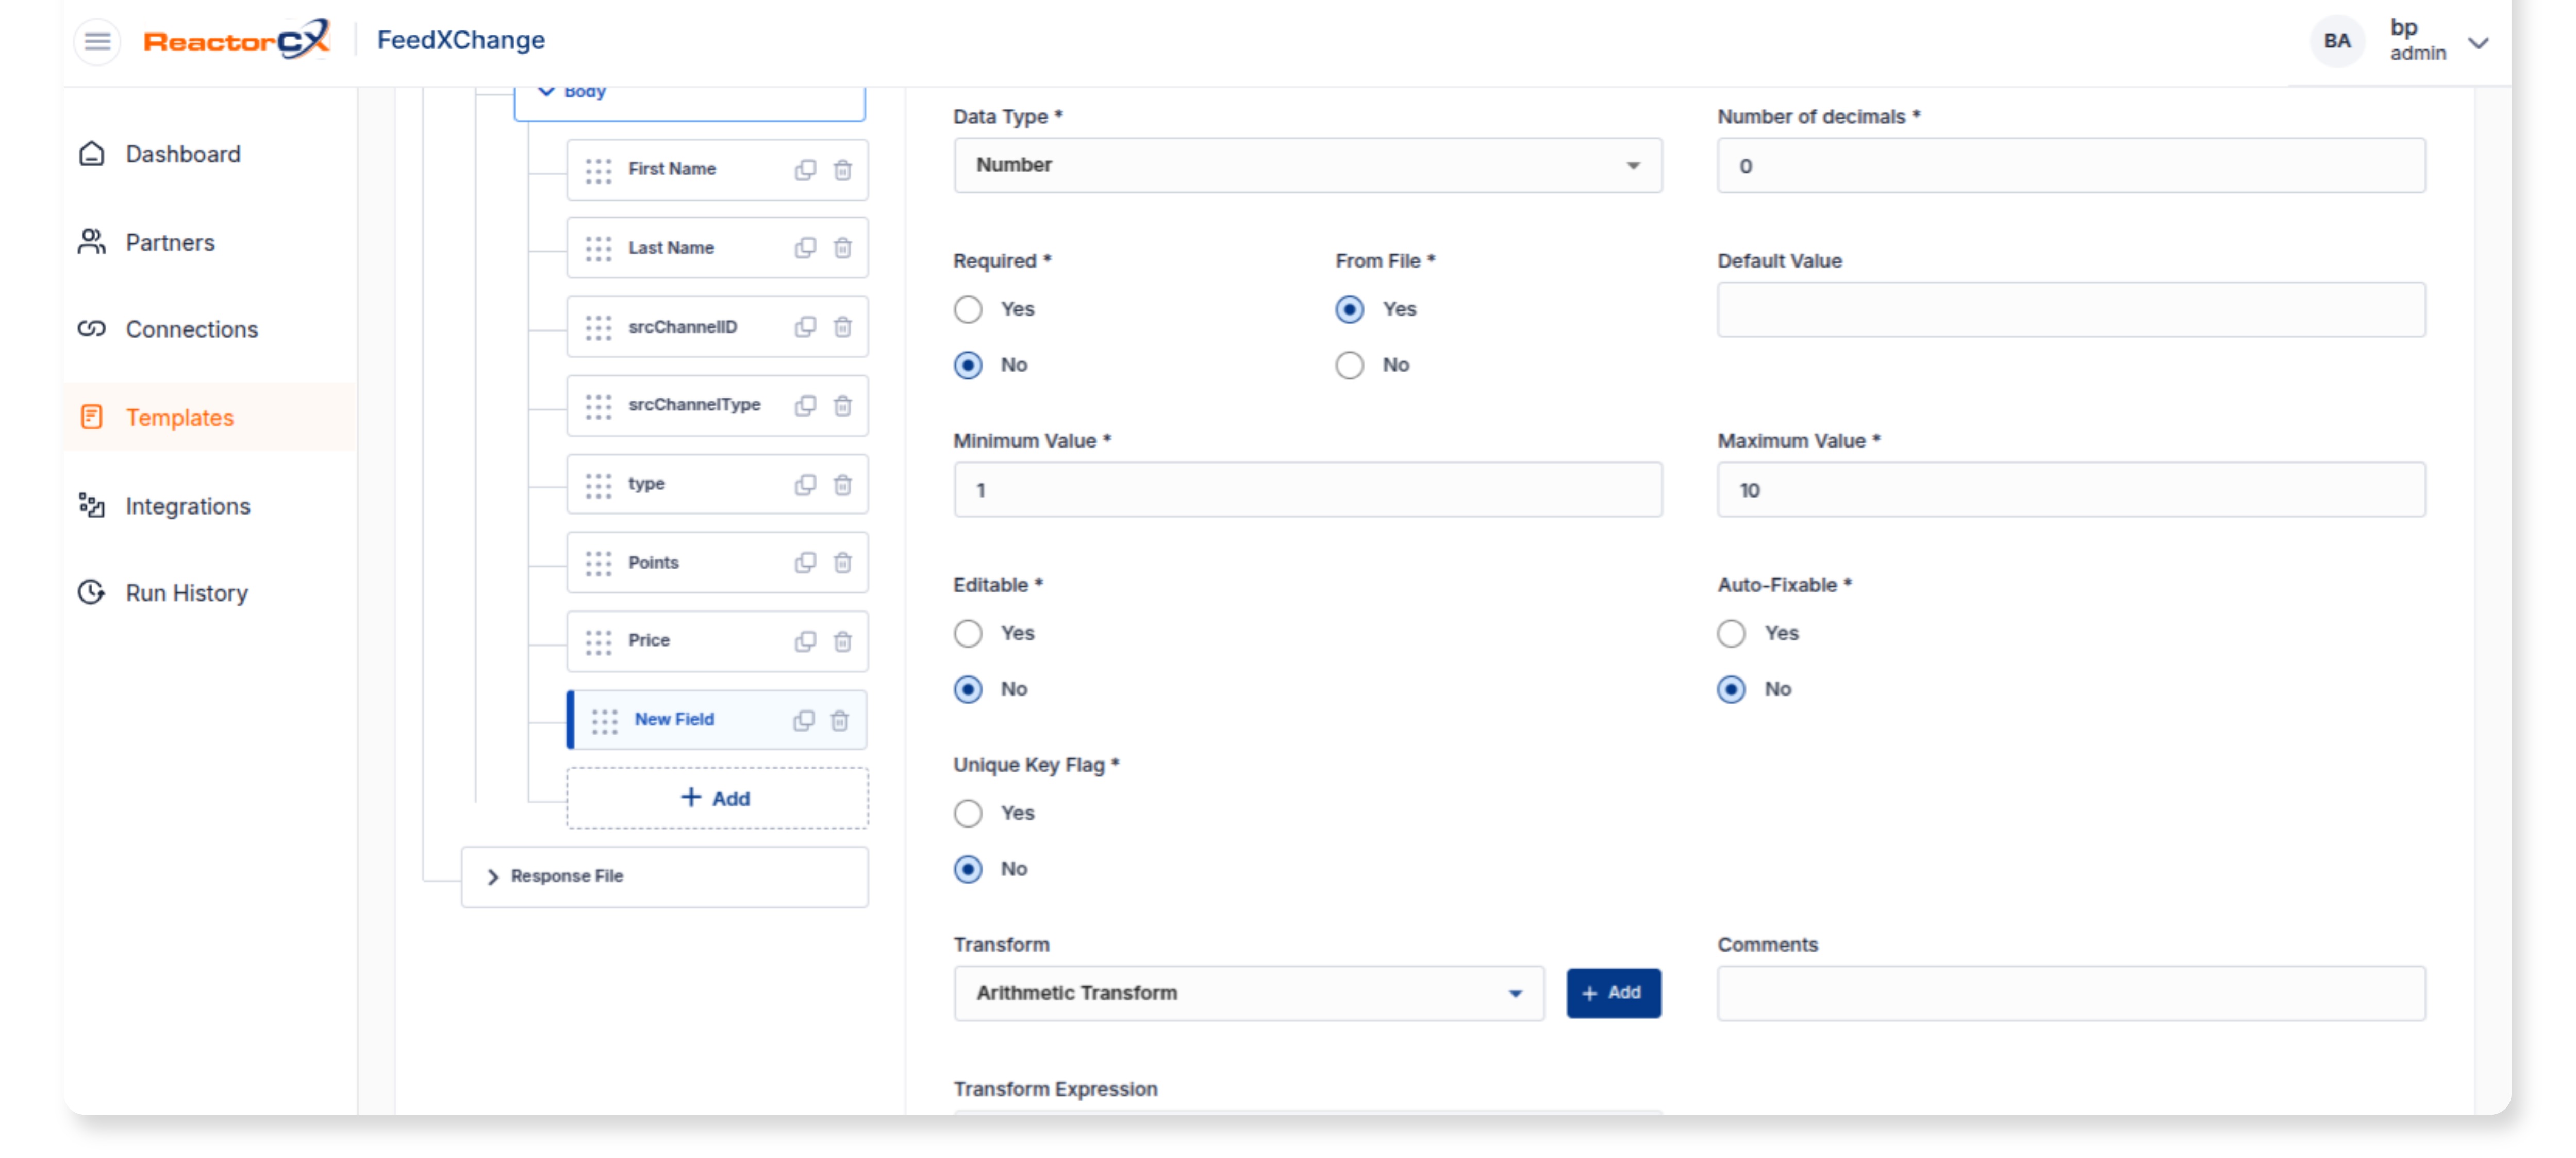
Figure 10. Add Arithmetic Transform
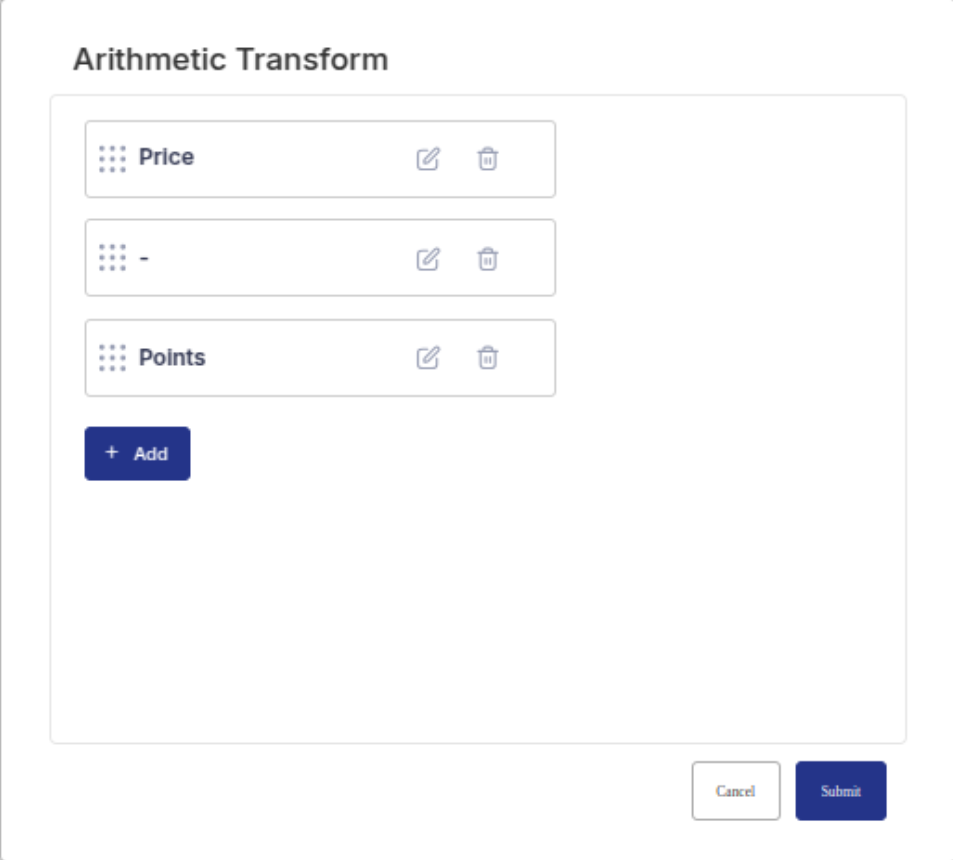
Figure 11. Arithmetic Transform. -
Date Transform:
Converts a date from one format to another.
Example: Change a date fromMM/DD/YYtoYYYY-MM-DDTHH:MM:ss.SSSZ.
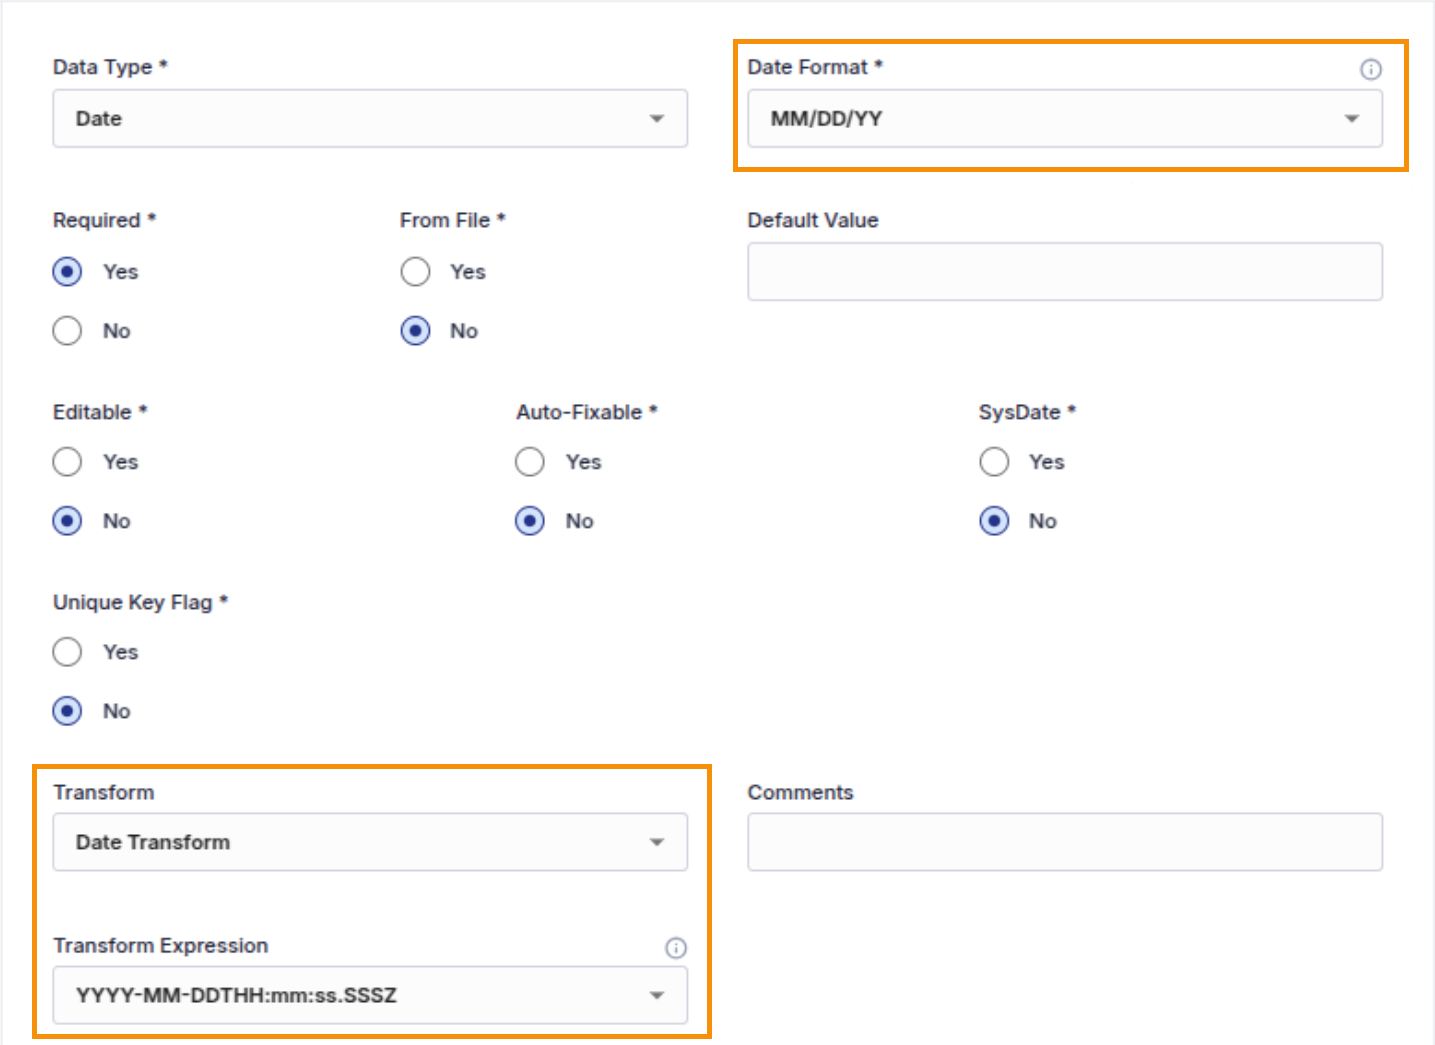
Figure 12. Date Transform. -
Mapping Transform:
Maps values from one field to another based on predefined rules.
Example: MapStatusvalues like1toActiveand0toInactive.
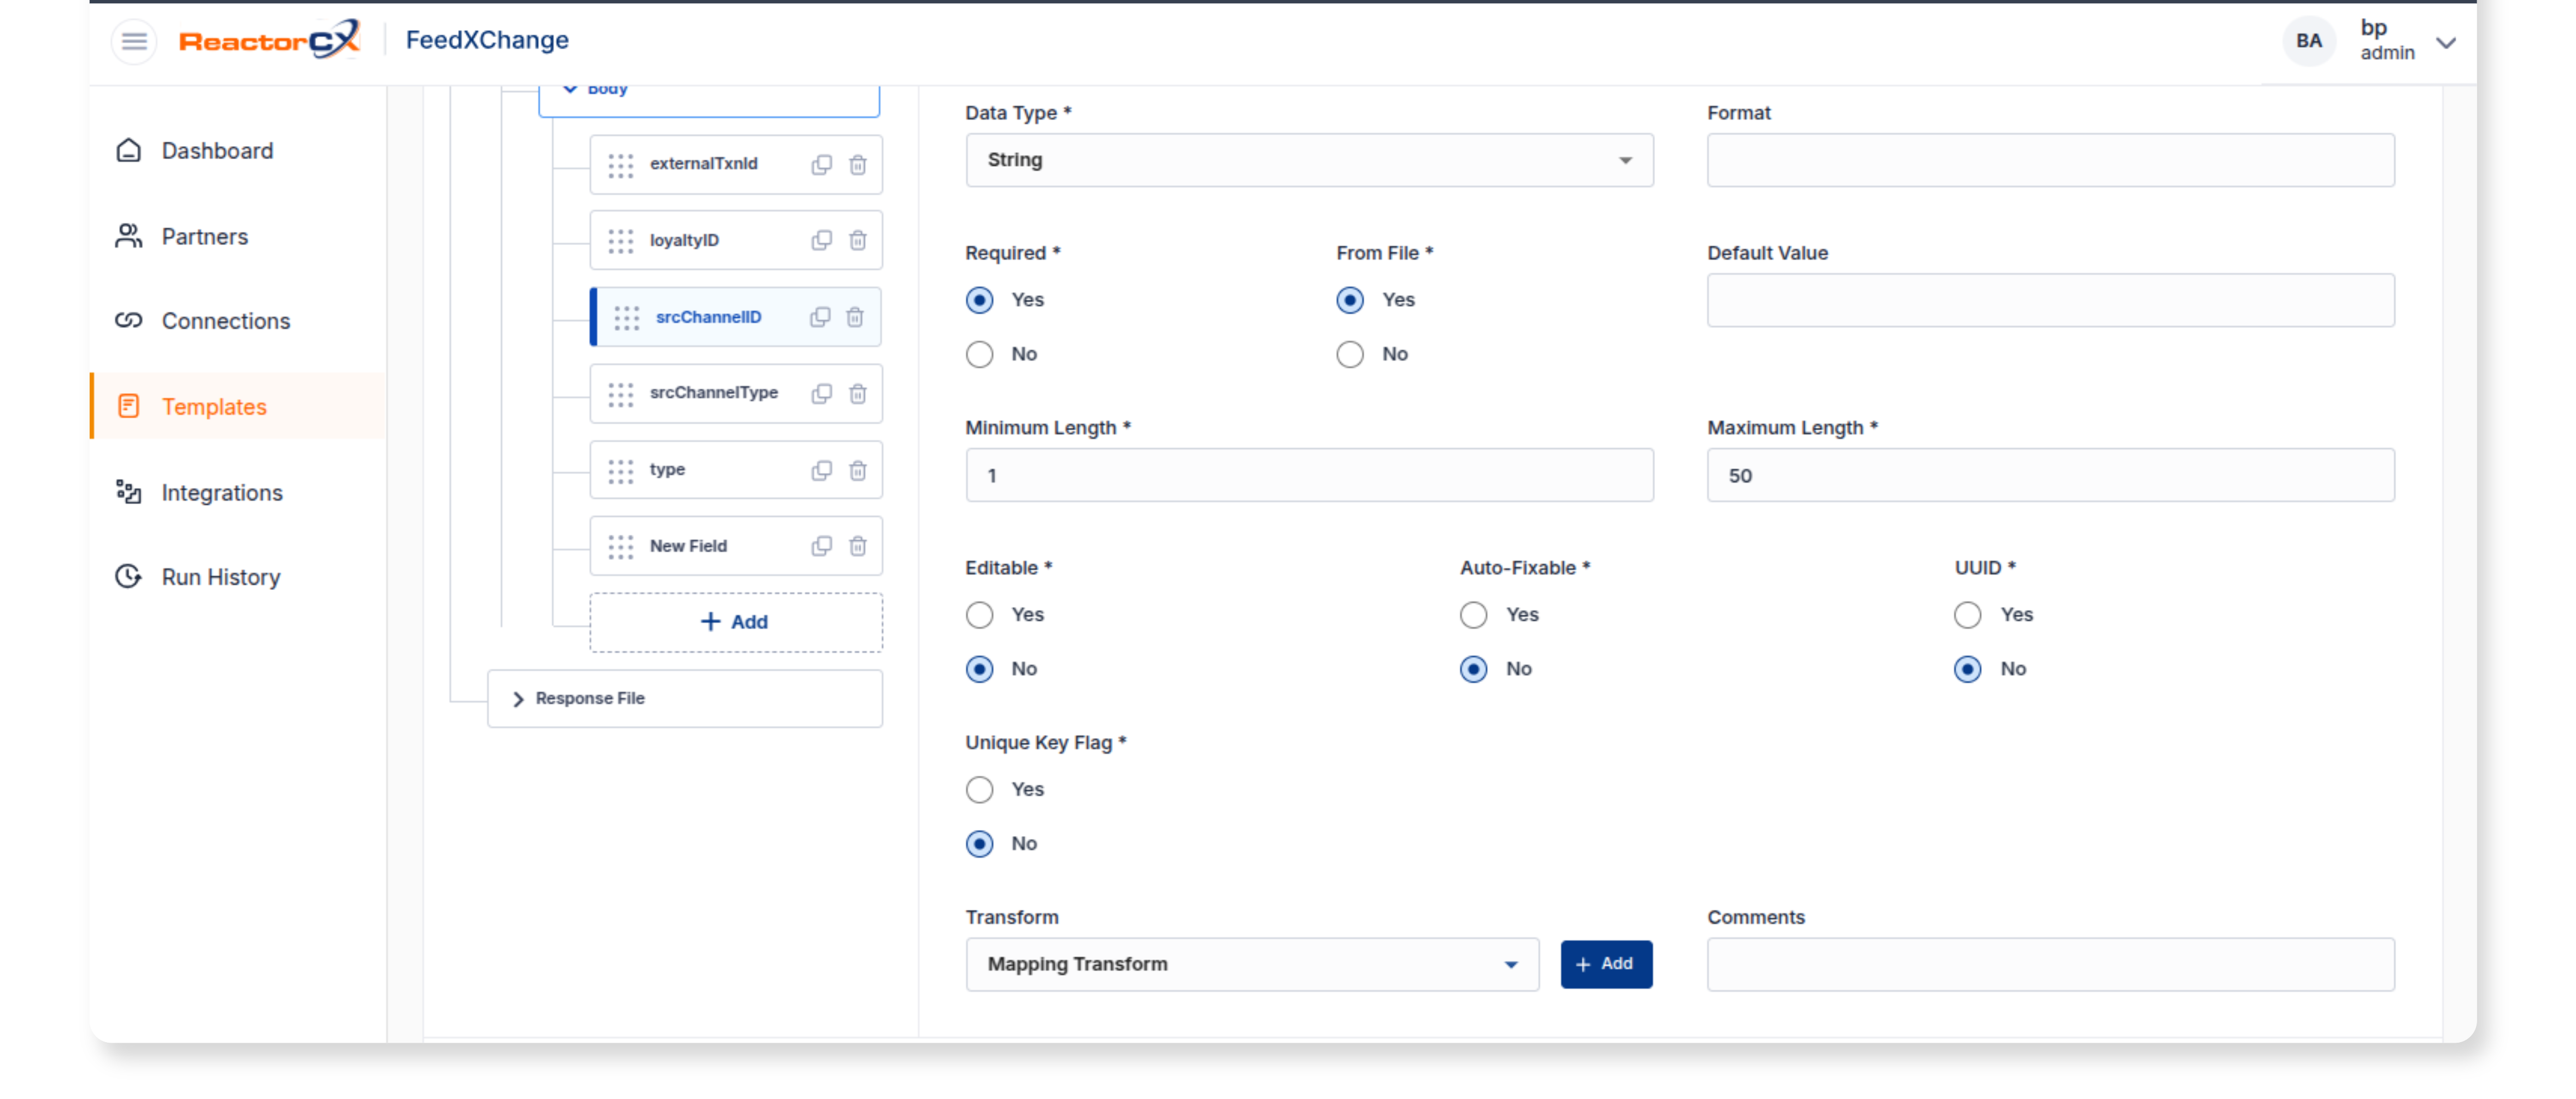
Figure 13. Add Transform Of Type String.
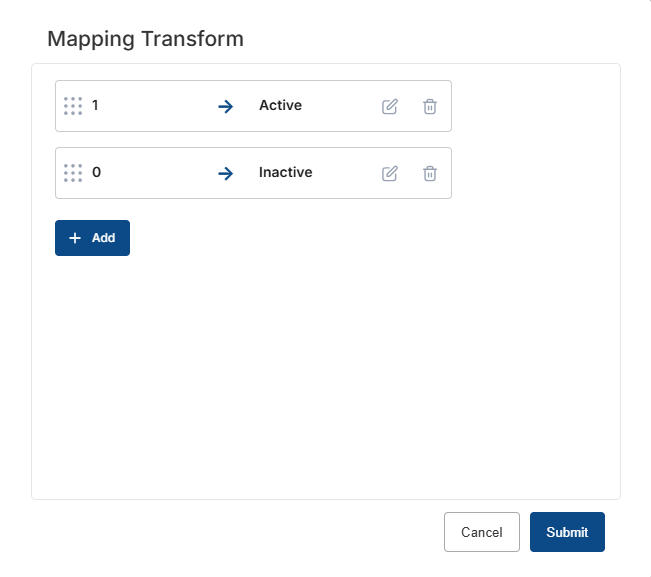
Figure 14. Mapping Transform Of Type String.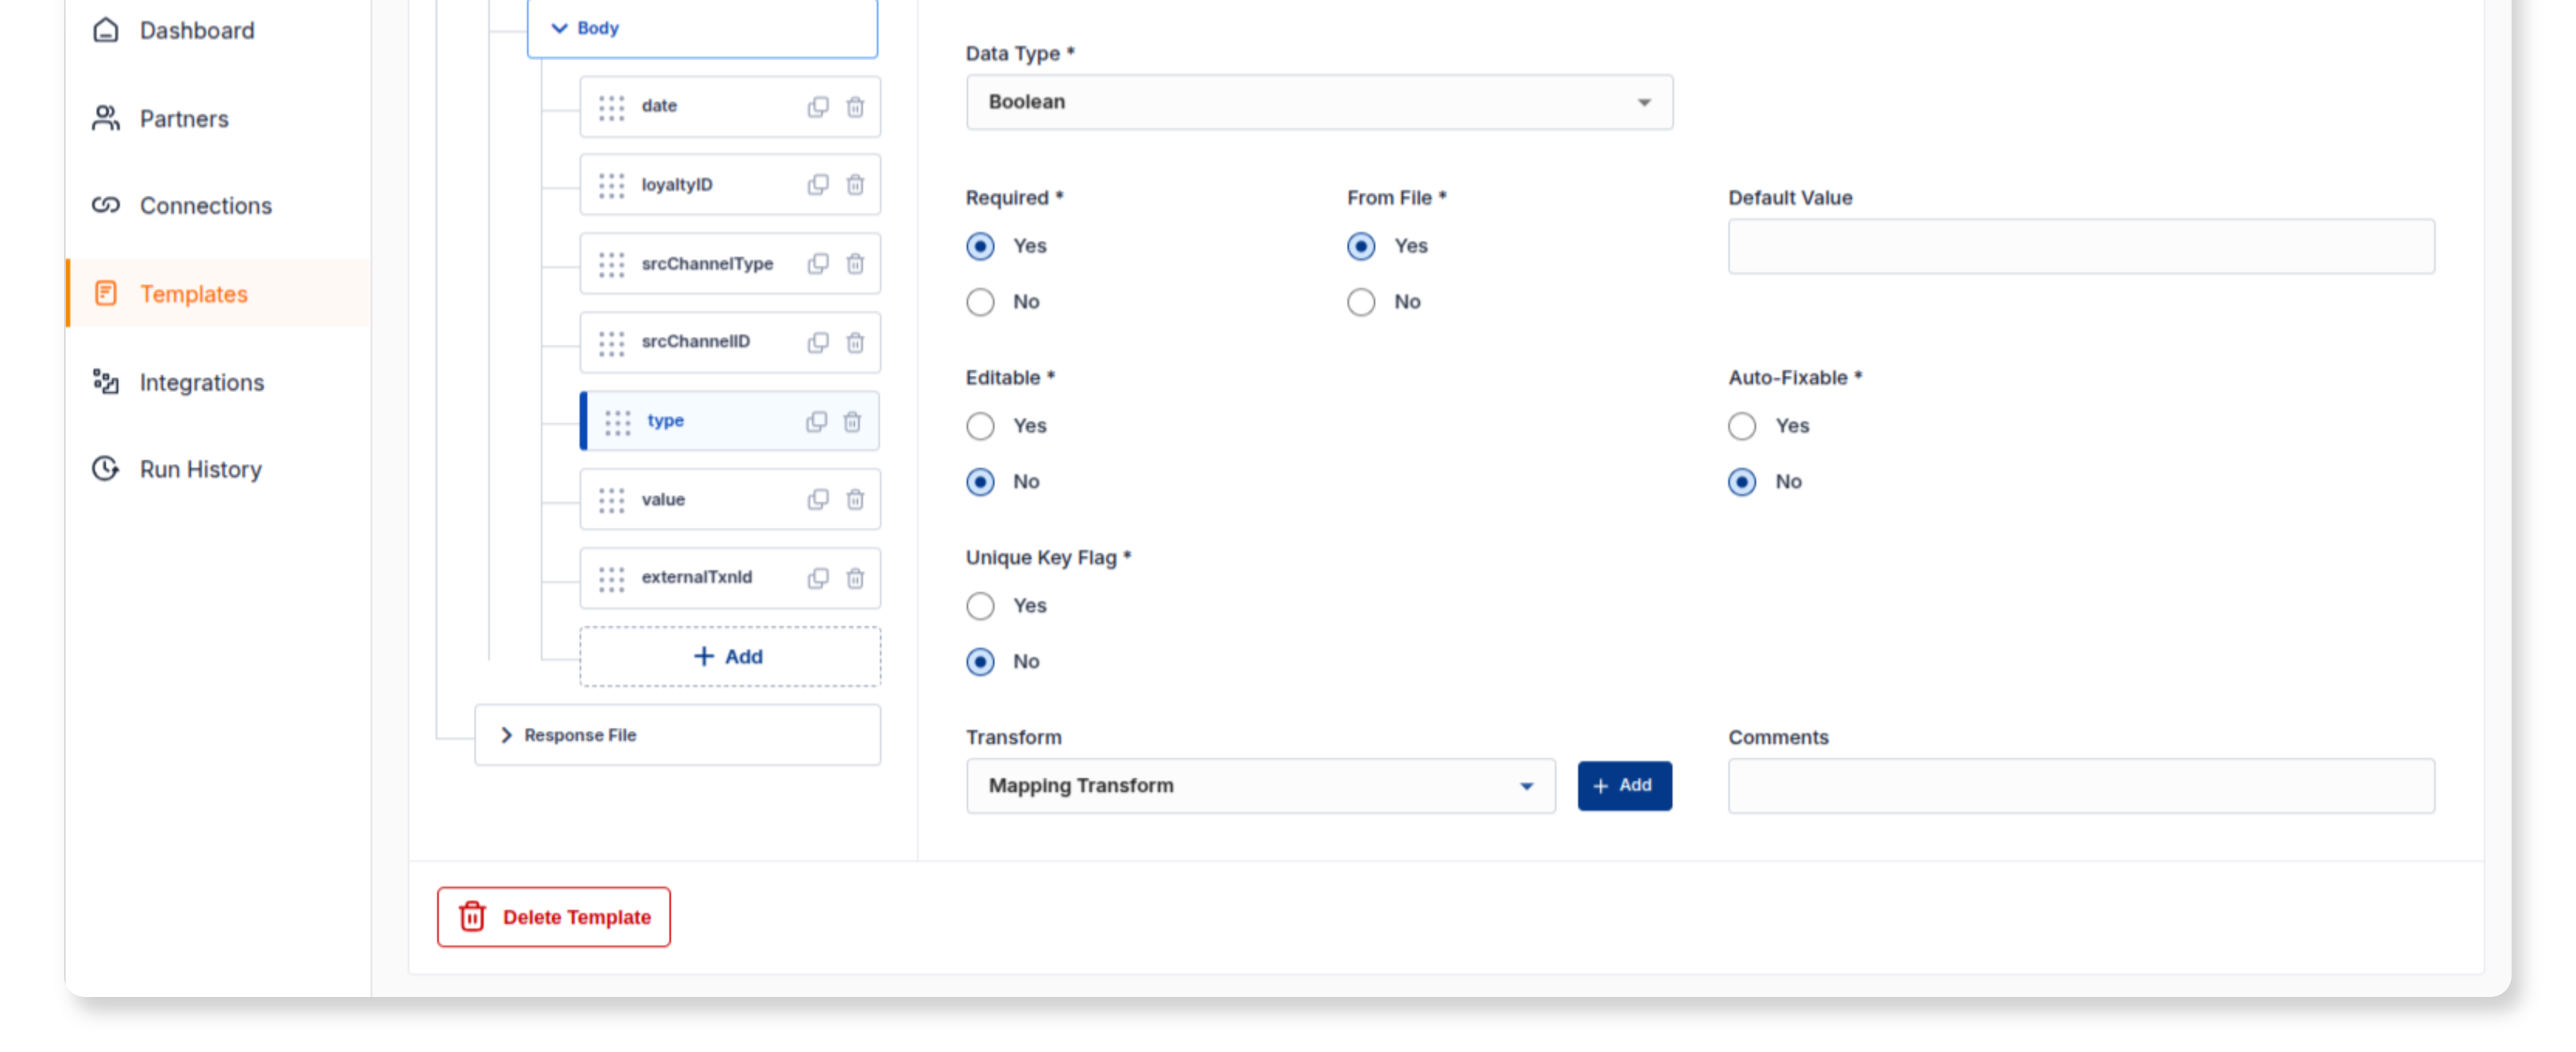
Figure 15. Add Transform Of Type Boolean.
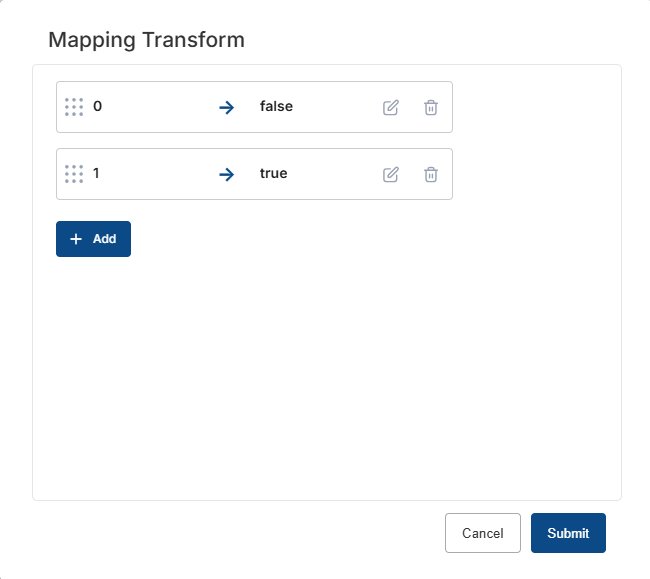
Figure 16. Mapping Transform Of Type Boolean. -
Save the Transform:
After configuring the transform, click theSubmitbutton in the pop-up to save it. -
Verify the Transform:
Confirm that the transform is displayed correctly in theTransform Expressionproperty of the field.
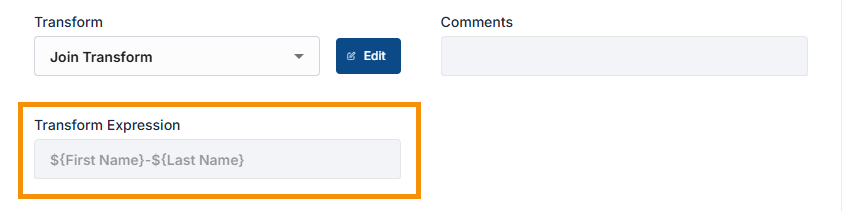
Figure 17. Transform Expression.
Note
For Date Transform, no additional configuration is required beyond selecting the transform type. The format conversion is automatically handled based on the field's Format property.
Input Footer Fields
To configure the Footer fields for the Input File, click the Footer box in the structure pane to expand it. Under that box is a list of the Body field definitions that can be configured at the field level:
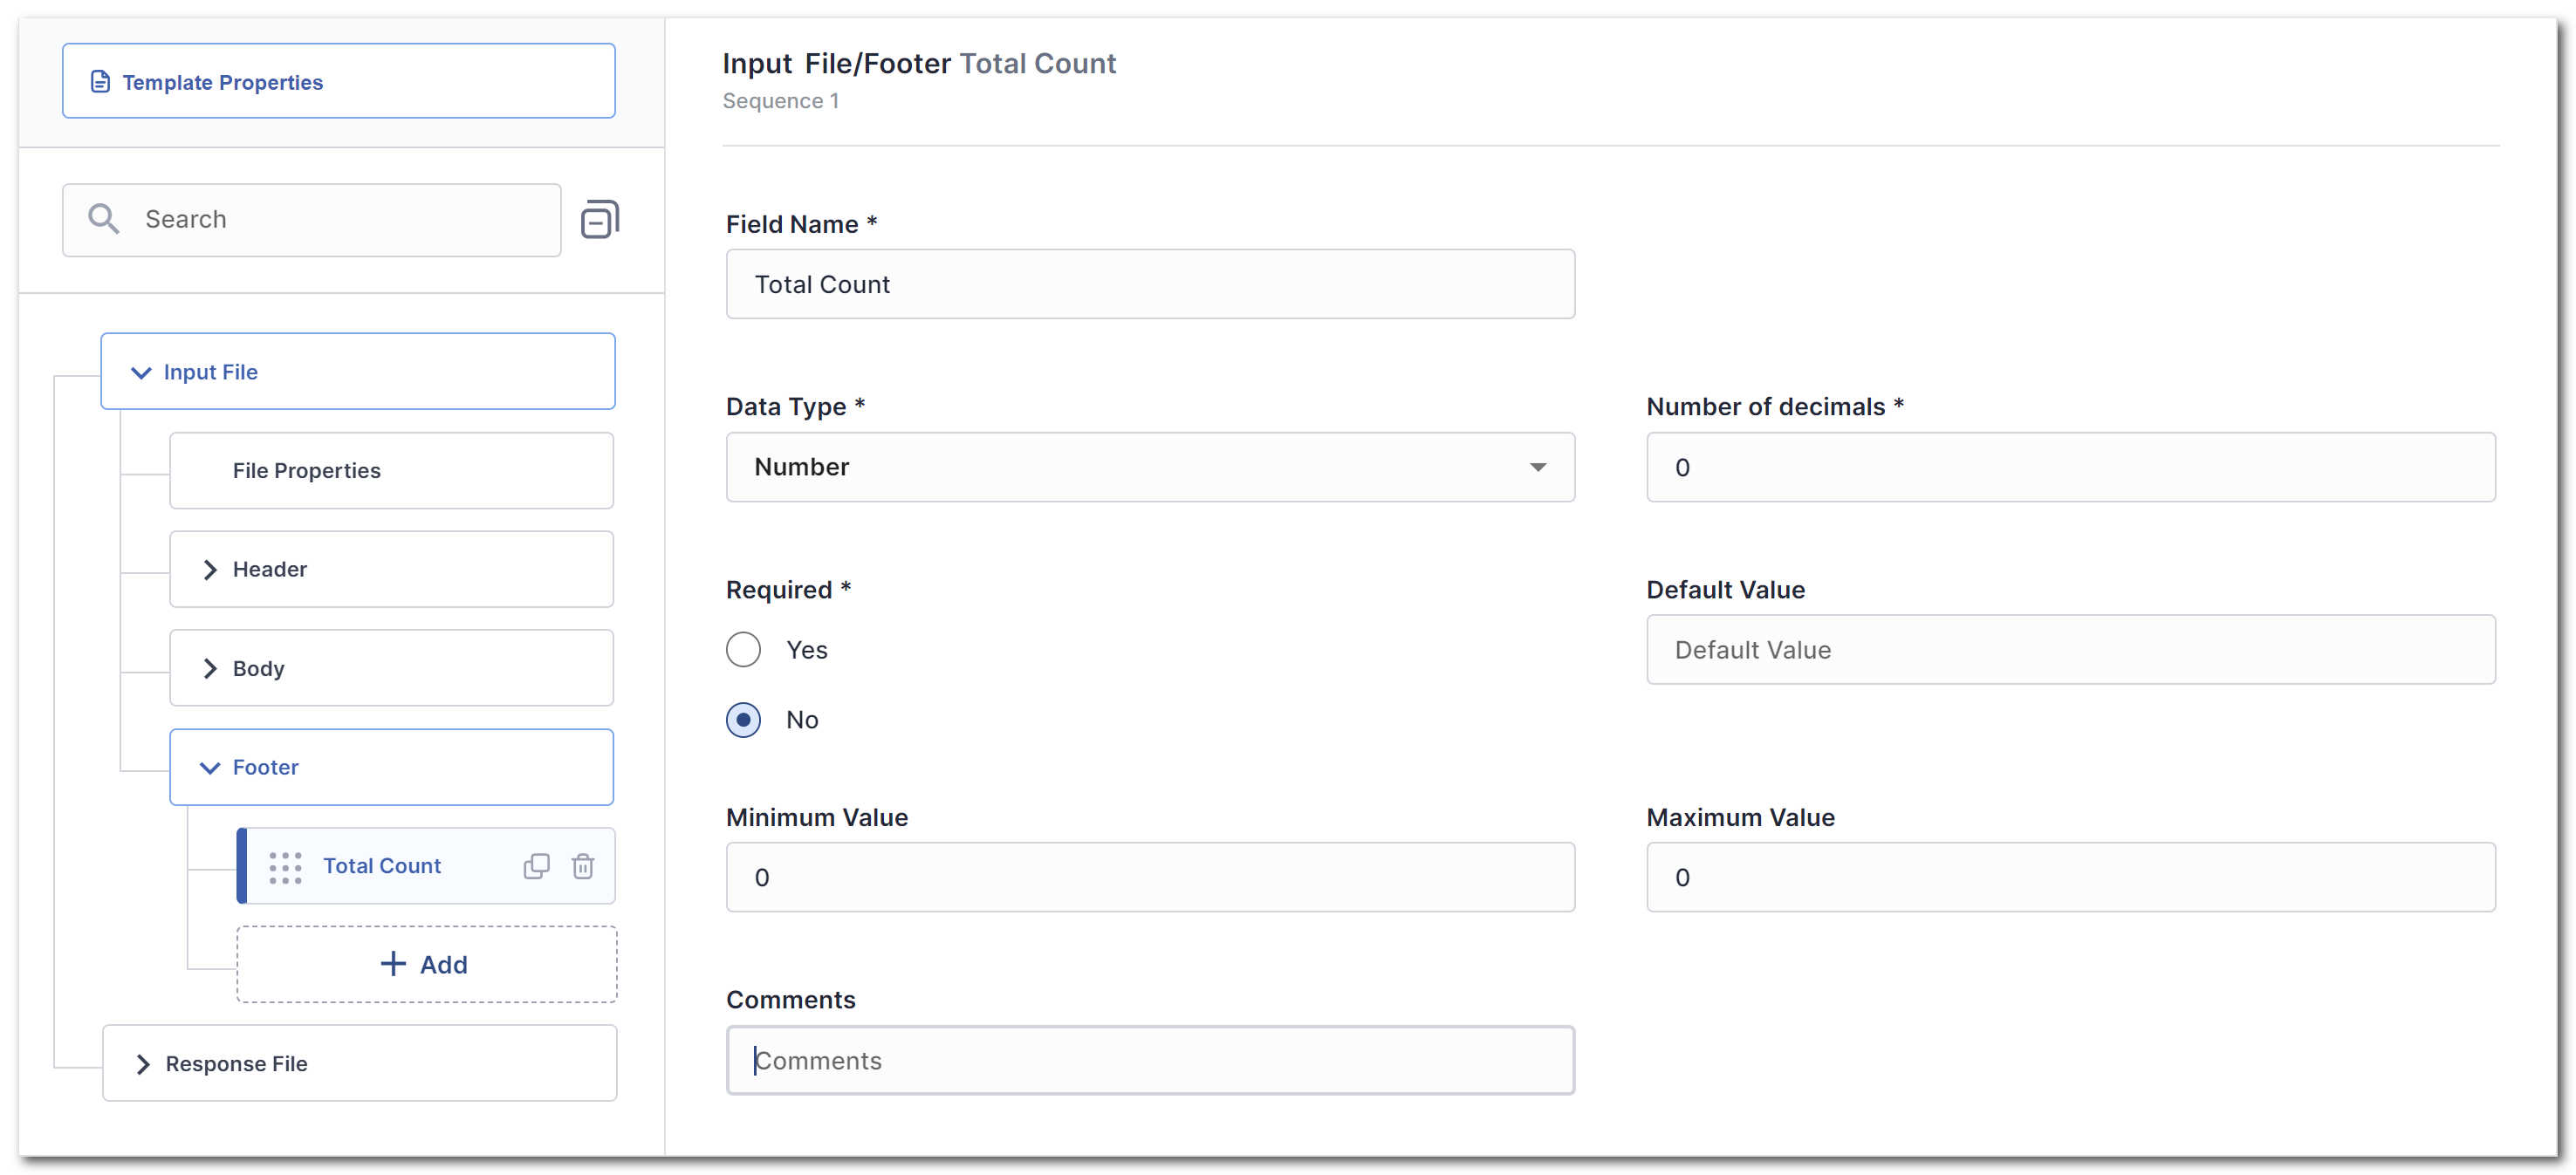 Figure 18. Input File Footer Field Configuration
| Property Name | Property Description |
|---|---|
| Field Name | The name of the field. Has to be unique within the parent object. |
| Data Type | Can be one of String, Date, Boolean, Number. |
| Format | Depending on the data type, the format can be specified as follows:
|
| Default Value | Optionally specifies a default value. |
| Required | Indicates whether the field is required to have a value. |
| Comments | Further description of the field and any additional information. |
Response File Configuration
Response files are generated after processing of an input file, and typically used to hand back to the partner who posted the input file, and to indicate success/failure at the record level.
To define the Response File layout click the Response File box in the structure pane.This allows you to define overall Response File Properties, as well as define the structure of the Header, Body**, and** Footer of the response file.
Note
One key difference between Input and Response files is that Response files are generated, and Input files are parsed and validated and processed.
Response File Properties
Click File Properties under Input File, to configure the overall properties of the file:
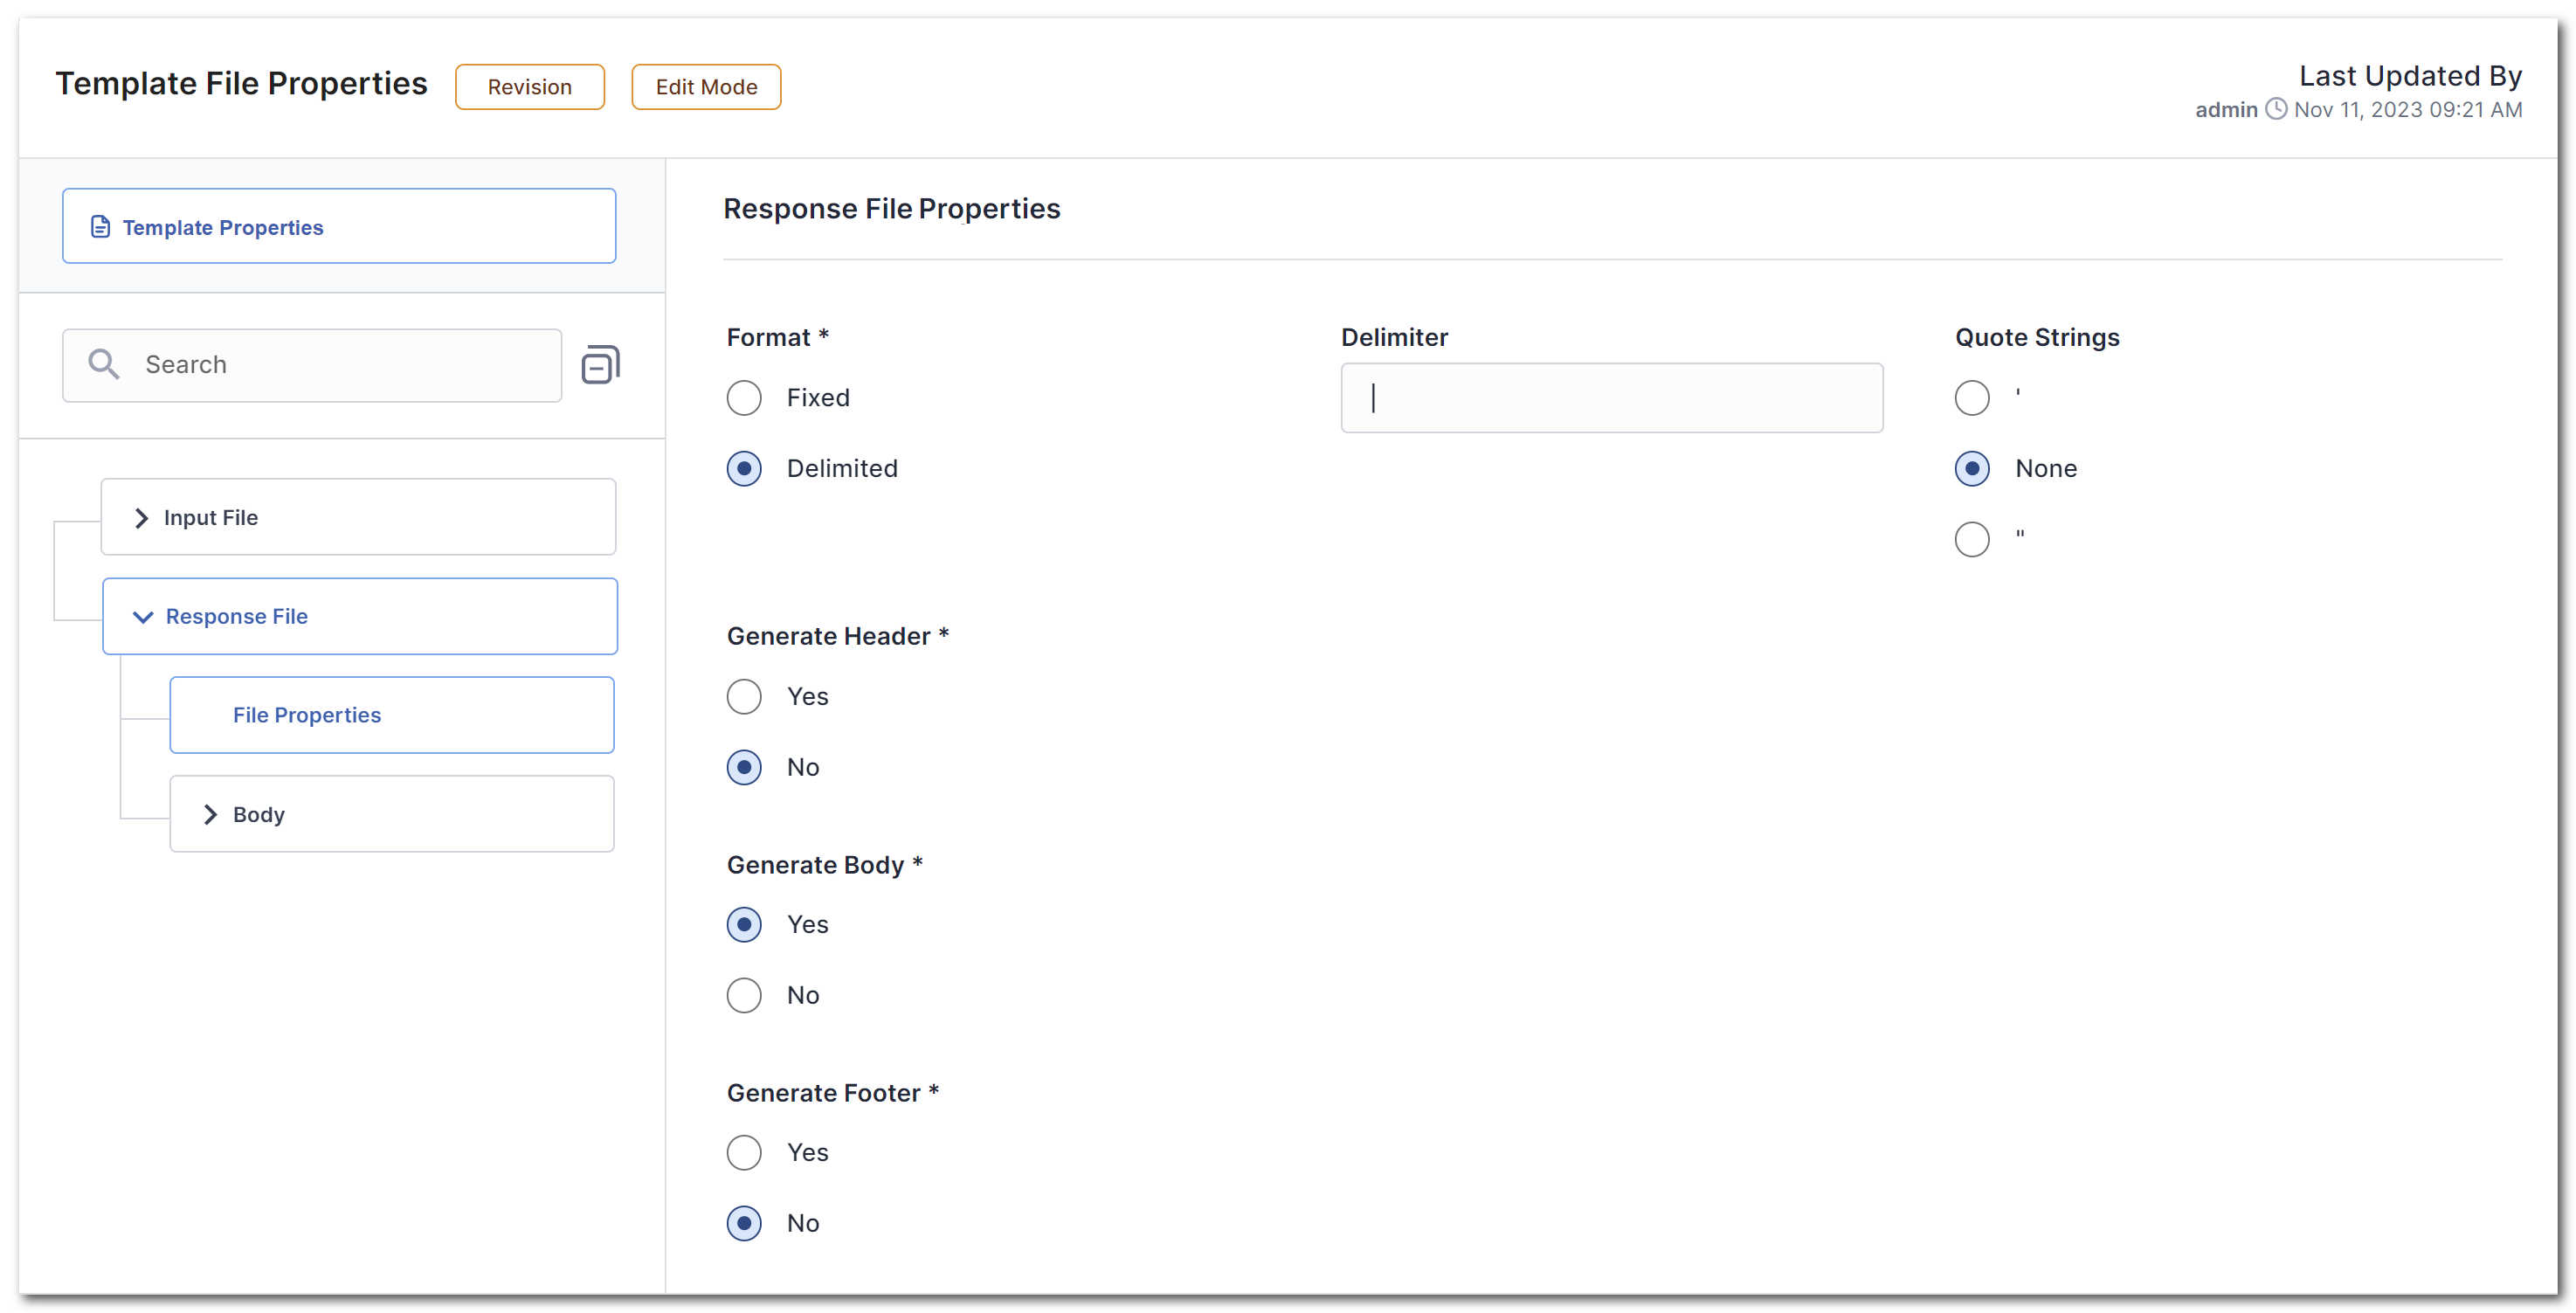 Figure 19. Response File Properties
The following properties can be configured:
| Property Name | Property Description |
|---|---|
| Format | Choose one of Fixed or Delimited. If Delimited is selected, specify the delimiter and string quotation handling. |
| Header | Choose whether your Input File has a header. |
| Body | Choose whether your Input File has a body. |
| Footer | Choose whether your Input File has a footer. |
Response Header Fields
To configure the header fields for the response file, click the Header box in the structure pane to expand it. Under that box is a list of the header field definitions that can be configured at the field level:
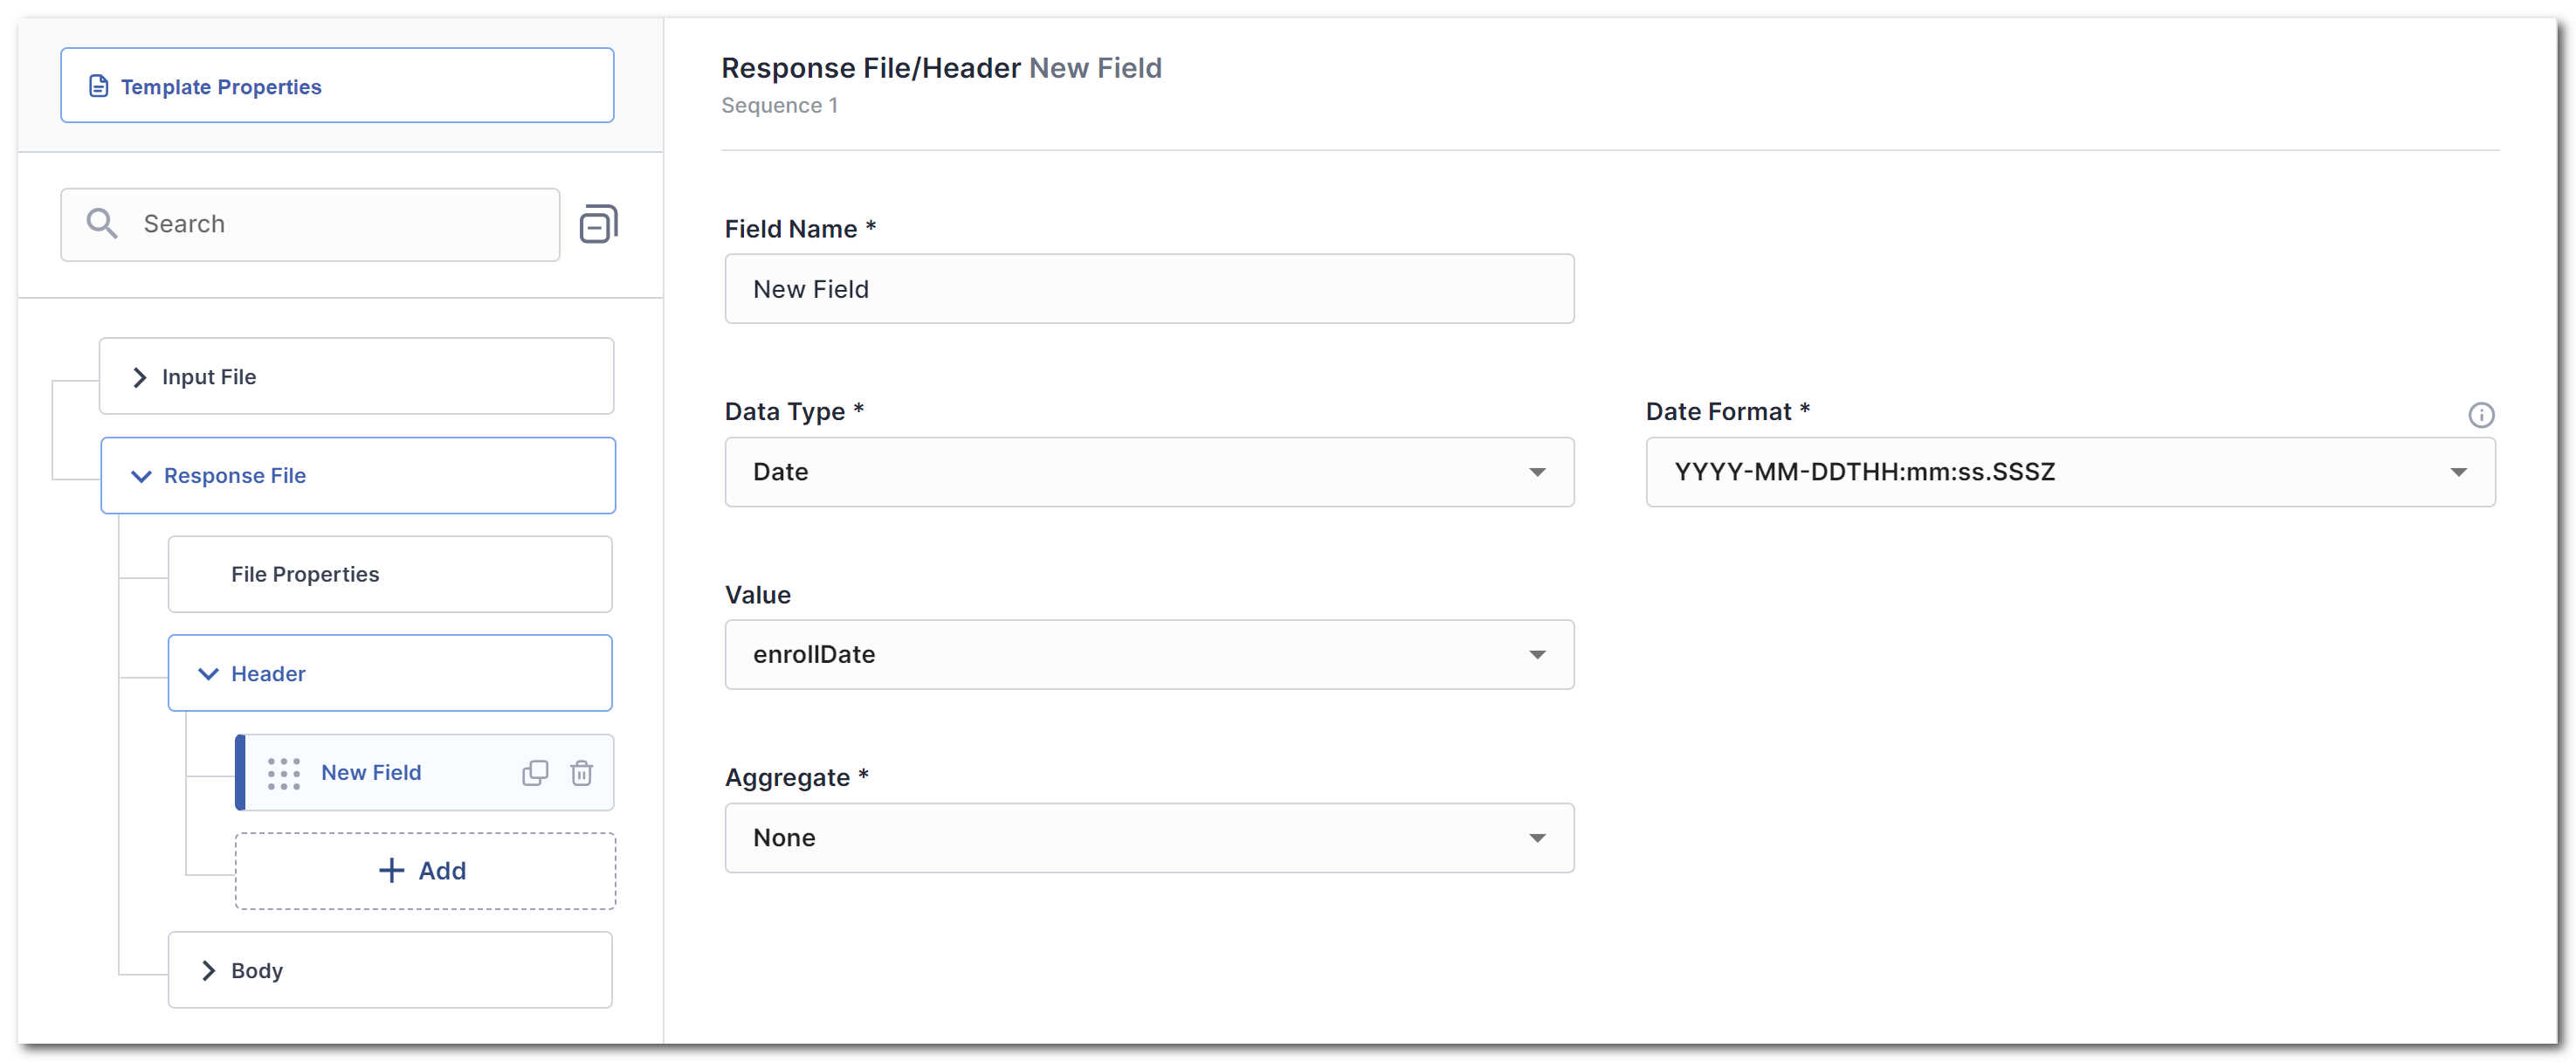 Figure 20. Response File Header Field Configuration
The following properties can be configured:
| Property Name | Property Description |
|---|---|
| Field Name | The name of the field. Has to be unique within the parent object. |
| Data Type | Can be one of String, Date, Boolean, Number. |
| Format | Depending on the data type, the output format can be specified as follows:
|
| Value | The value can be either a value from the entity which was processed (for example Activity), or a Constant |
| Aggregate | Aggregates the Value field using one of the aggregate functions available in the dropdown. |
| Comments | Further description of the field and any additional information. |
Response Body Fields
To configure the body fields for the Response File, click the Body box in the structure pane to expand it. Under that box is a list of the Body field definitions that can be configured at the field level:
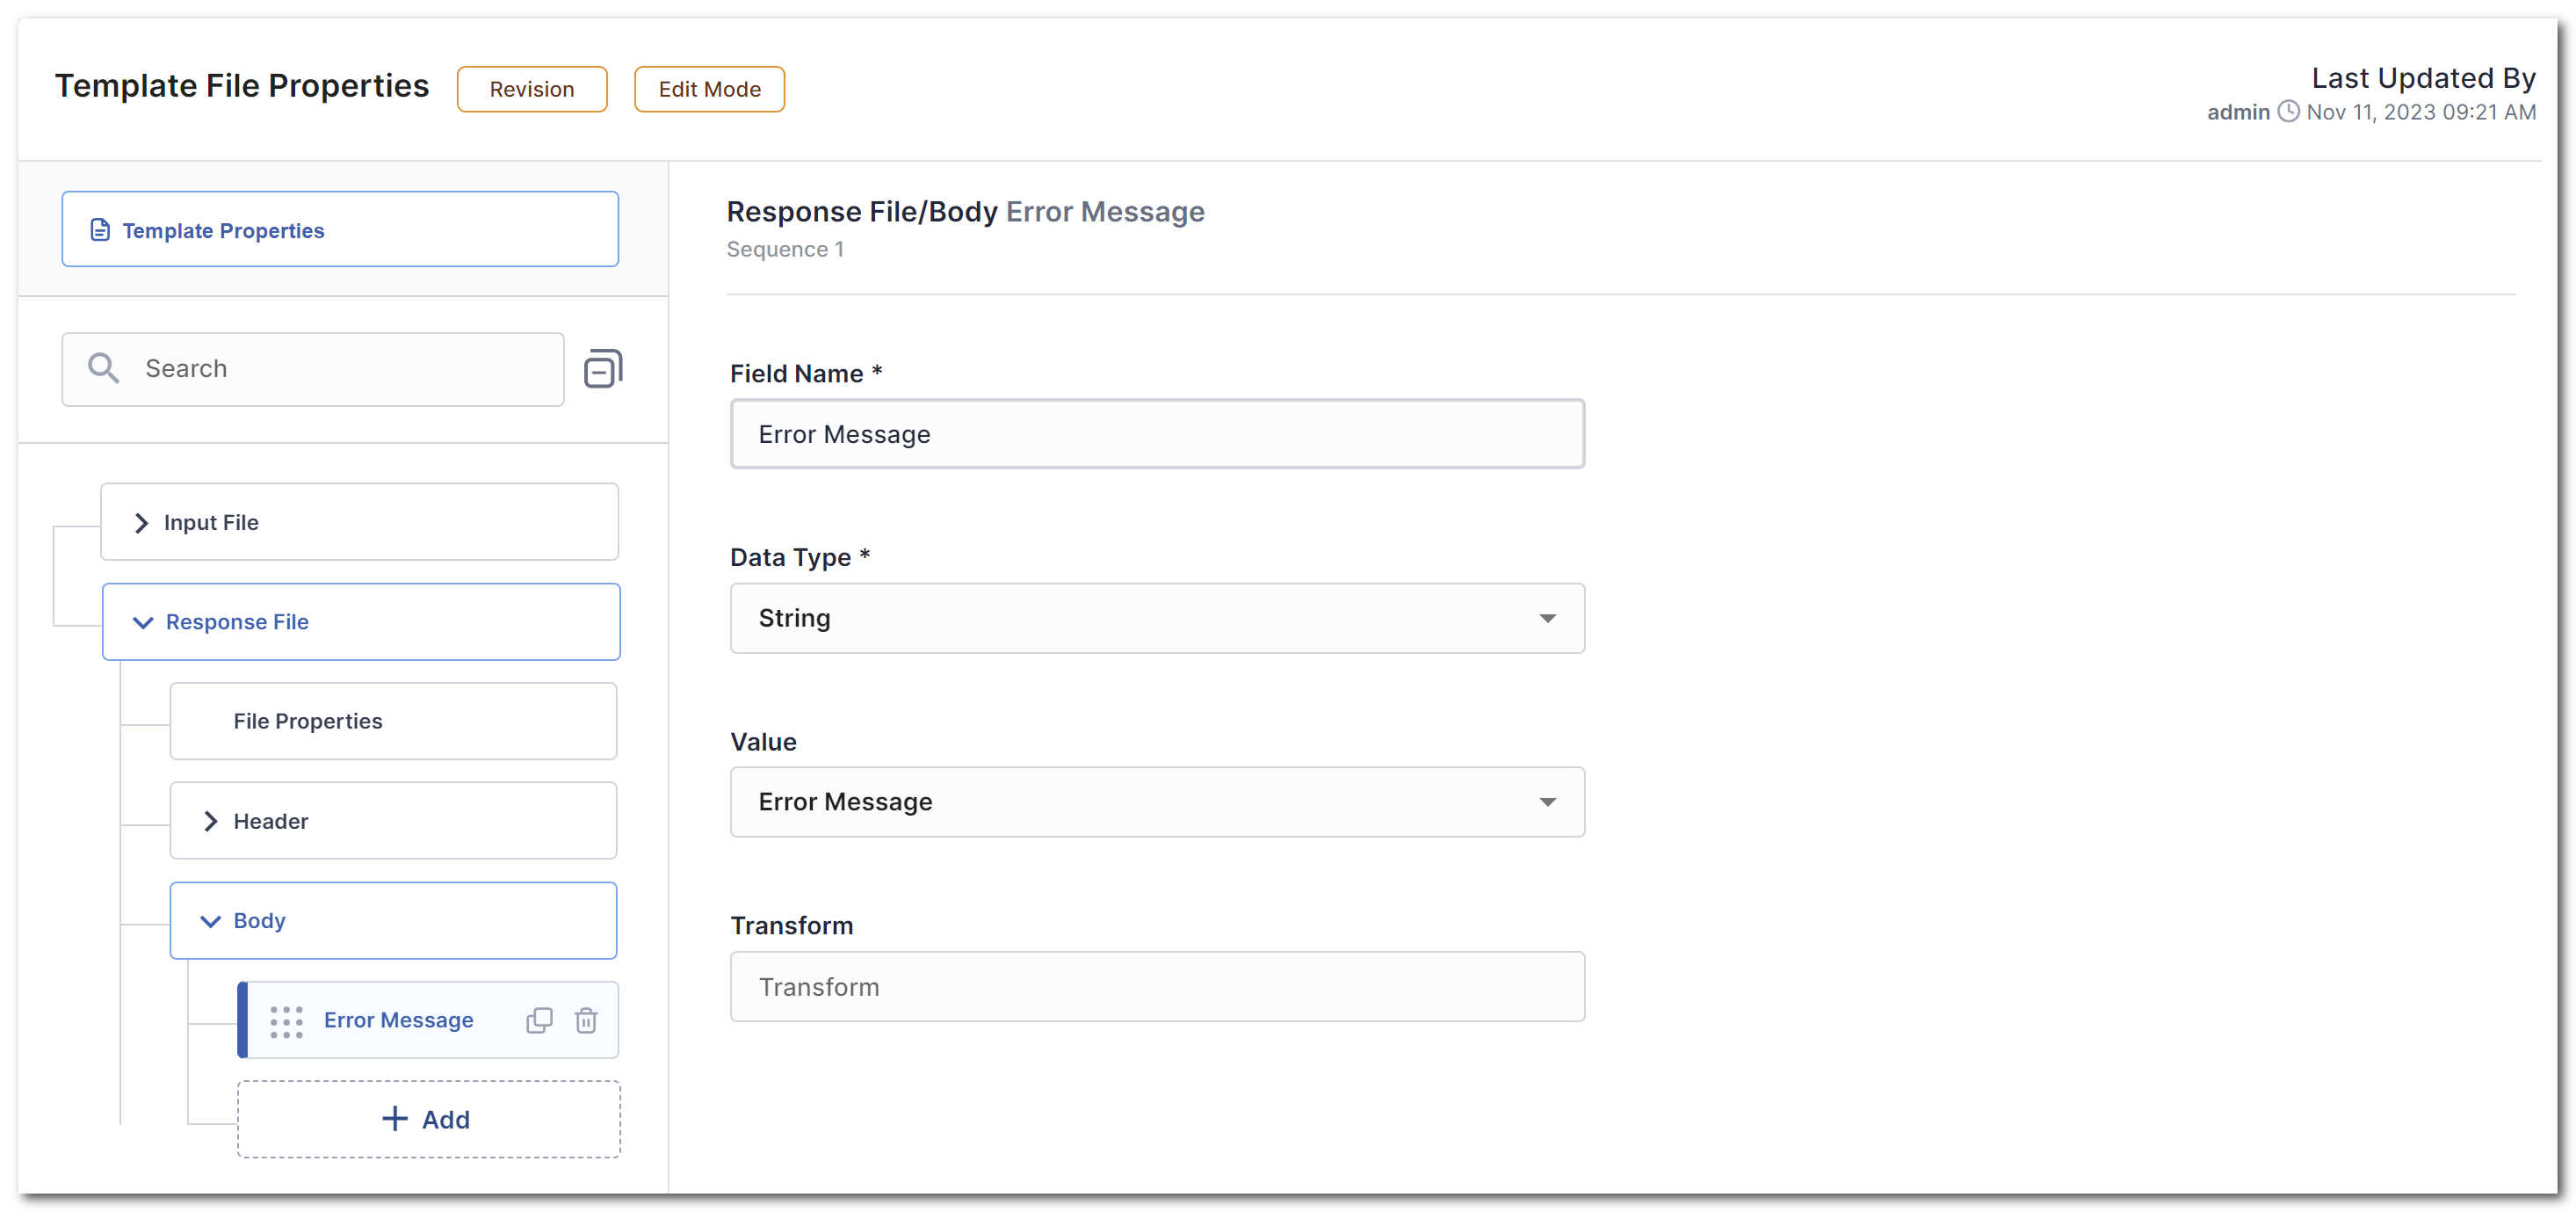 Figure 21. Response File Body Field Configuration
The following properties can be configured:
| Property Name | Property Description |
|---|---|
| Field Name | The name of the field. Has to be unique within the parent object. |
| Data Type | Can be one of String, Date, Boolean, Number. |
| Format | Depending on data type, the output format can be specified as follows:
|
| Value | The value can be either a value from the entity that was processed (for example activity), a Constant or one of the standard processing result values:
|
| Transform | Optionally specifies a transform function to be used on the Value before output |
| Comments | Further description of the field and any additional information. |
Response Footer Fields
To configure the Footer fields for the Response File, click the Body box in the structure pane to expand it. Under that box is a list of the Body field definitions that can be configured at the field level:
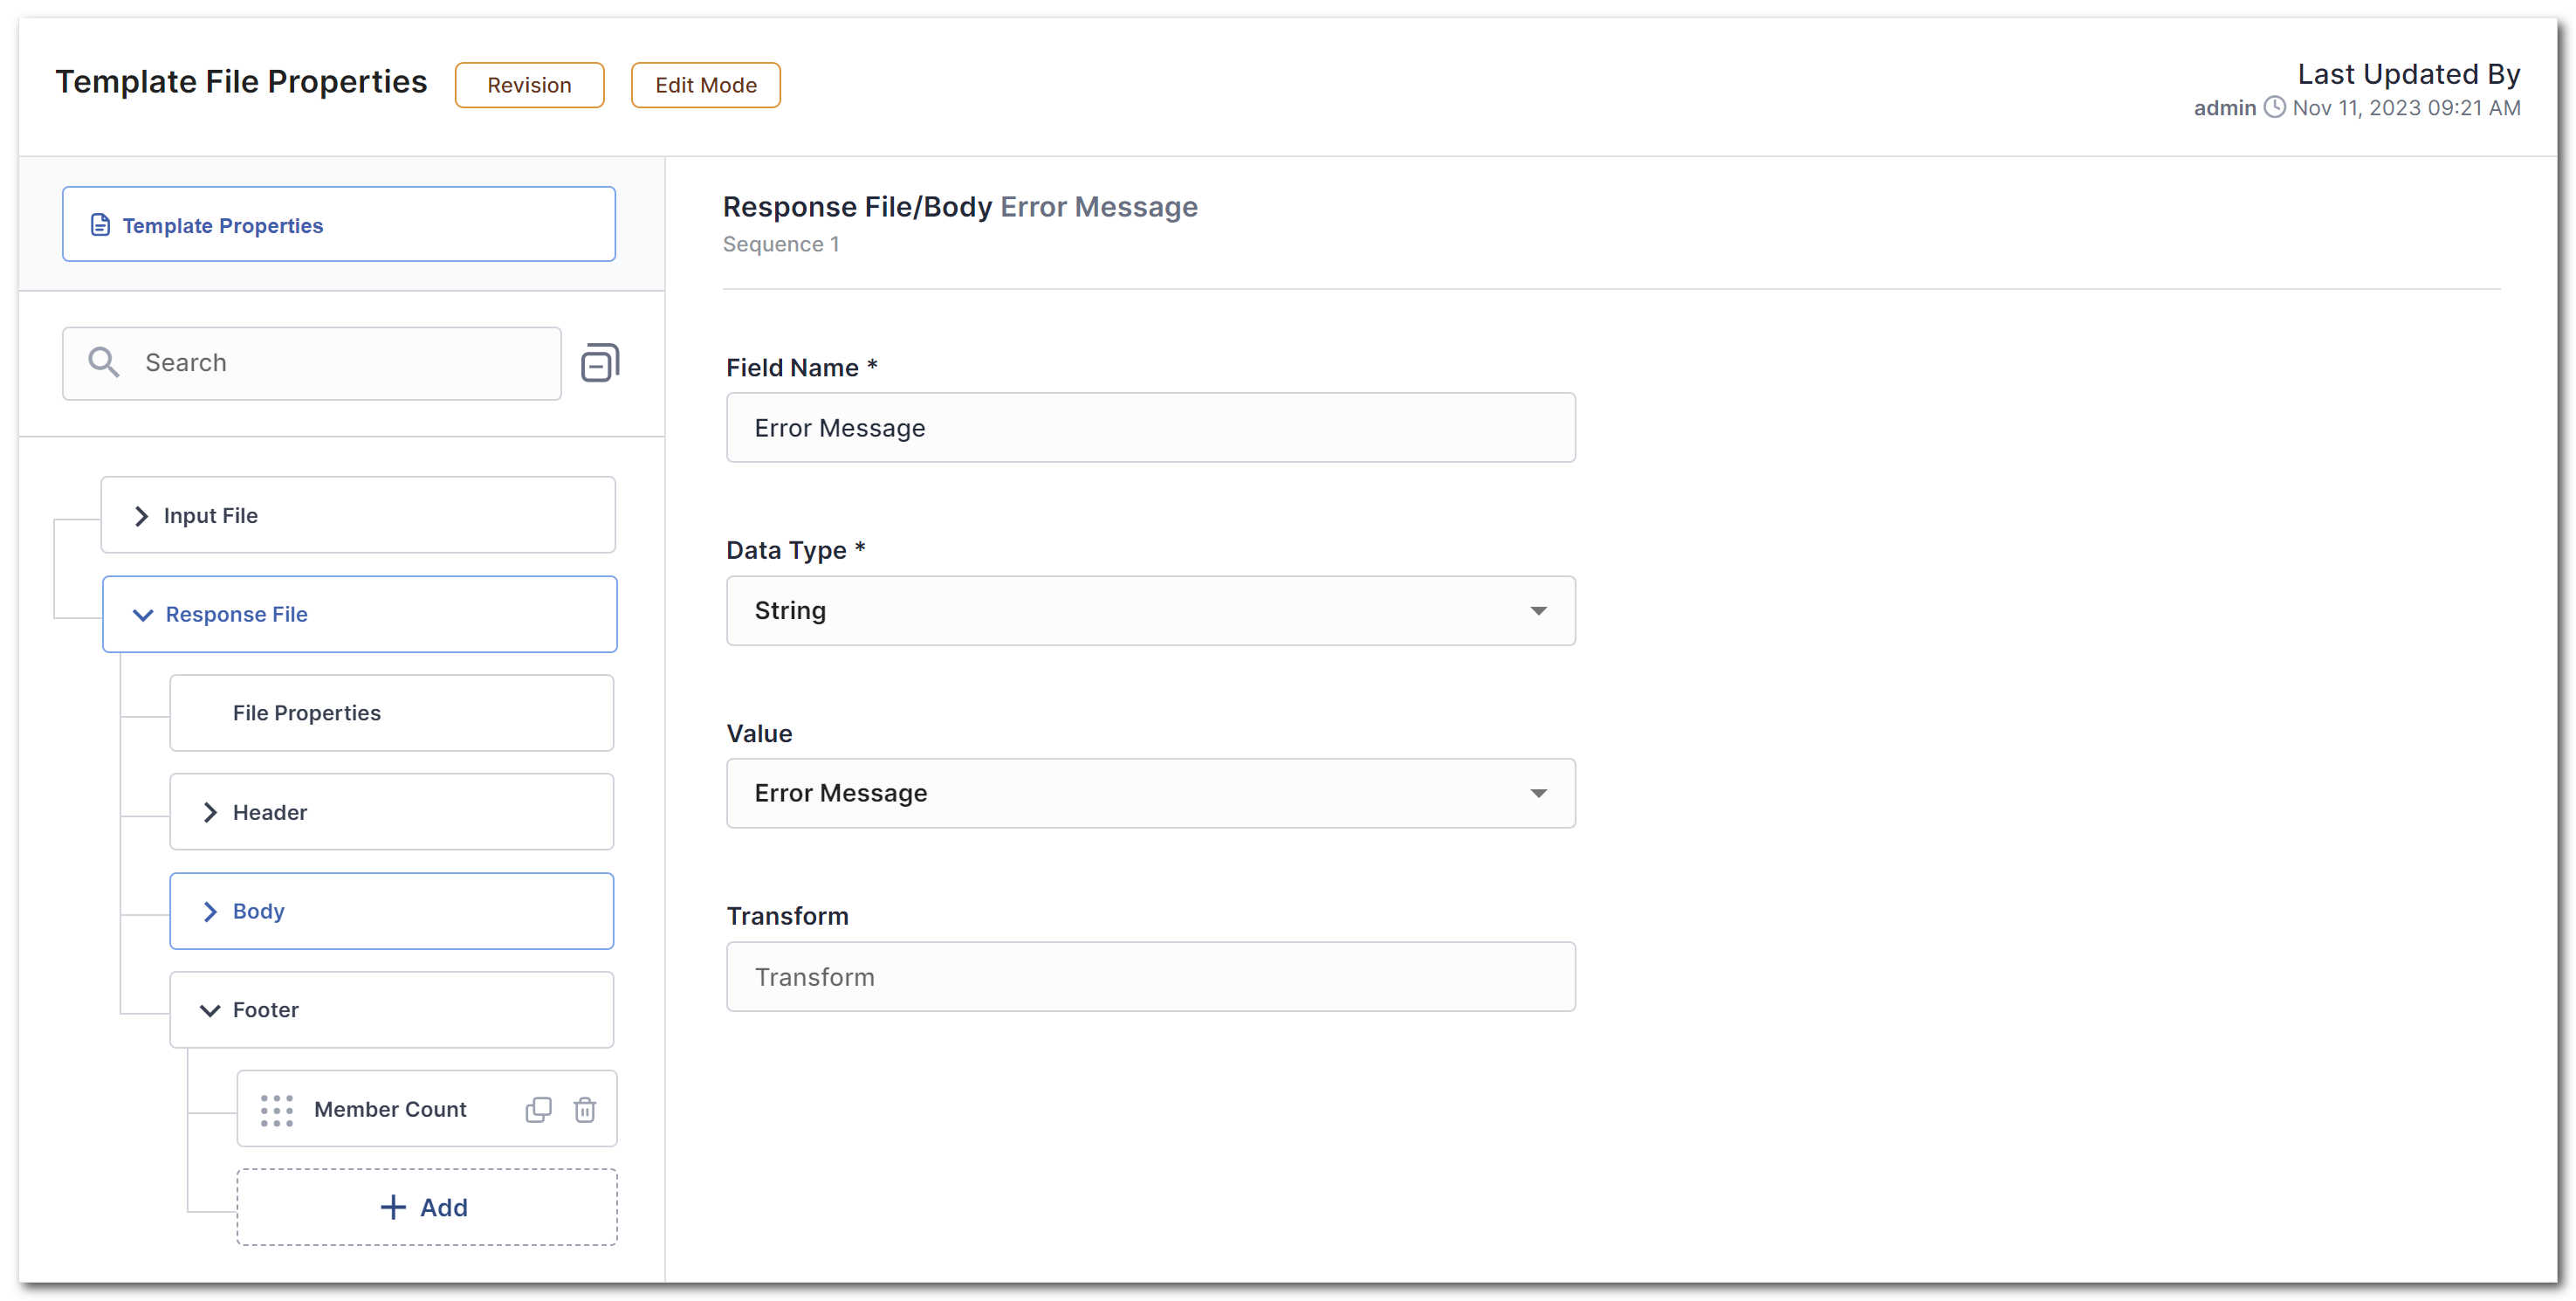 Figure 22. Response File Footer Field Configuration
The following properties can be configured:
| Property Name | Property Description |
|---|---|
| Field Name | The name of the field. Has to be unique within the parent object. |
| Data Type | Can be one of String, Date, Boolean, Number. |
| Format | Depending on data type, the output format can be specified as follows:
|
| Value | The value can be either a value from the entity which was processed (for example Activity), or a Constant |
| Aggregate | Aggregates the Value field using one of the aggregate functions available in the dropdown. |
| Comments | Further description of the field and any additional information. |
Template Import and Export
Export
To export a specific template, click Export in the corresponding list view. Then, confirm the action by click Yes in the confirmation popup.
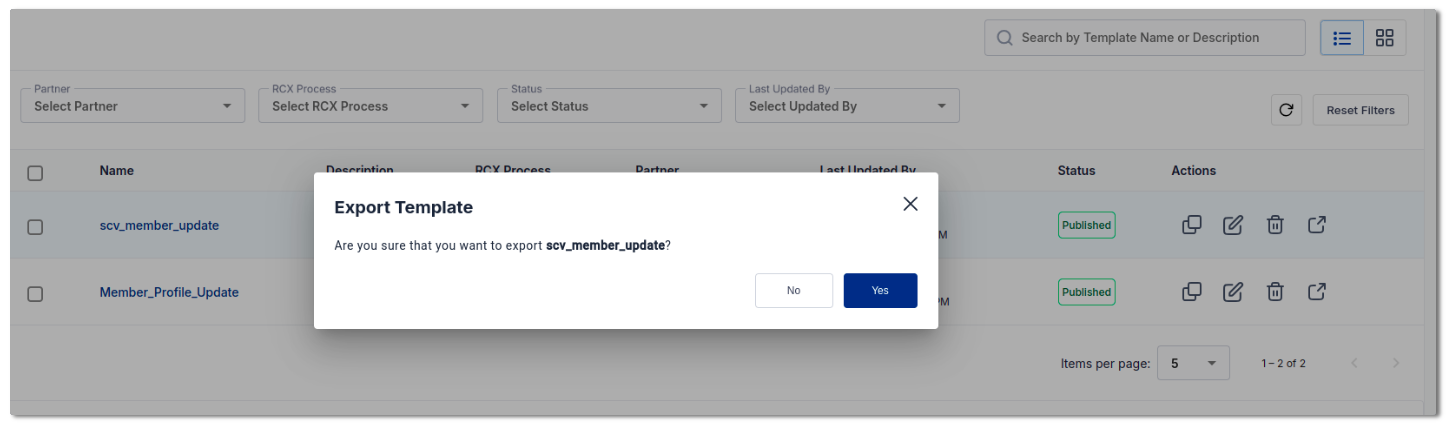 Figure 23. Export confirmation dialog box.
Import
To import a template, click the Import button located at the top right of the list view. Then, upload the .json file of the template you wish to import. Additionally, you can enable the toggle to override any existing template that's configured with the same name.
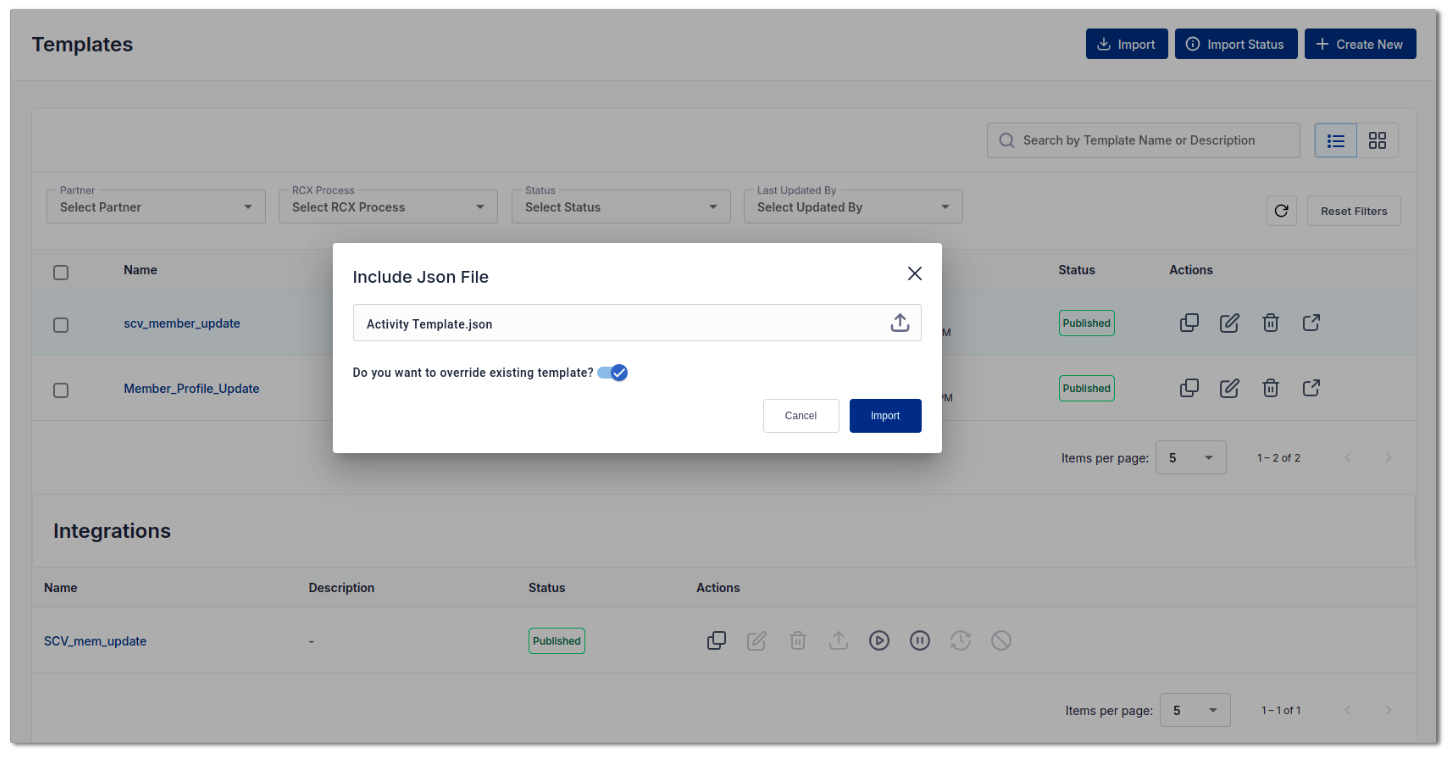 Figure 24. Import file upload dialog box.
Import Status
To check the import status, click the Import Status button located at the top right of the list view.
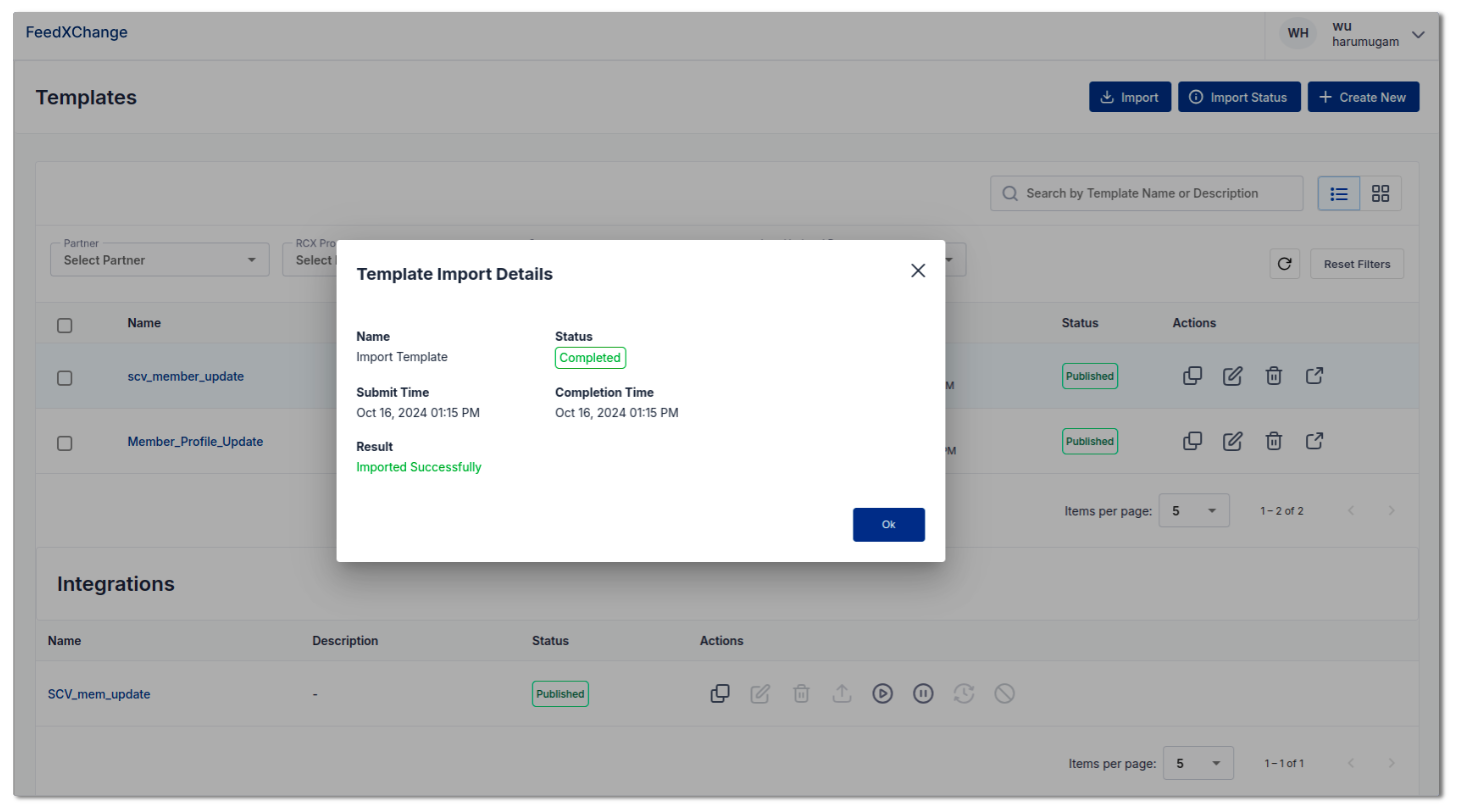 Figure 25. Import Status dialog box.
Browsing Integrations
To browse integrations available in FeedXChange navigate to the integrations tab in the side-panel menu as shown below:
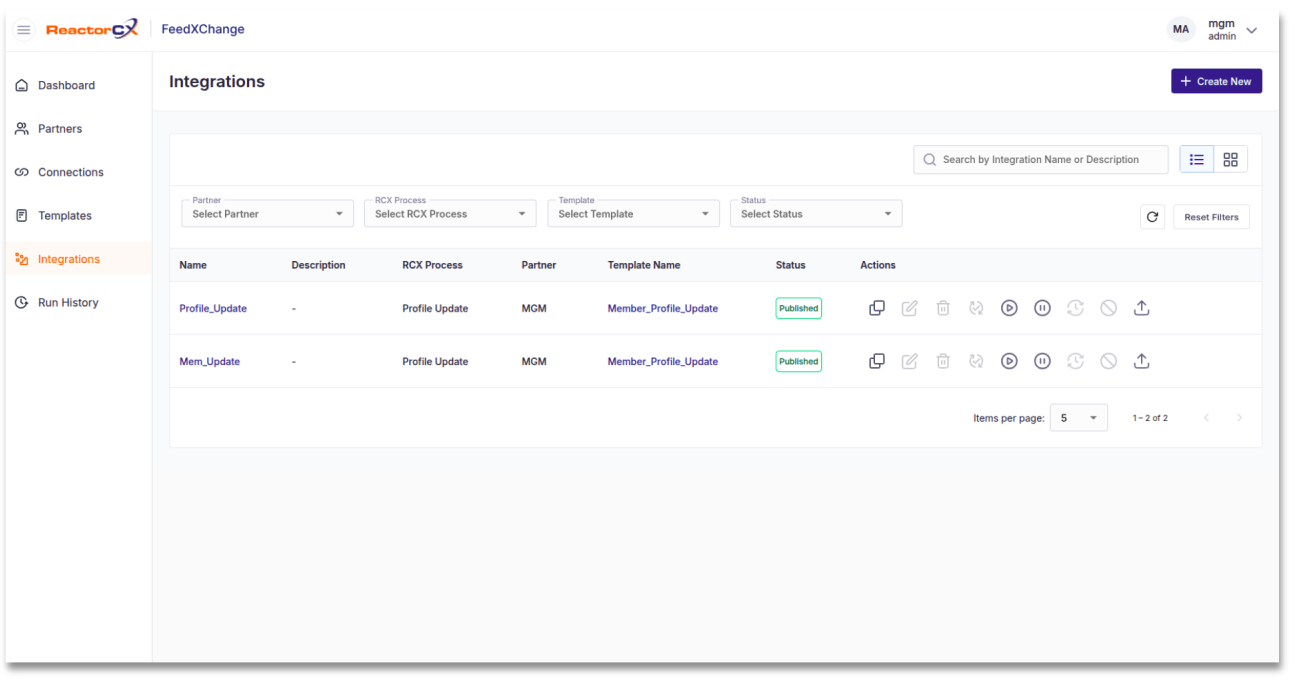 Figure 26. Browsing Integrations
You can filter the integration list by Name and by Partner. In addition, you can use the global integration search to search integration names and Descriptions. Use the Reset Filters button to reset the filters and show all integrations in the system.
You can use the Create New button at the top right corner to create a new integration.
You can use the following Action Buttons to take action on a specific integration:
| Button | Description |
|---|---|
|
Copy an Integration under a new name |
|
Edit an Integration |
|
Delete a Integration |
 |
Run an Integration once |
 |
Schedule an Integration |
 |
Un-schedule an Integration |
 |
upload file |
Viewing an Integration
To view an integration without the risk of changing it, click the title of the integration, which is a hyperlink that takes you to a read-only view of the integration and all of its details.
Editing Integration Configuration
To edit the configuration of an integration, you need to either create a new integration, or edit an existing one via the edit Action Button.
The integration Editor has two panes - the structure pane is on the left and the detail pane is on the right as shown below:
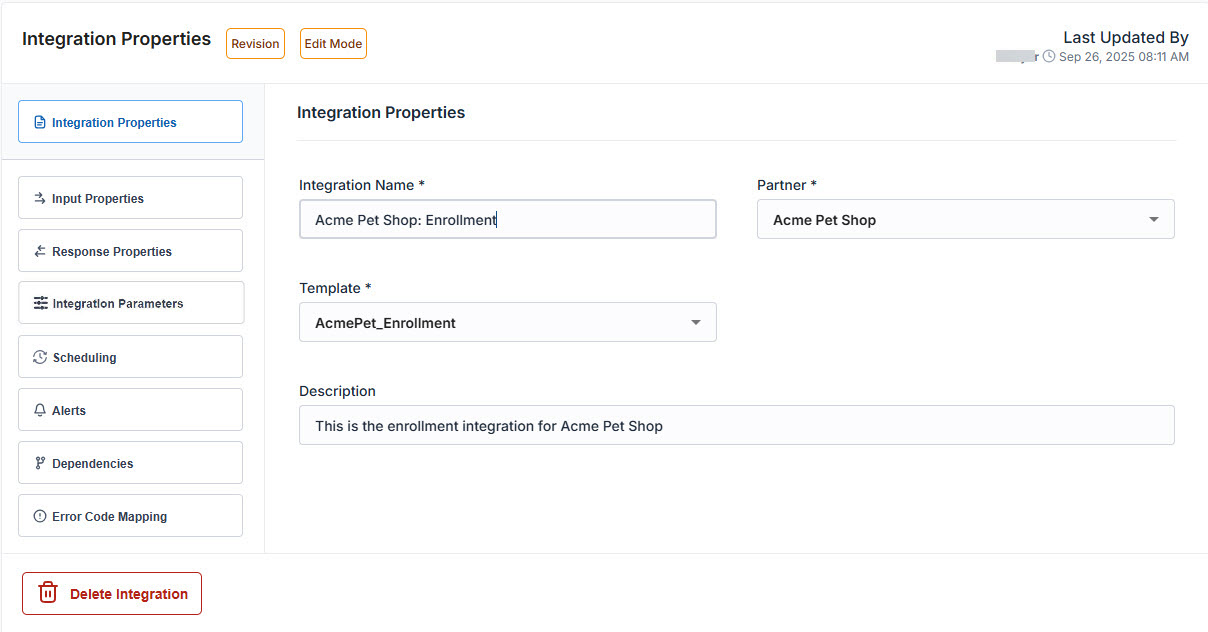 Figure 27. integration Editor
Integration Properties
When you select the integration Properties tab of the integration Editor, you can edit the following properties:
| Property Name | Property Description |
|---|---|
| Name | integration Name |
| Partner | The Partner who is associated with this integration |
| Template | The Template which is associated with this integration |
| Description | integration description |
Input Properties
The Input Properties define how an integration receives its inputs:
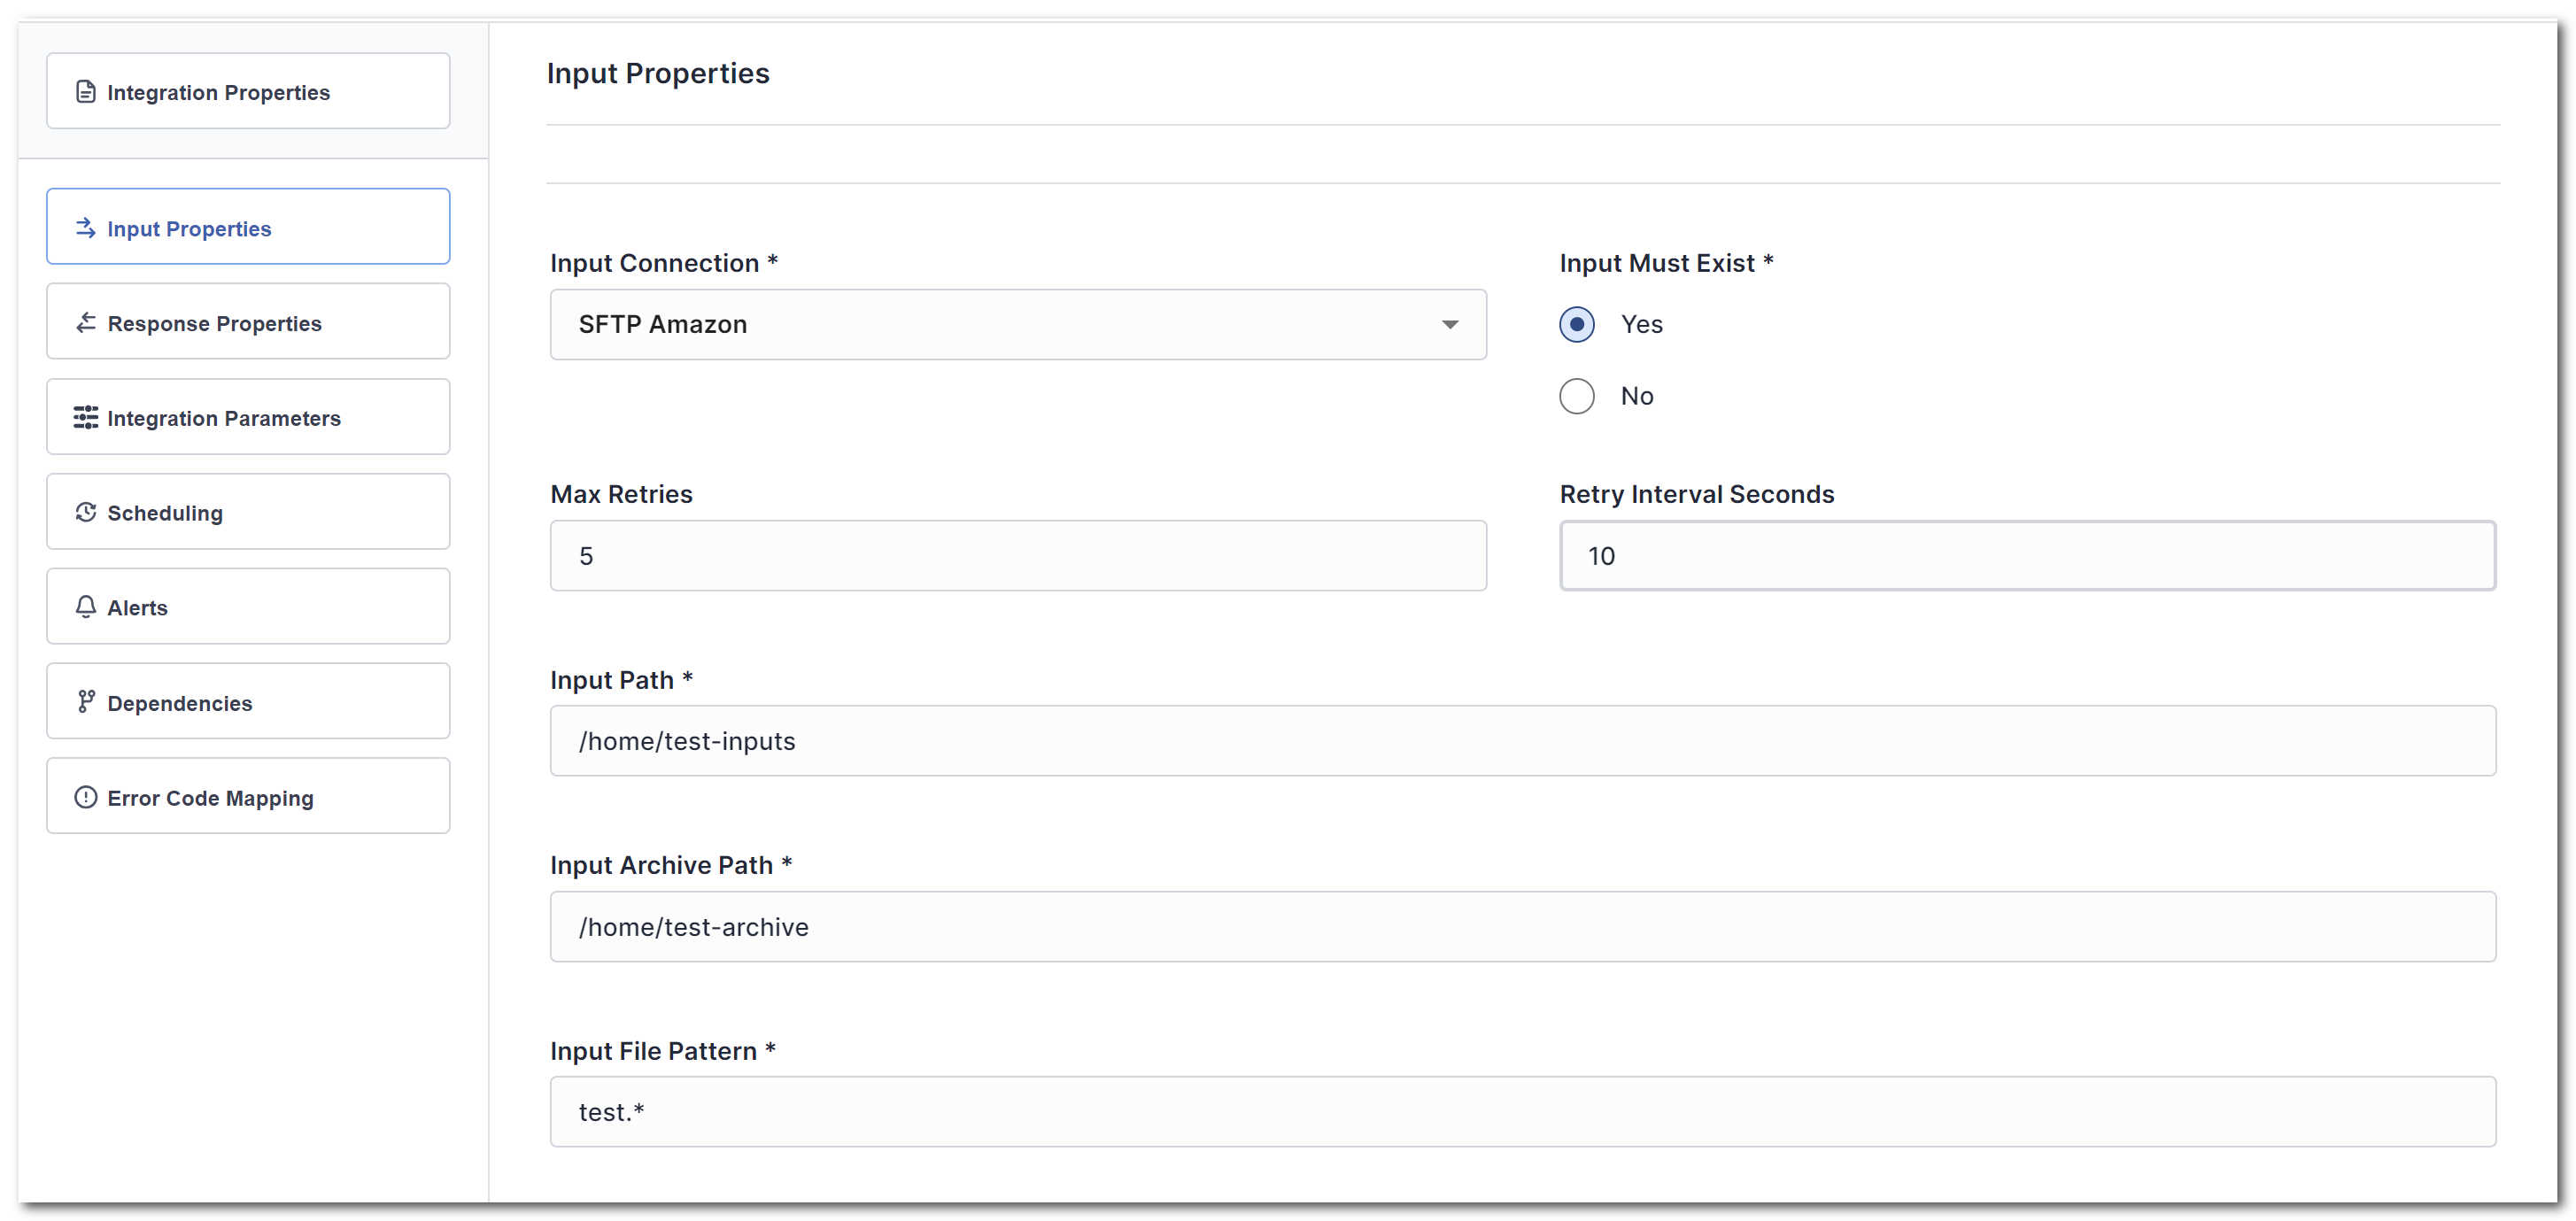 Figure 28. integration Input Properties
The following properties can be configured:
| Property Name | Property Description |
|---|---|
| Input Connection | Select a Connection that's used to retrieve the inputs. |
| Input Must Exist | Choose whether an input file must be present for each run of the integration. |
| Max Retries | If Input Must Exist, then this determines how many attempts are tried before the integration run fails due to missing inputs. |
| Retry Interval Seconds | Determines the number of seconds to wait between retries, if Input Must Exist. |
| Input Path | The path within the Connection where files are located. |
| Input Archive Path | The path within the Connection where files are archived after they have been picked up and processed. |
| Input File Pattern | The file pattern that is used to match files for this integration's inputs. This is a regular expression. |
Response Properties
The Response Properties define how an integration writes its outputs:
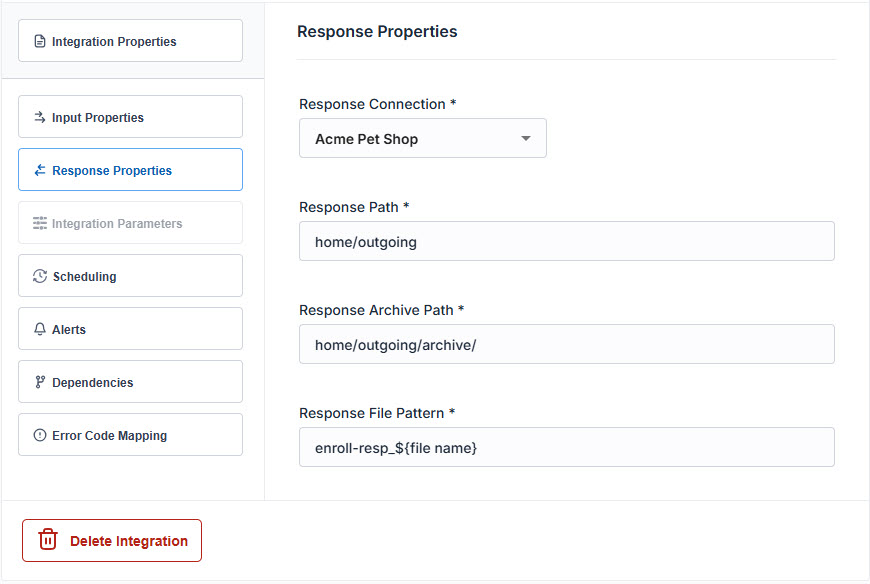 Figure 29. integration Response Properties
The following properties can be configured:
| Property Name | Property Description |
|---|---|
| Response Connection | Select a Connection that are used to post the response file. |
| Response Path | The path within the Connection where response files are written. |
| Response Archive Path | The path within the Connection where response files are archived after they have been picked up. |
| Response File Pattern | The pattern to generate response file names. Currently this is a prefix to be added to the original file name. |
Integration Parameters
Integration Parameters are additional properties passed to the RCX Processed that an integration is running. For example, there is a Persist parameter, which when set to False causes the integration to do a dry run on all the transactions instead of actually posting them to RCX.
Please refer to the integration Parameter reference section for further details on RCX Process parameters.
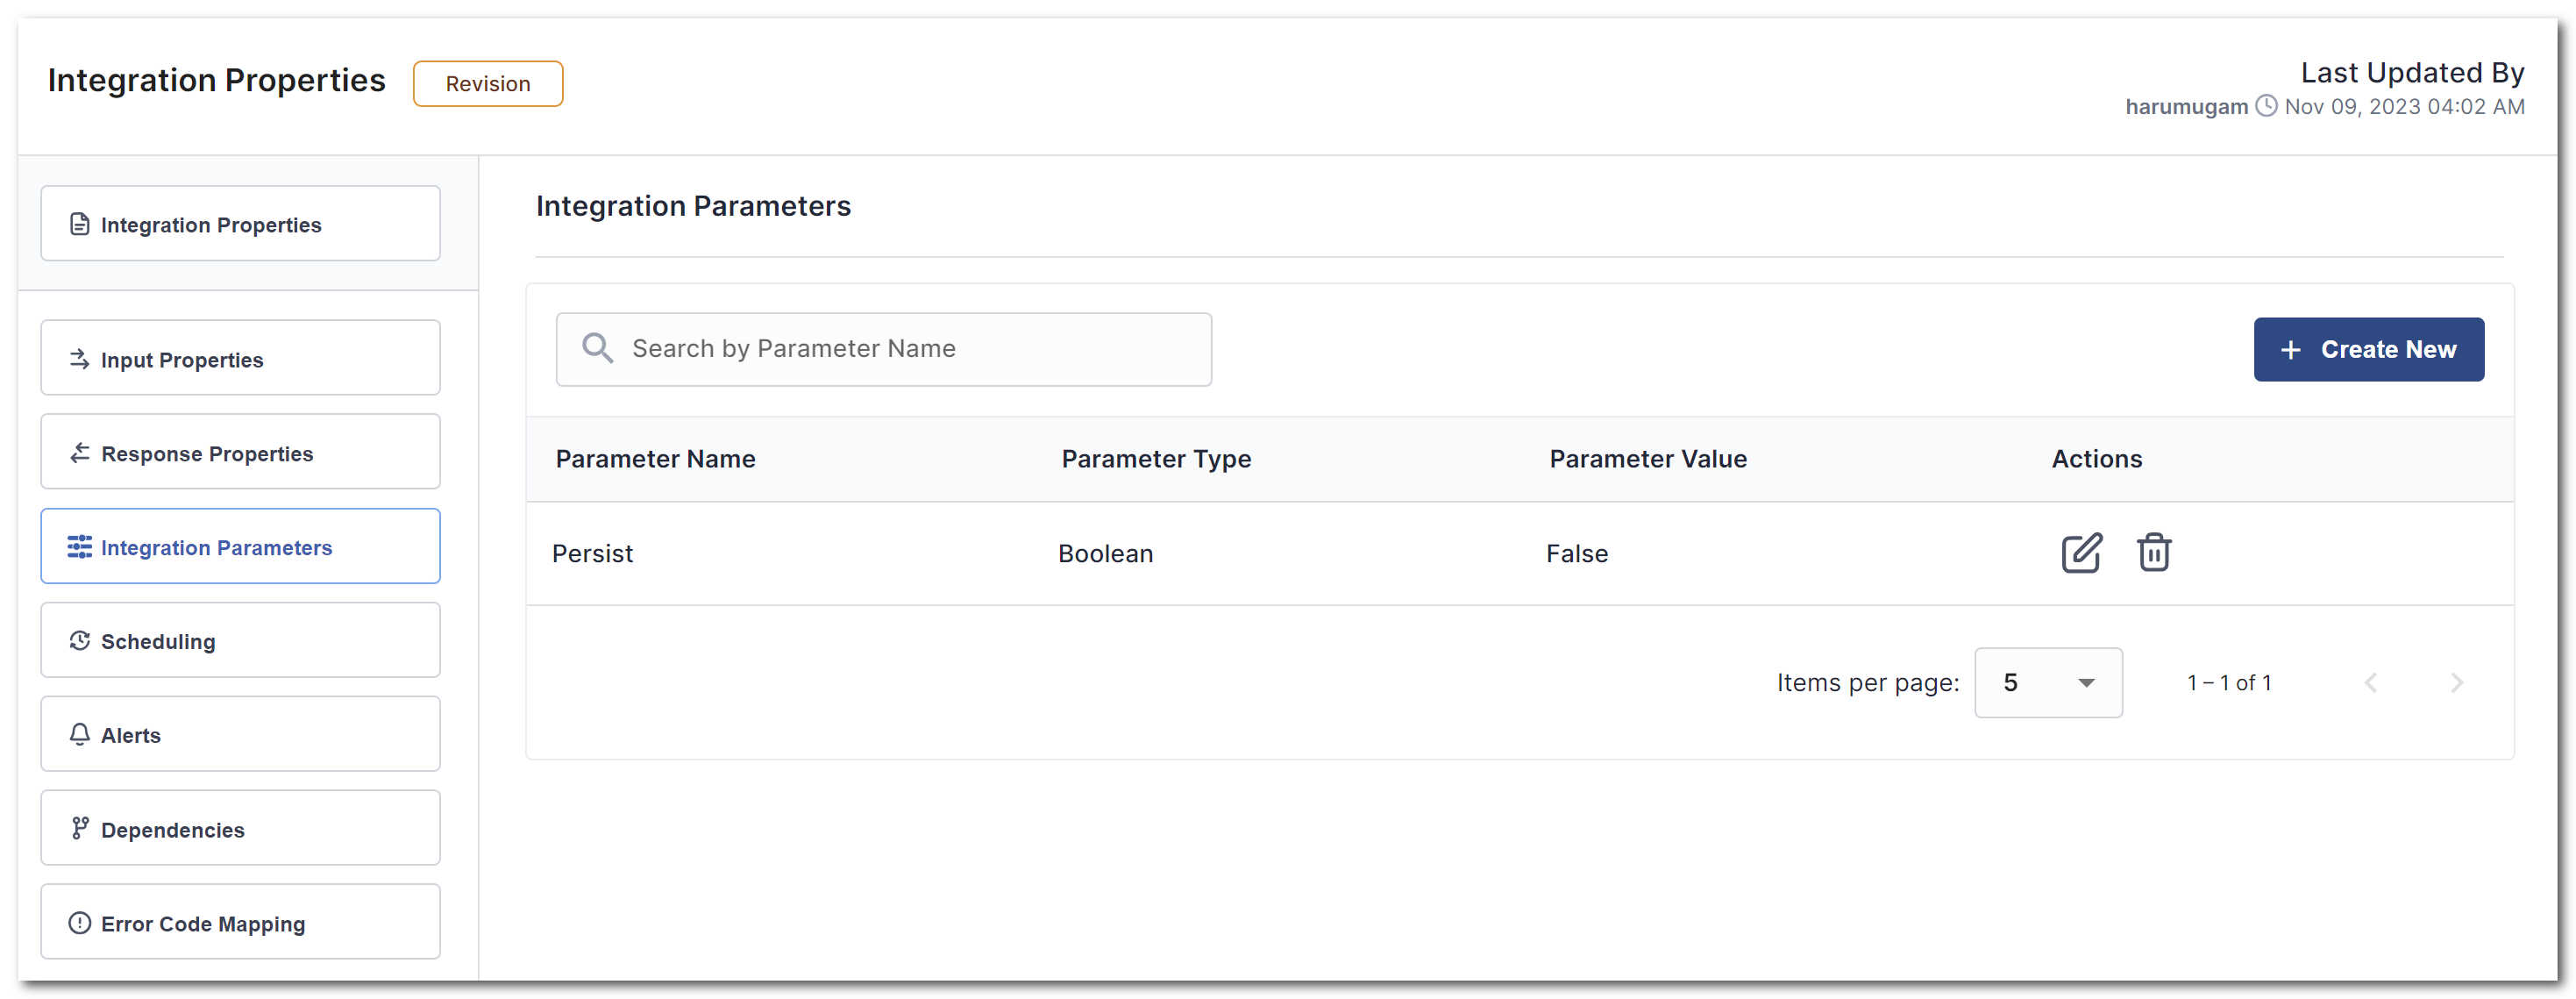 Figure 30. integration Parameters
Use the Create New button to add new parameters.
Use the Action buttons to Edit the value of a parameter and to Delete a Parameter.
Scheduling
The Scheduling tab allows entering a single, or repeating schedule to run an integration.
Figure 31. integration Scheduling
The following properties can be configured:
| Property Name | Property Description |
|---|---|
| Effective Date/Time | The first time the integration runs. |
| Repeating | Whether this integration schedule is repeating on a regular basis. |
| Frequency | Frequency of repetition - Minutes, Hours, Days, Weeks, Months, Years. |
| Repeat Interval | Number of Frequency values to wait between runs -for example if set to 1, and Frequency is Week then the integration runs once a week. |
Alerts
The Alerts tab allows configuring alerts when certain conditions are met, such as when integrations start, fail, or succeed.
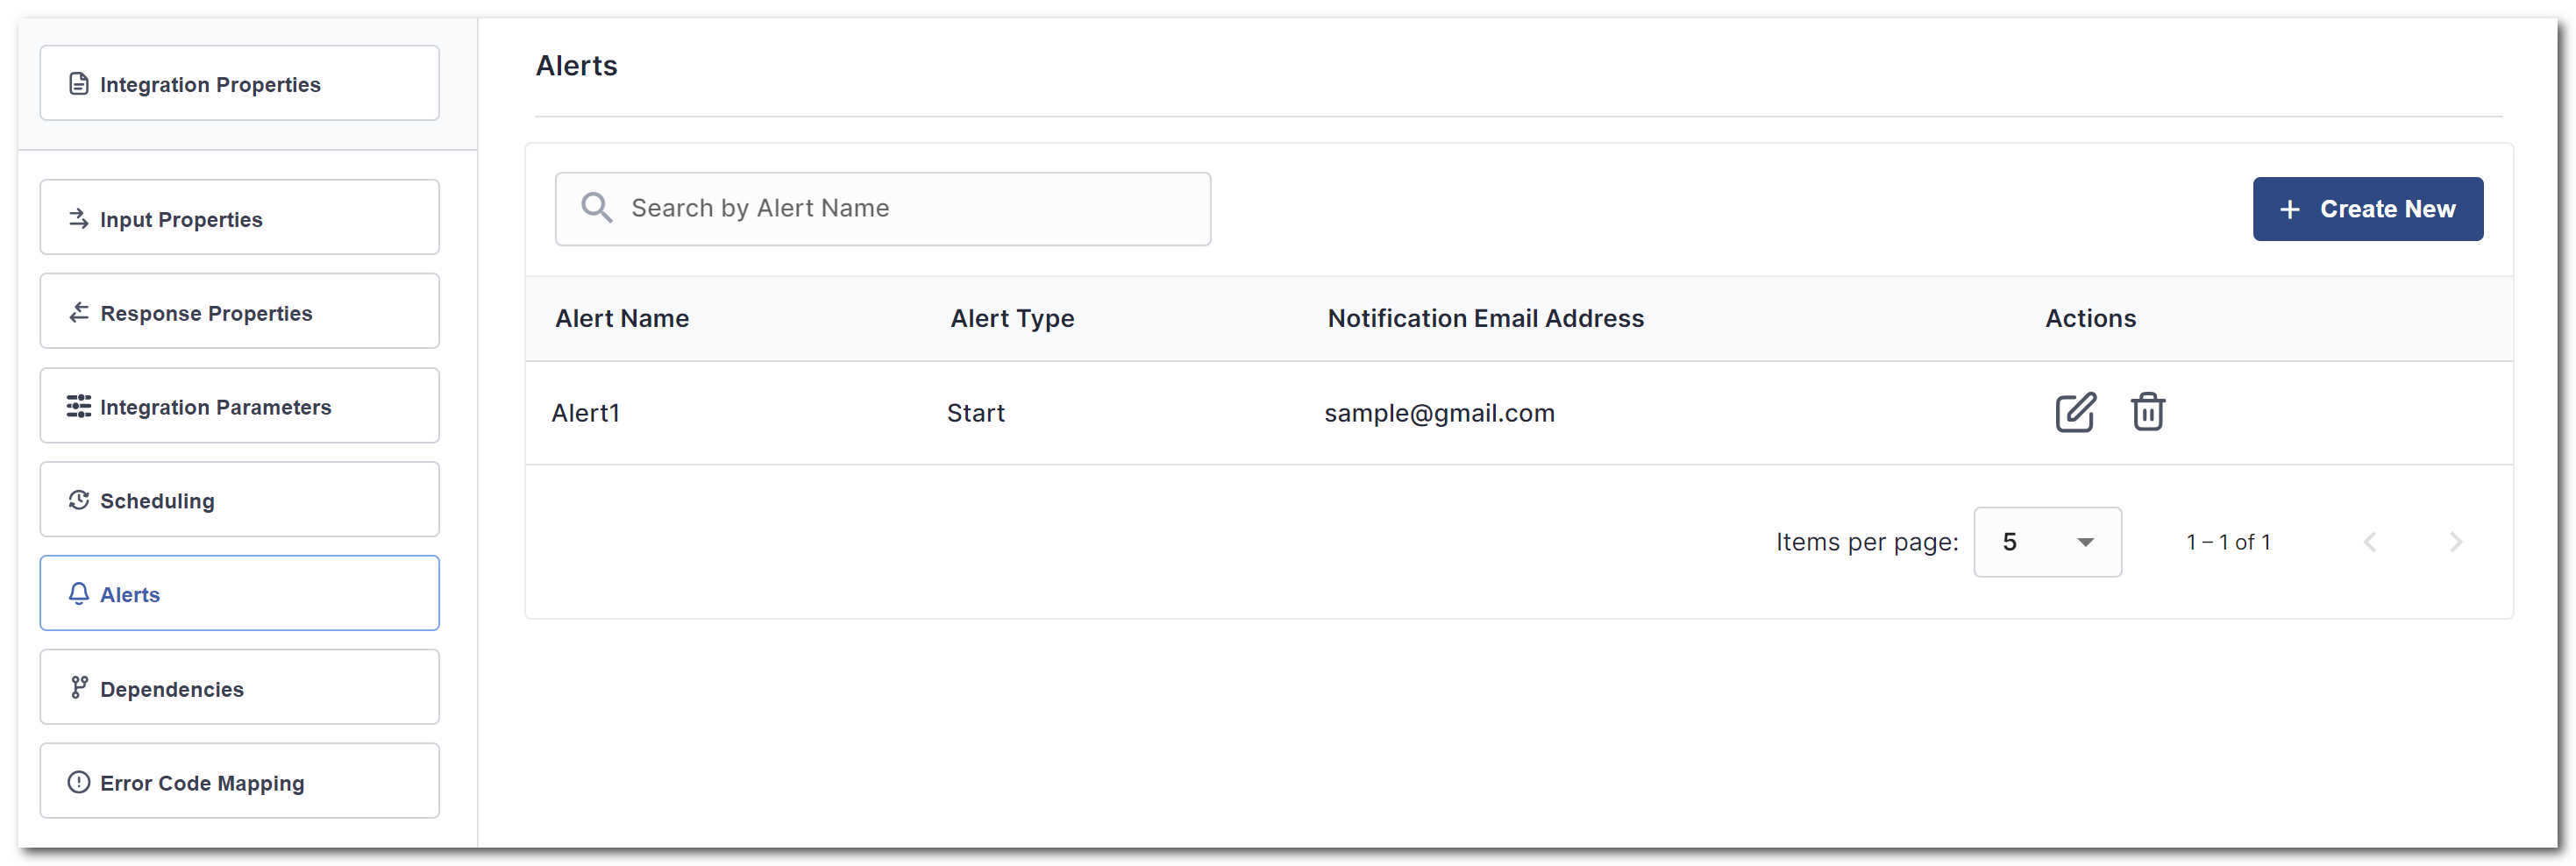 Figure 32. integration Alerts
Use the Create New button to add new Alerts.
Use the Action buttons to Edit the values of an Alert and to Delete an Alert.
The following types of Alerts are currently configurable:
Start- issued when an integration starts.Success- issued when an integration succeeds.Records Failed- issued when some records failed, but the integration run was still successful.Integration Failed- issued when the integration run failed.
Dependencies
The Dependencies tab allows configuring dependencies between integrations, which ensures execution order.
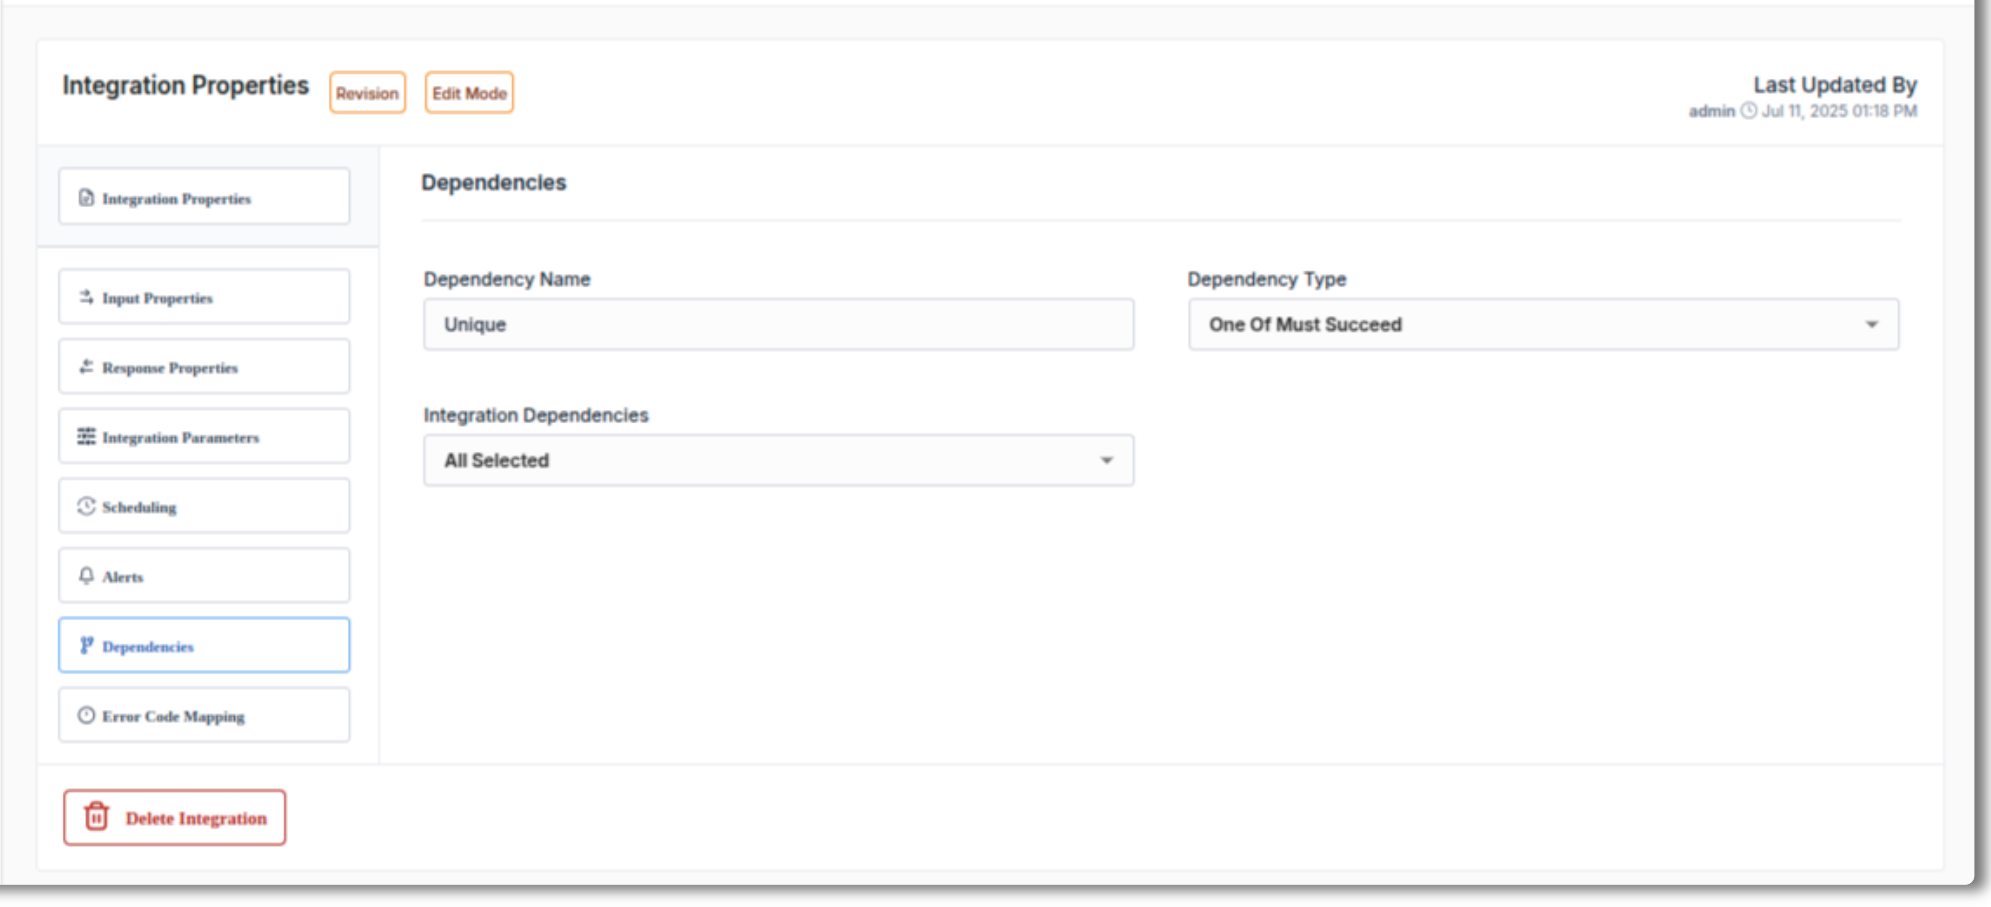 Figure 33. integration Dependencies
The following dependency types can be configured:
All Must Succeed- all of the selected dependencies must succeed before the current integration can run.One of Must Succeed- one of the selected dependencies must succeed before the current integration can run.
Note
When dependencies are present, FeedXChange ensures that a dependency has a run that's after the most recent execution of the current dependency.
Error Code Mapping
The Error Code Mapping tab is used to translate RCX Error codes to error codes that are used by Partners. This is sometimes required in order to harmonize error handling between Partners.
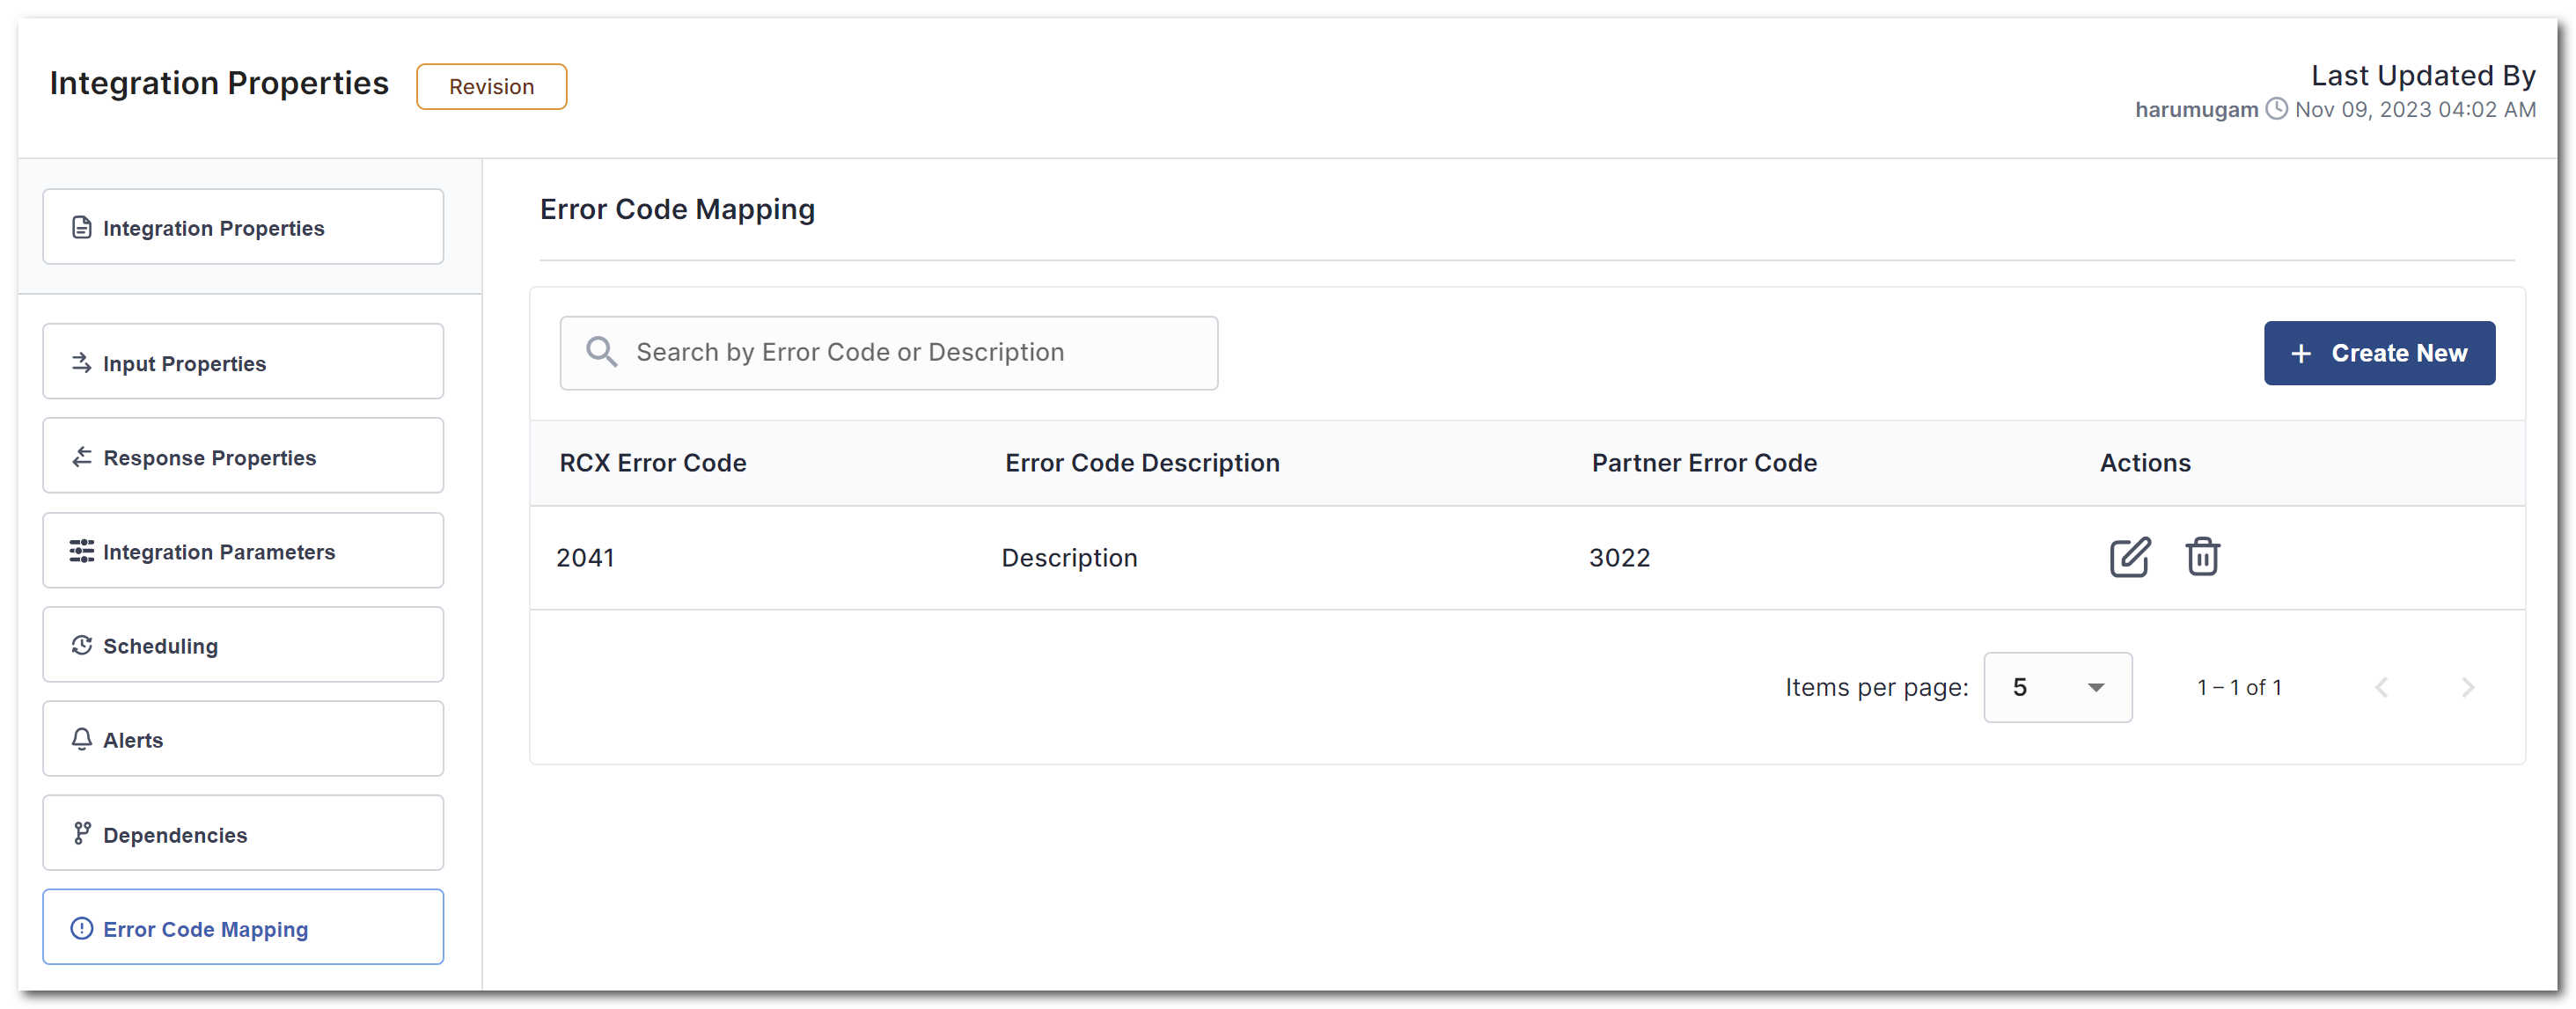 Figure 34. integration Error Code Mapping
Use the Create New button to add new Alerts.
Use the Action buttons to Edit the values of an Error Code Mapping and to Delete an Error Code Mapping.
Browsing Connections
To browse Connections available in FeedXChange navigate to the Connections tab in the side-panel menu as shown below:
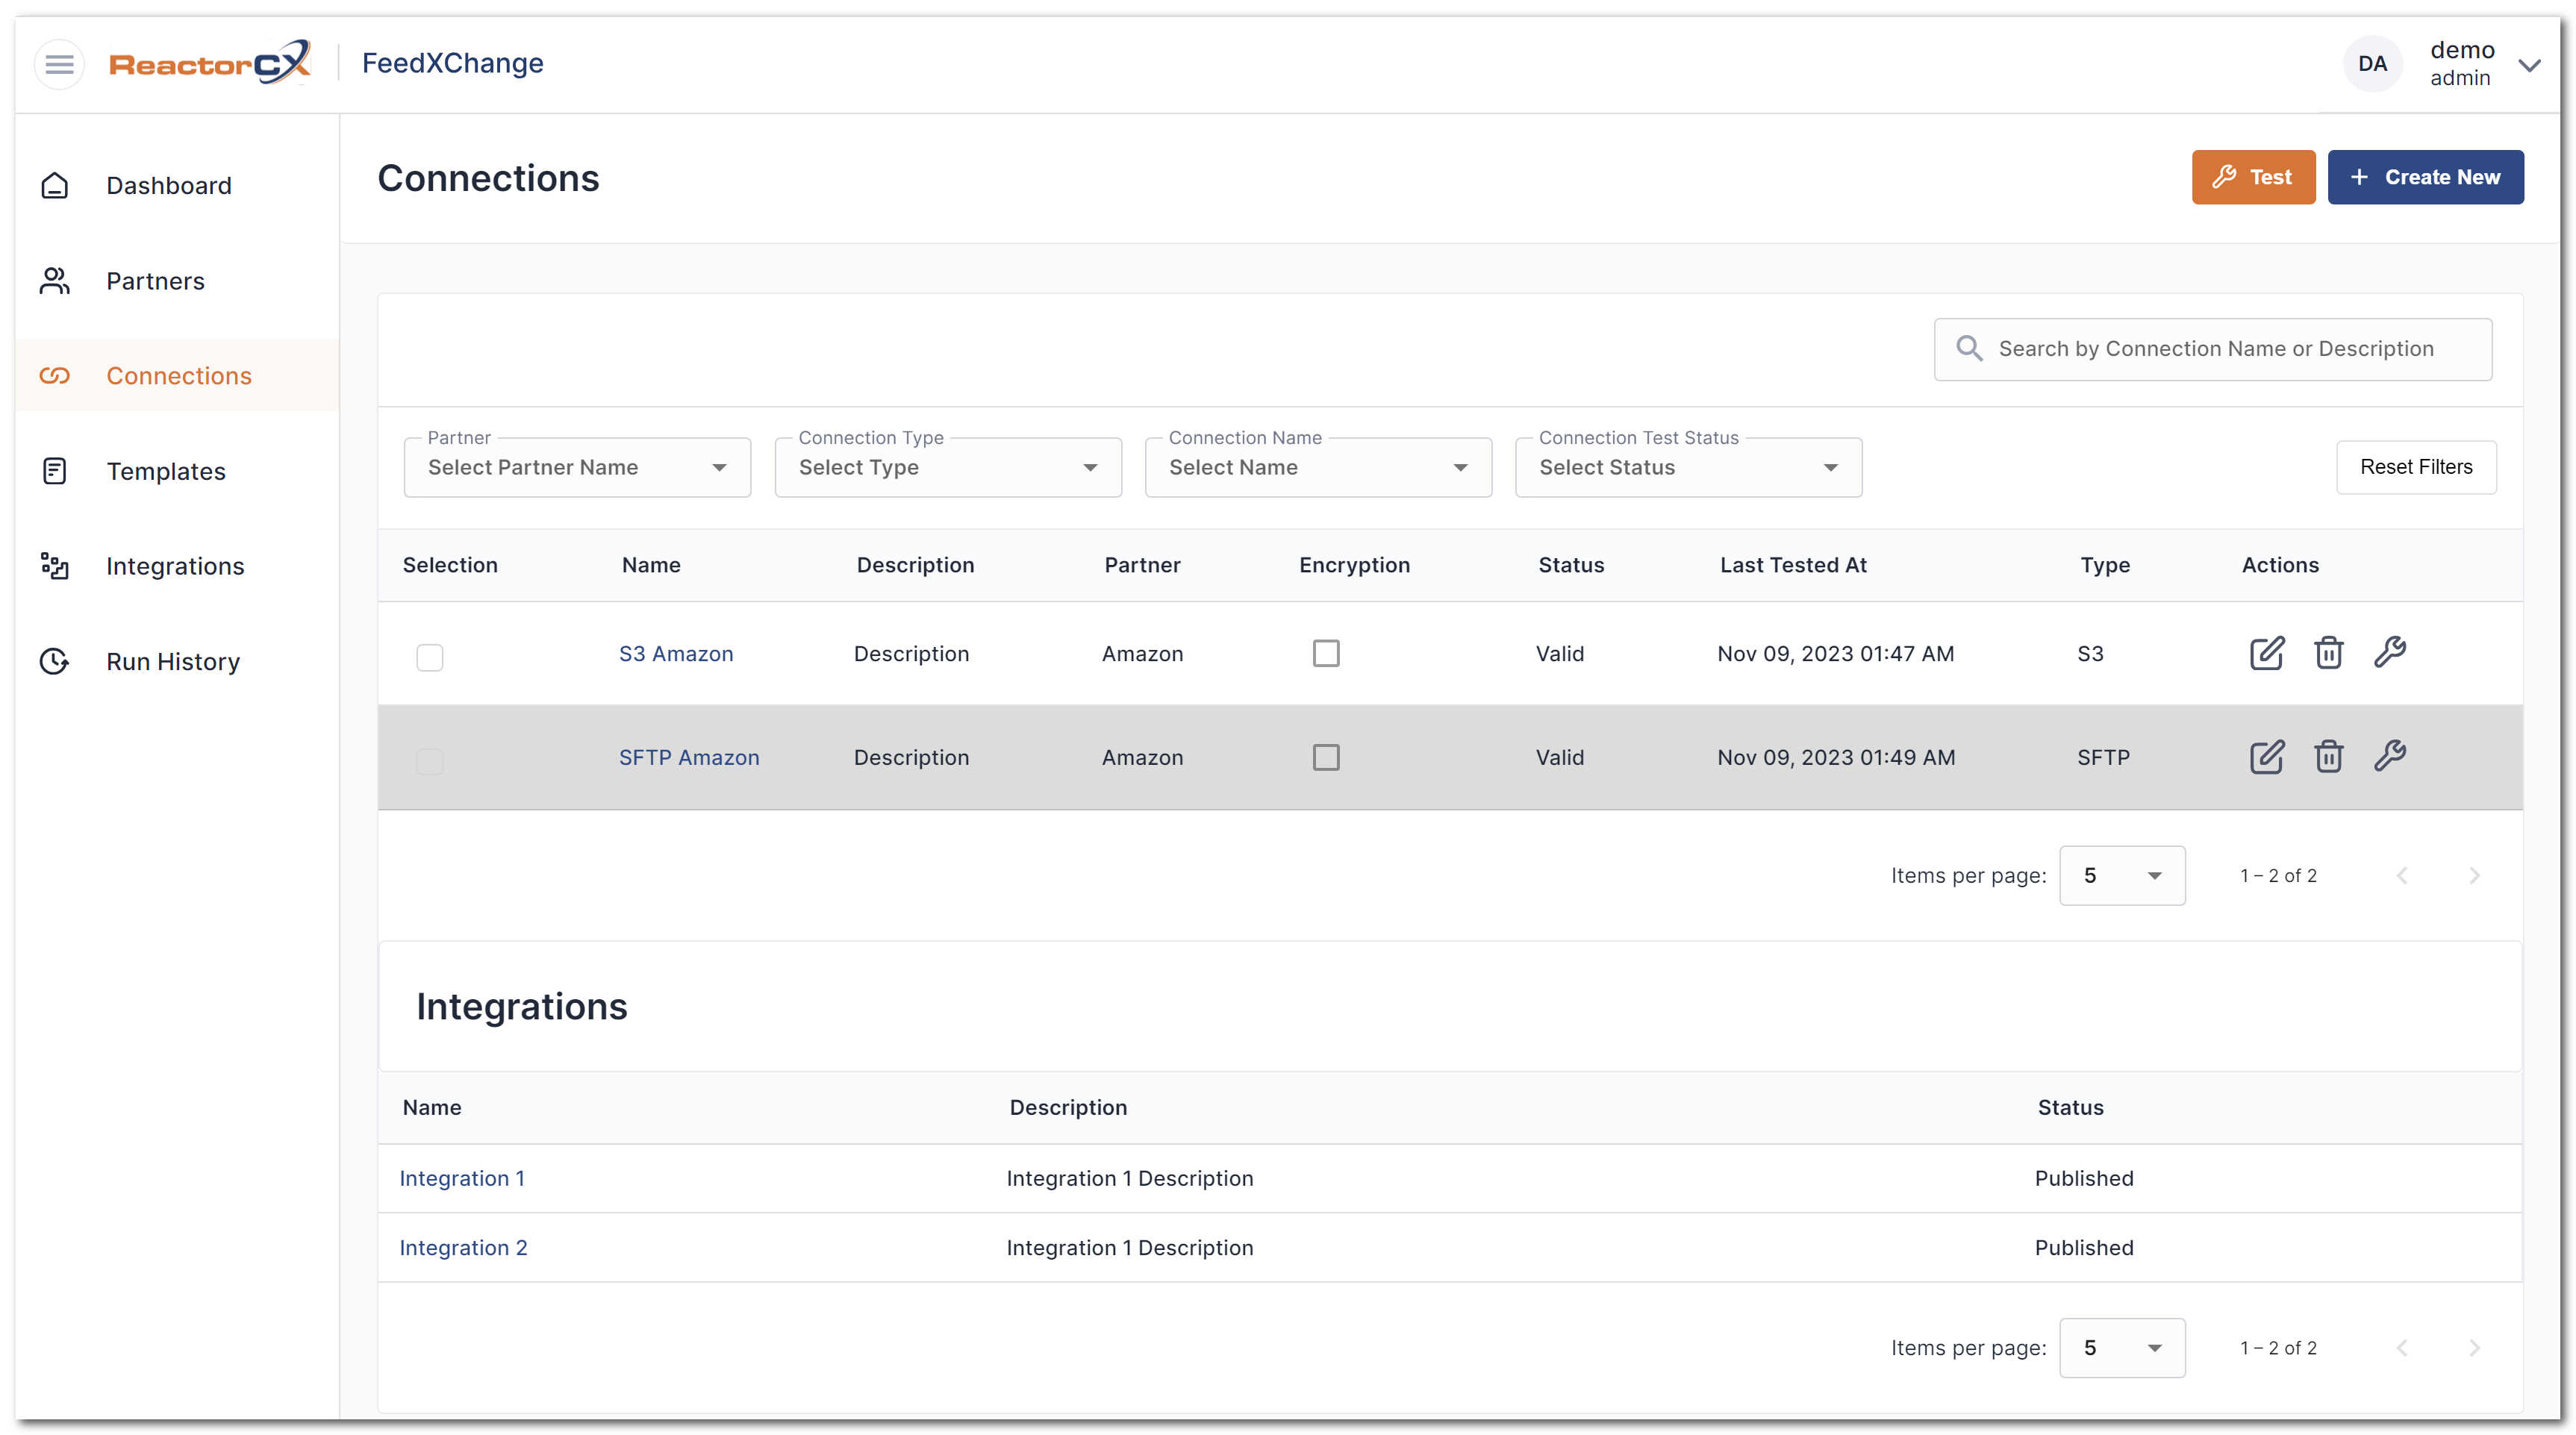 Figure 35. Browsing Connections
You can filter the Connections list by:
- Partner
- Connection Type
- Connection Name
- Connection Test Status
In addition, you can use the global Connection search to search Connection names and Descriptions. Use the Reset Filters button to reset the filters and show all Connections in the system.
You can use the Create New button at the top right corner to create a new Connection.
You can use the Test button to test one or more connections that can be selected using the check-box on the left of the Connection list. The Test attempts to connect and reflect the validity of the connection in the list, as well as update the last date when the connection was tested.
You can see the integrations which use a particular Connection by selecting the Connection in the table and checking the list of integrations at the bottom of the screen.
You can use the following Action Buttons to take action on a specific Connection:
| Button | Description |
|---|---|
|
Edit an Connection |
|
Delete a Connection |
 |
Test a Connection |
Viewing a Connection
To view a connection without the risk of changing it, click the title of the connection, which is a hyperlink that takes you to a read-only view of the connection and all of its details.
Editing Connection Configuration
To edit the configuration of a connection, you need to either create a new connection, or edit an existing one via the edit Action Button.
Note
You can also use the Test button while editing the connection to verify the details.
SFTP
To edit or create an SFTP connection, select "SFTP" as the connection type and choose the desired authentication method, either password or key file.
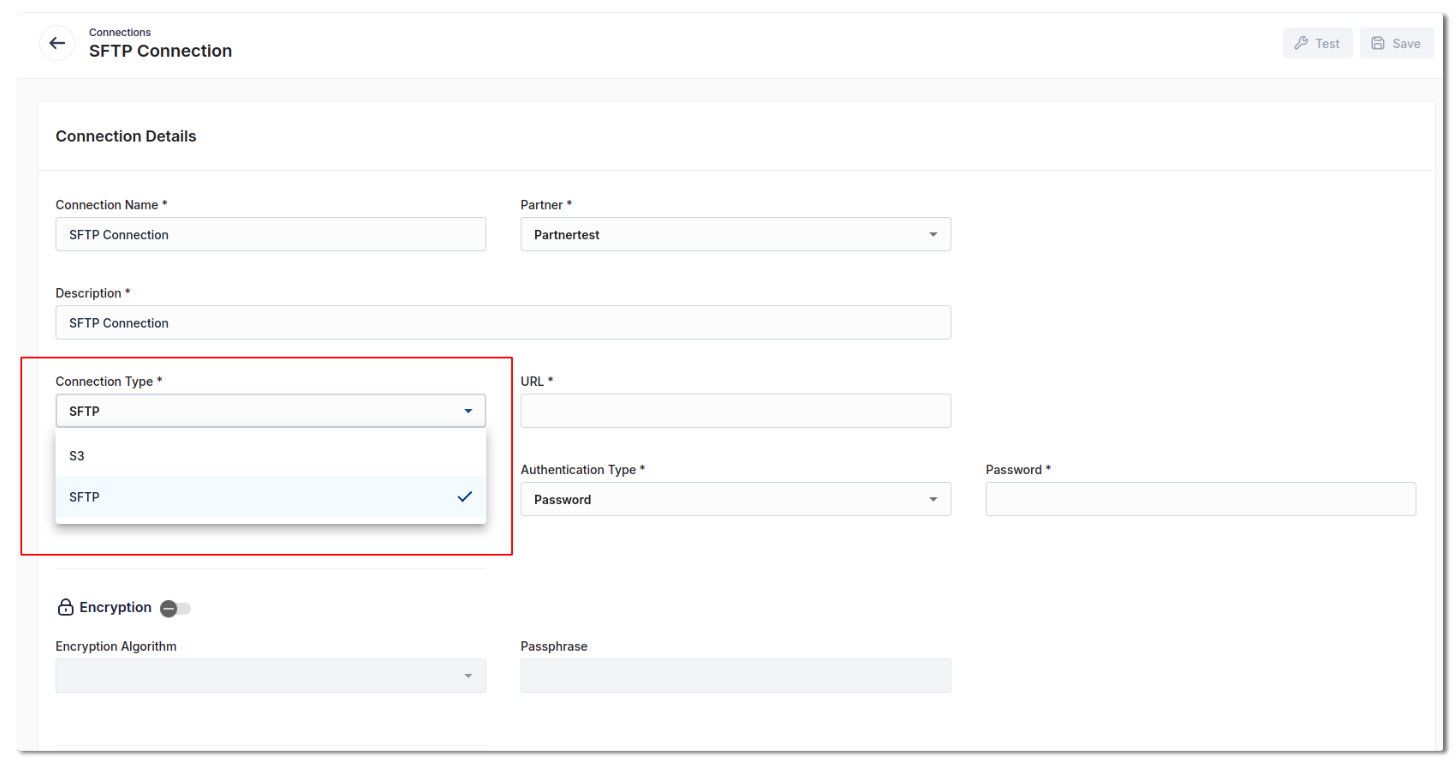 Figure 36. Configuring connection details
Password
For password-based authentication, select "Password" as the authentication type and configure the username and password.
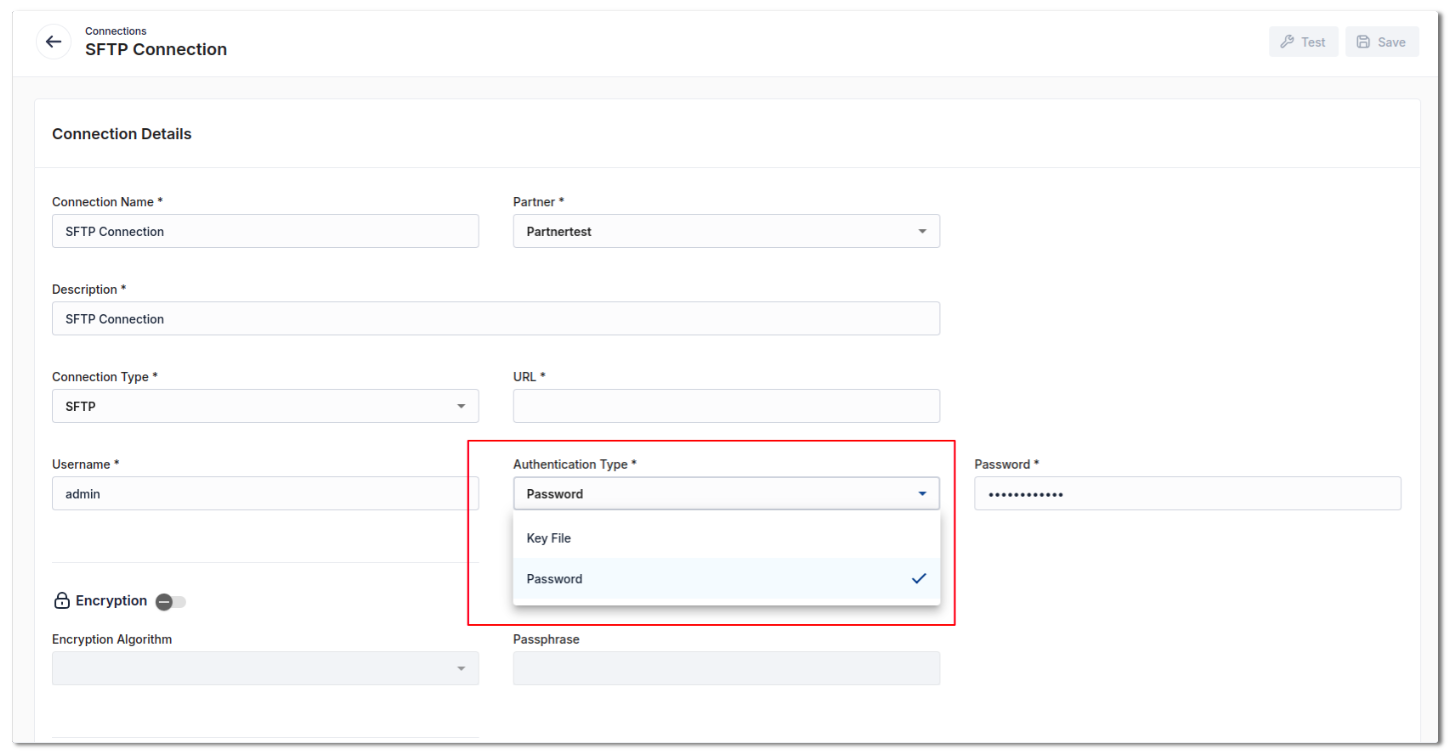 Figure 37. Configuring SFTP connection using authentication as password
Key File
For key file-based authentication, select "Key File" as the authentication type. Then, configure the username, upload the key file, and provide the passphrase if the uploaded file is encrypted.
 Figure 38. Configuring SFTP connection using authentication as key file
S3
To edit or create an S3 connection, choose "S3" as the connection type and configure the access key ID, secret access key, and the corresponding region..
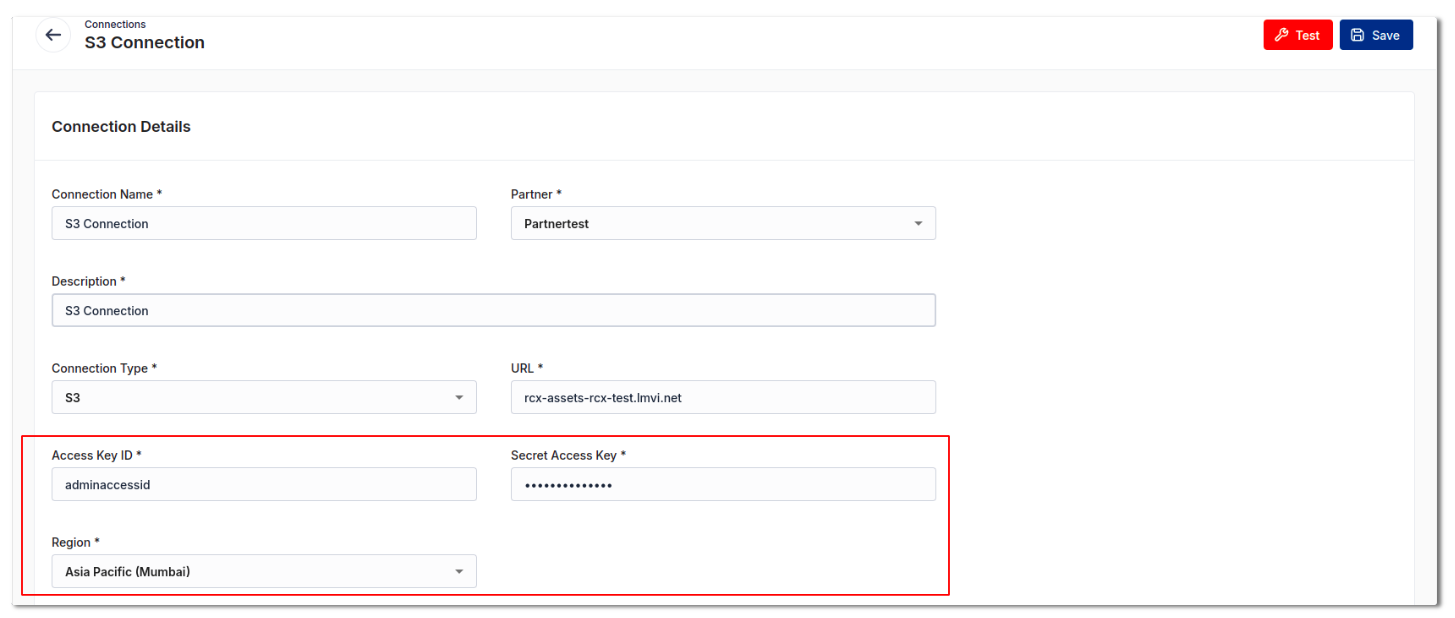 Figure 39. Configuring s3 parameters
Encryption and Compression
Encryption
You can enable the encryption field, which allows you to configure the two fields below: the algorithm and the passphrase. Here, you can select the algorithm and enter the passphrase to decrypt the file that was dropped via this connection.
Encryption using Algorithm and Passphrase
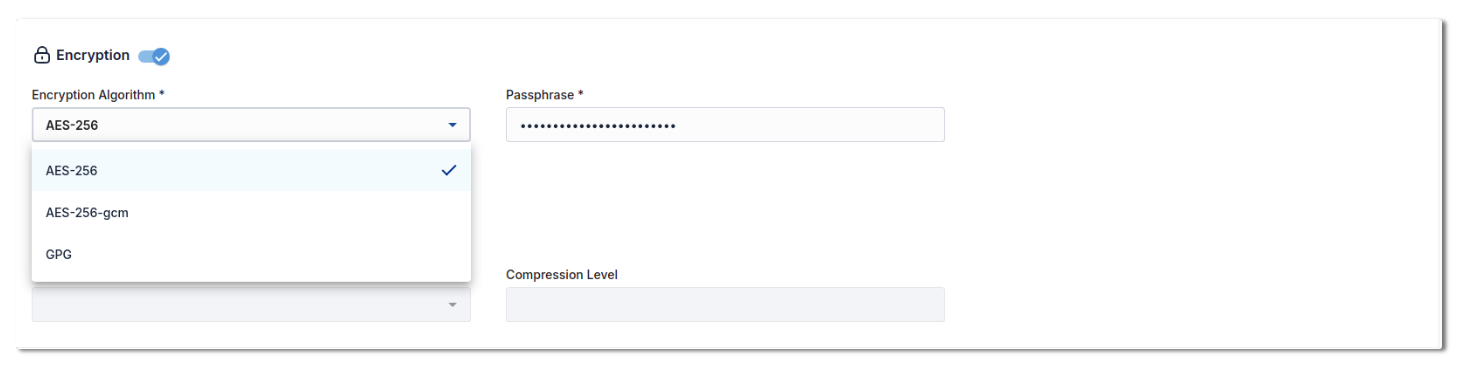 Figure 40. Configuring encryption parameters
Encryption using Algorithm, key file, Passphrase
Encryption using a key file and passphrase (since GPG supports both methods), with the passphrase also being used to decrypt the key file.
 Figure 41. Configuring encryption key file parameters
Compression
You can enable the compression field, which allows you to configure the two fields below: the algorithm and the compression level. Here, you can select the algorithm and enter the compression level to decompress the file that was dropped via this connection.
 Figure 42. Configuring compression parameters
S3 Connections
For Connections with Connection Type of S3, the following Configuration properties are available:
| Property Name | Property Description |
|---|---|
| Connection Name | Name of the Connection. |
| Partner | Partner associated with the Connection. |
| Description | Description of the Connection. |
| Region | The AWS Region where the S3 bucket is located. |
| Access Key ID | The Access Key ID for the S3 bucket. |
| Secret Access Key | The Secret Access Key for the S3 bucket. |
| URL | The URL of the S3 bucket. |
| Encryption Algorithm | Select one of AES-256, GPG, or AES-256-gcm. |
| Encryption Key | Upload the encryption key for the selected encryption algorithm. |
| Compression Algorithm | Select one of None, GZip, Deflate, ZSTD, Snappy, LZMA, or BZip2. |
SFTP Connections
For Connections with Connection Type of SFTP, the following Configuration properties are available:
| Property Name | Property Description |
|---|---|
| Connection Name | Name of the Connection. |
| Partner | Partner associated with the Connection. |
| Description | Description of the Connection. |
| Username | Username to use for SFTP login. |
| Authentication Type | Select one of Password or Key File |
| Password | Enter password if Authentication Type is Password |
| Key File | Upload the private key file for SFTP login. |
| URL | The name of the SFTP host. |
| Encryption Algorithm | Select one of AES-256, GPG, or AES-256-gcm. |
| Encryption Key | Upload the encryption key for the selected encryption algorithm. |
| Compression Algorithm | Select one of None, GZip, Deflate, ZSTD, Snappy, LZMA, or BZip2. |
Browsing Partners
To browse Partners available in FeedXChange navigate to the Partners tab in the side-panel menu as shown below:
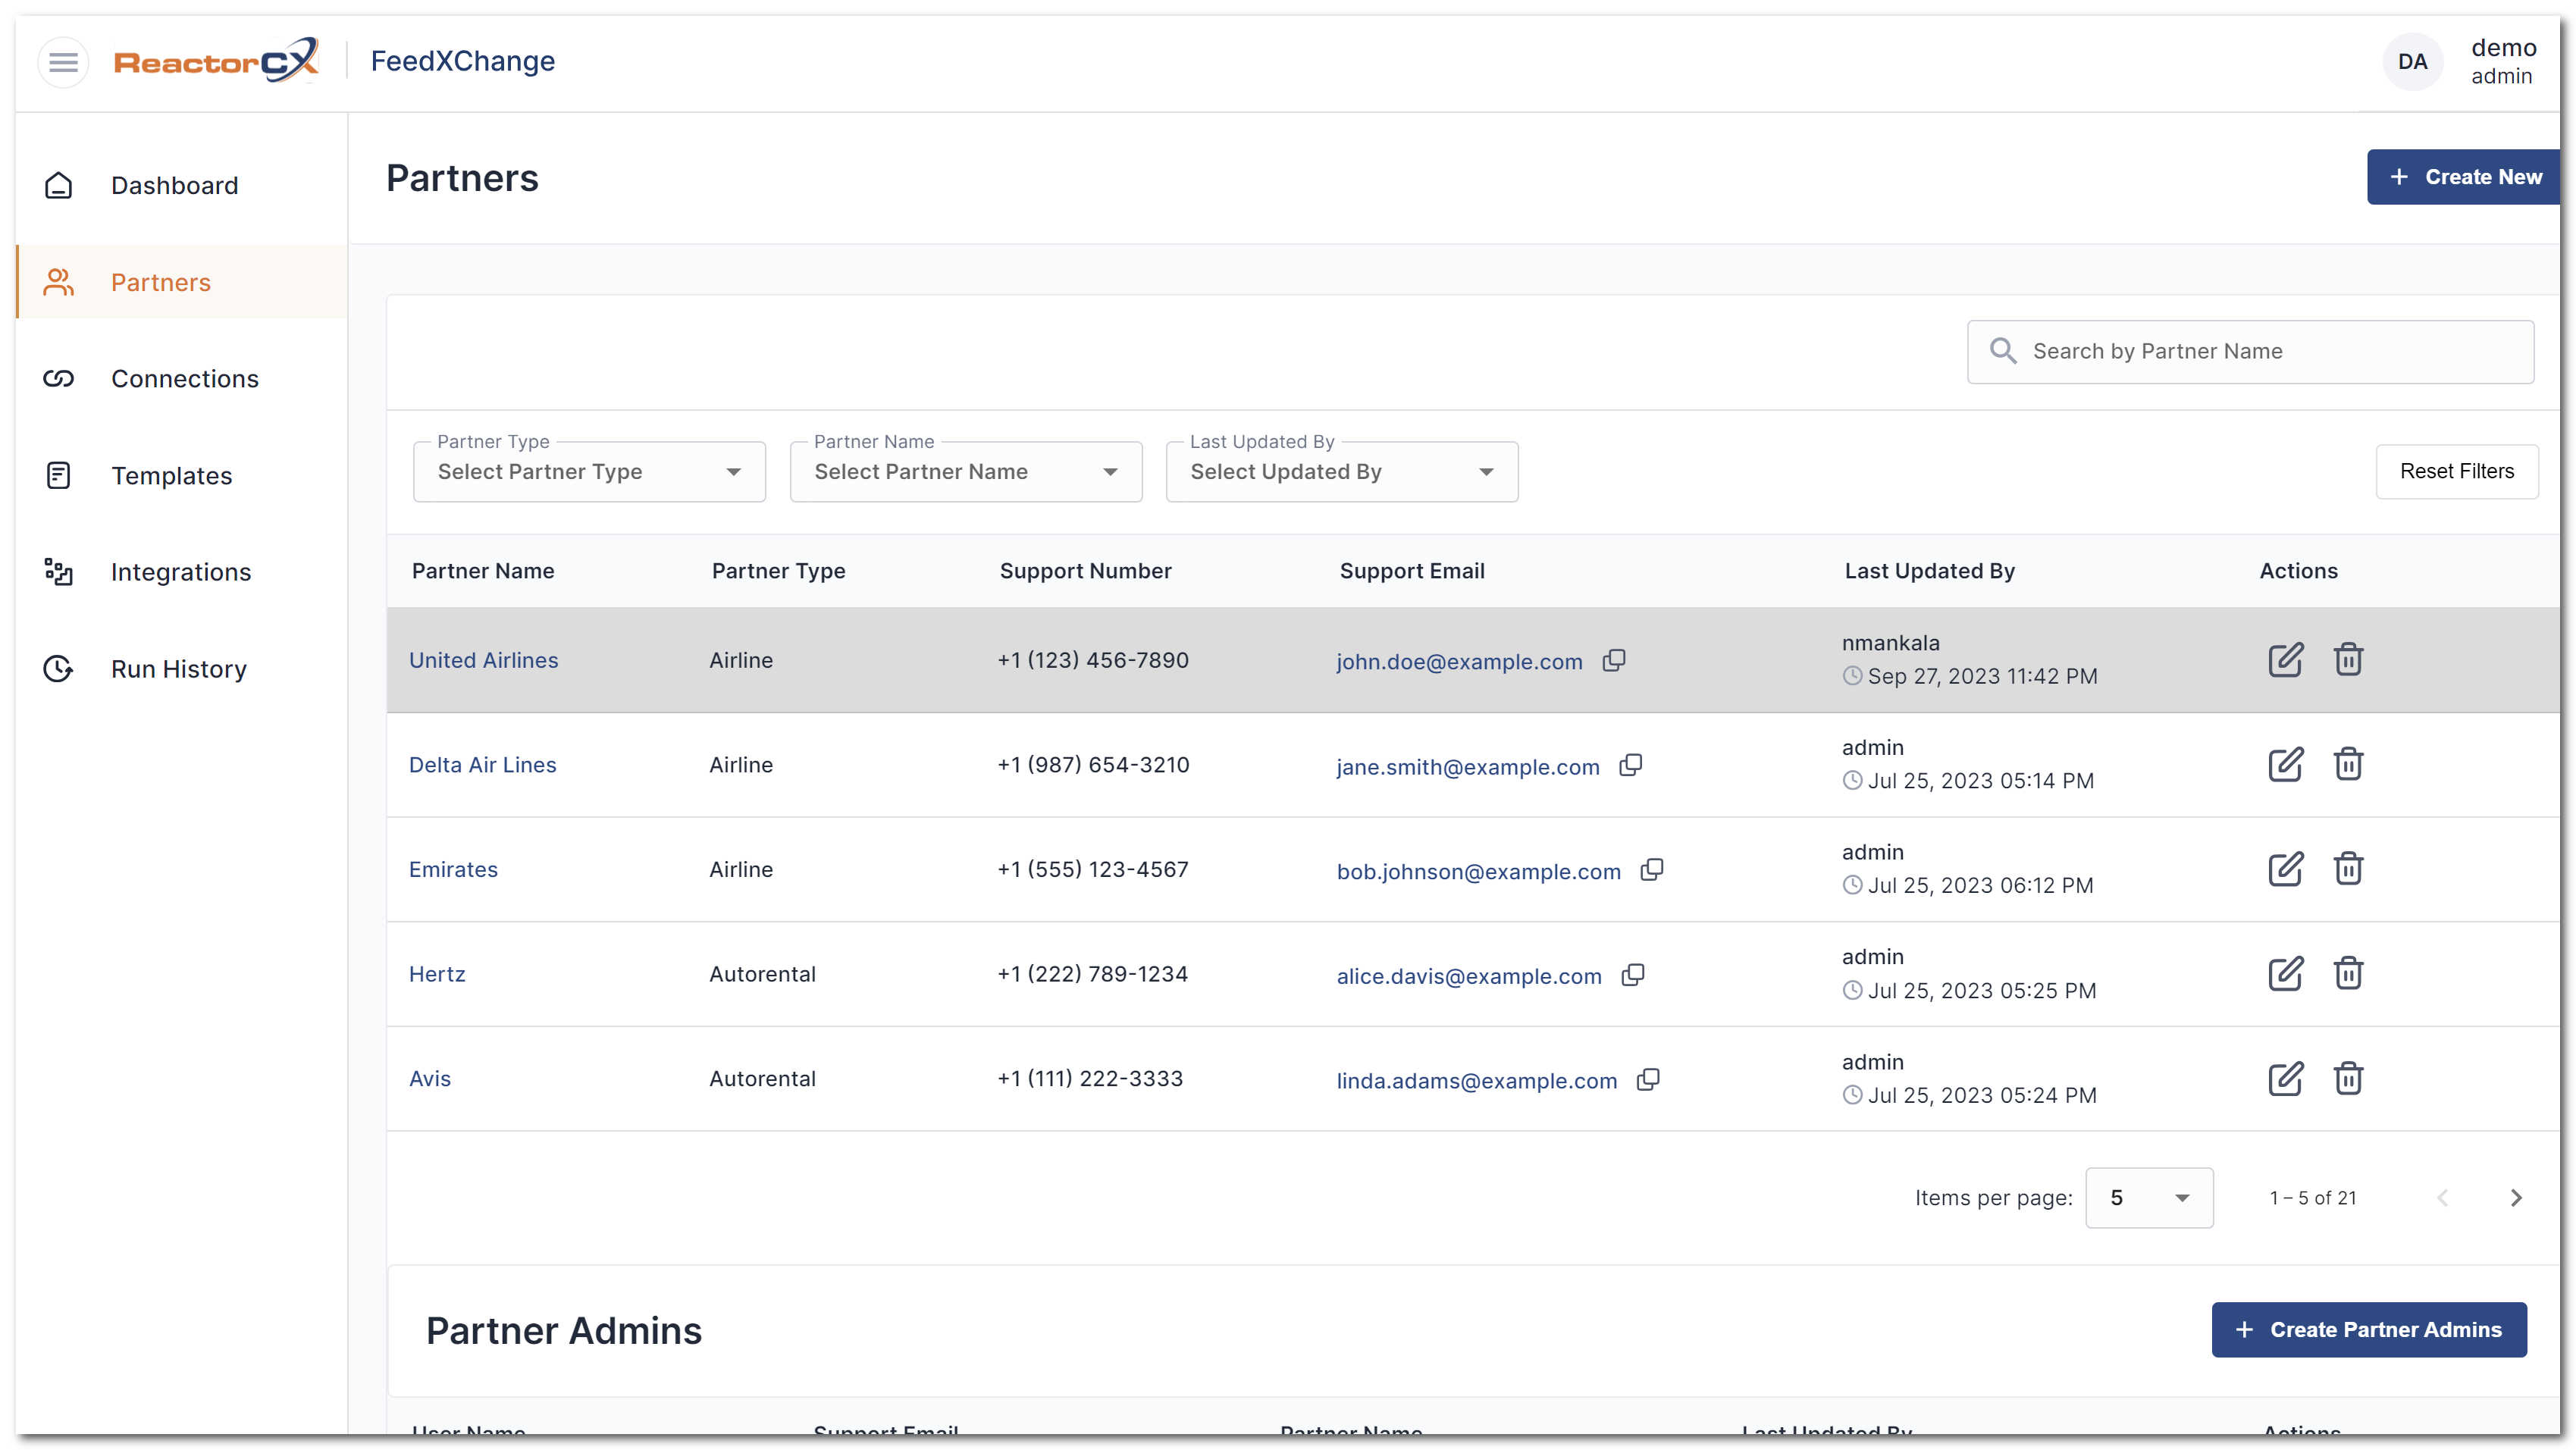 Figure 43. Browsing Partners
You can filter by:
- Partner Type
- Partner Name
- Last Updated By
You can use the global Partner search to search Partner names and Descriptions. Use the Reset Filters button to reset the filters and show all Partners in the system.
You can see the Partner Admins for a particular Partner by selecting the Partner in the table and checking the list of Admins at the bottom of the screen. The same table has buttons to Create, Delete**, and** Edit Admins.
You can create a new Partner by clicking the Create New button at the top right corner.
You can use the following Action Buttons to take action on a specific Partner:
| Button | Description |
|---|---|
|
Edit an Partner |
|
Delete a Partner |
Viewing a Partner
To view a Partner without the risk of changing it, click the title of the Partner, which is a hyperlink that takes you to a read-only view of the Partner and all of its details.
Editing Partner Configuration
The following properties can be configured for a Partner:
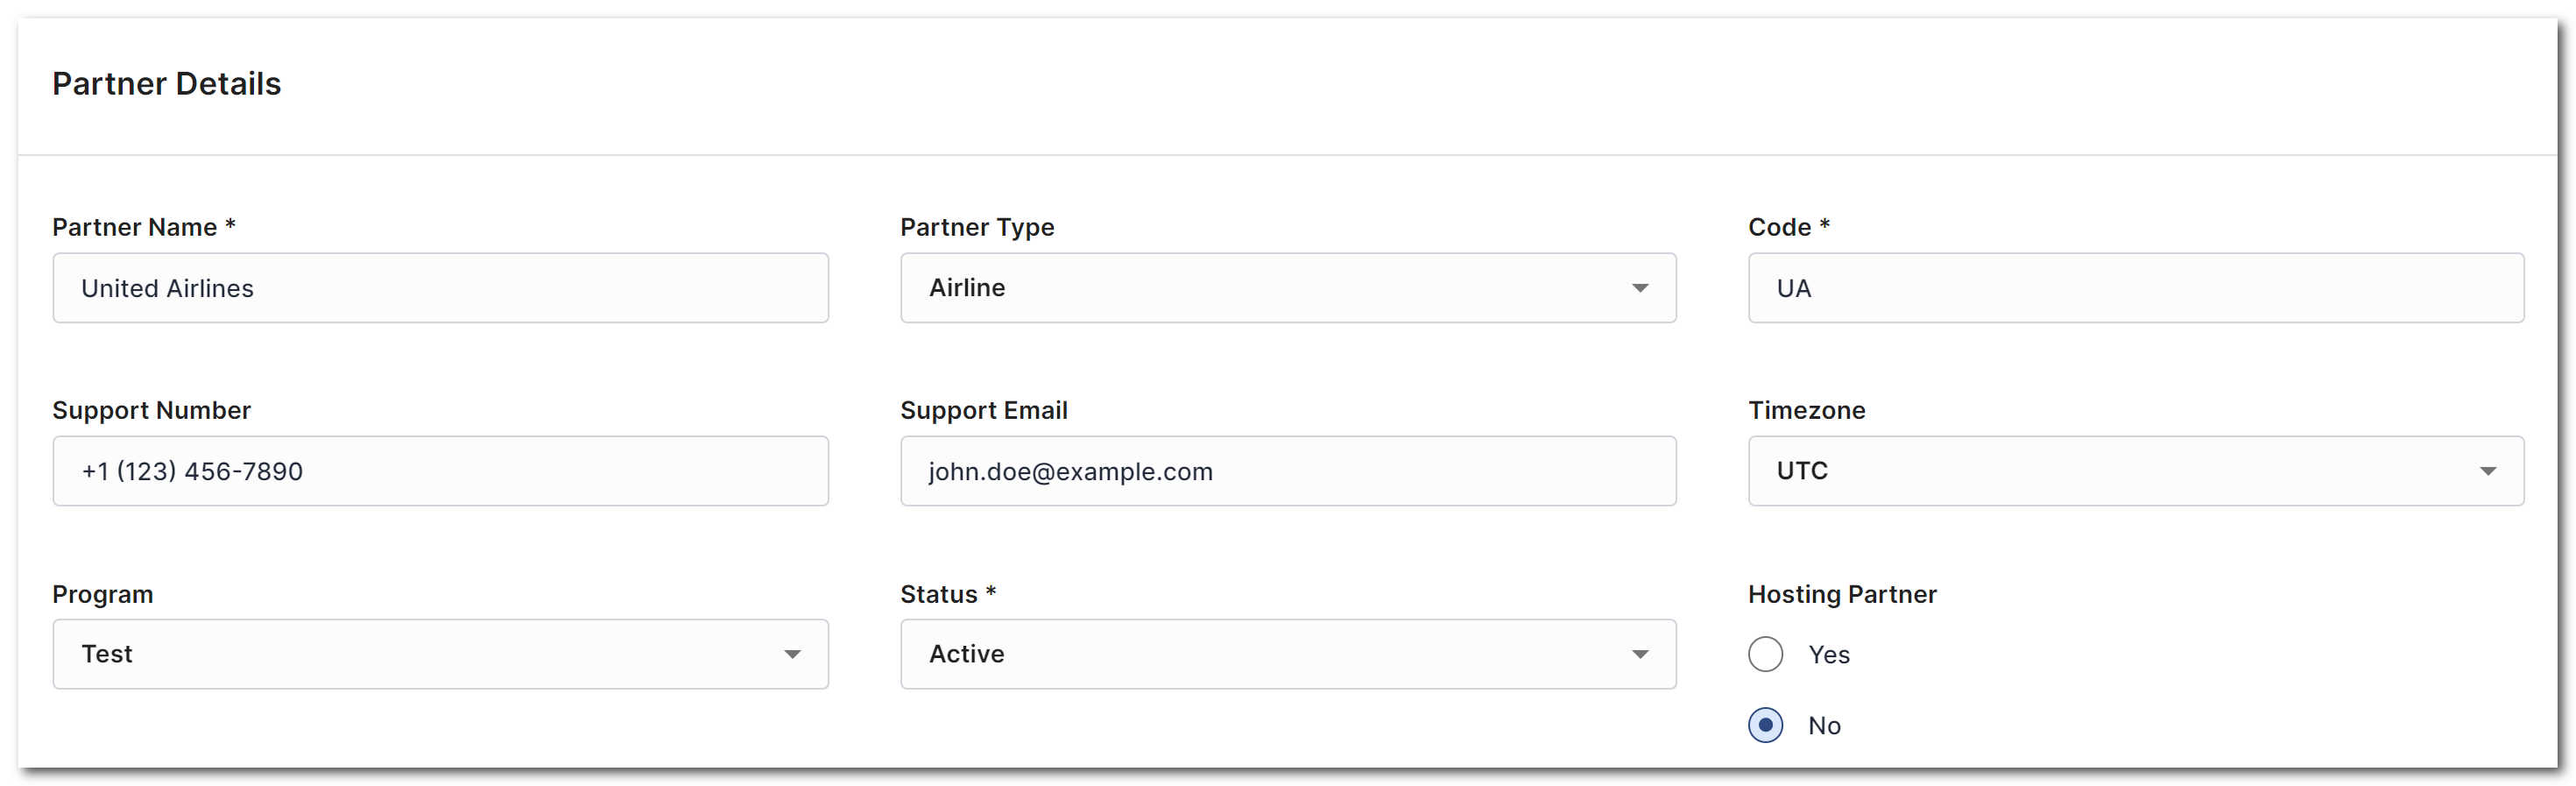 Figure 44. Partner Details
| Property Name | Property Description |
|---|---|
| Partner Name | The name of the Partner. |
| Partner Type | The type of business the Partner is in, for example Airline, Hotel, and other. |
| Code | The unique transaction code for the Partner that's present on transactions. |
| Support Number | The support number for the Partner. |
| Support Email | The support email for the Partner. |
| Program | The Program where the Partner is in coalition. |
| Timezone | The timezone for the Partner. |
| Status | Select one of Active or Inactive. |
| Hosting Partner | Select one of Yes or No. |
Note
There can be only one Hosting Partner in a Program.
Monitoring Integrations
Integration Runs
An integration run is a single execution of an integration. For example, if the integration is scheduled to run every 15 minutes, then a single integration run occurs every 15 minutes.
FeedXChange Operations Dashboard
The FeedXChange Operations Dashboard is a summary of all the integration that have been run in the system recently:
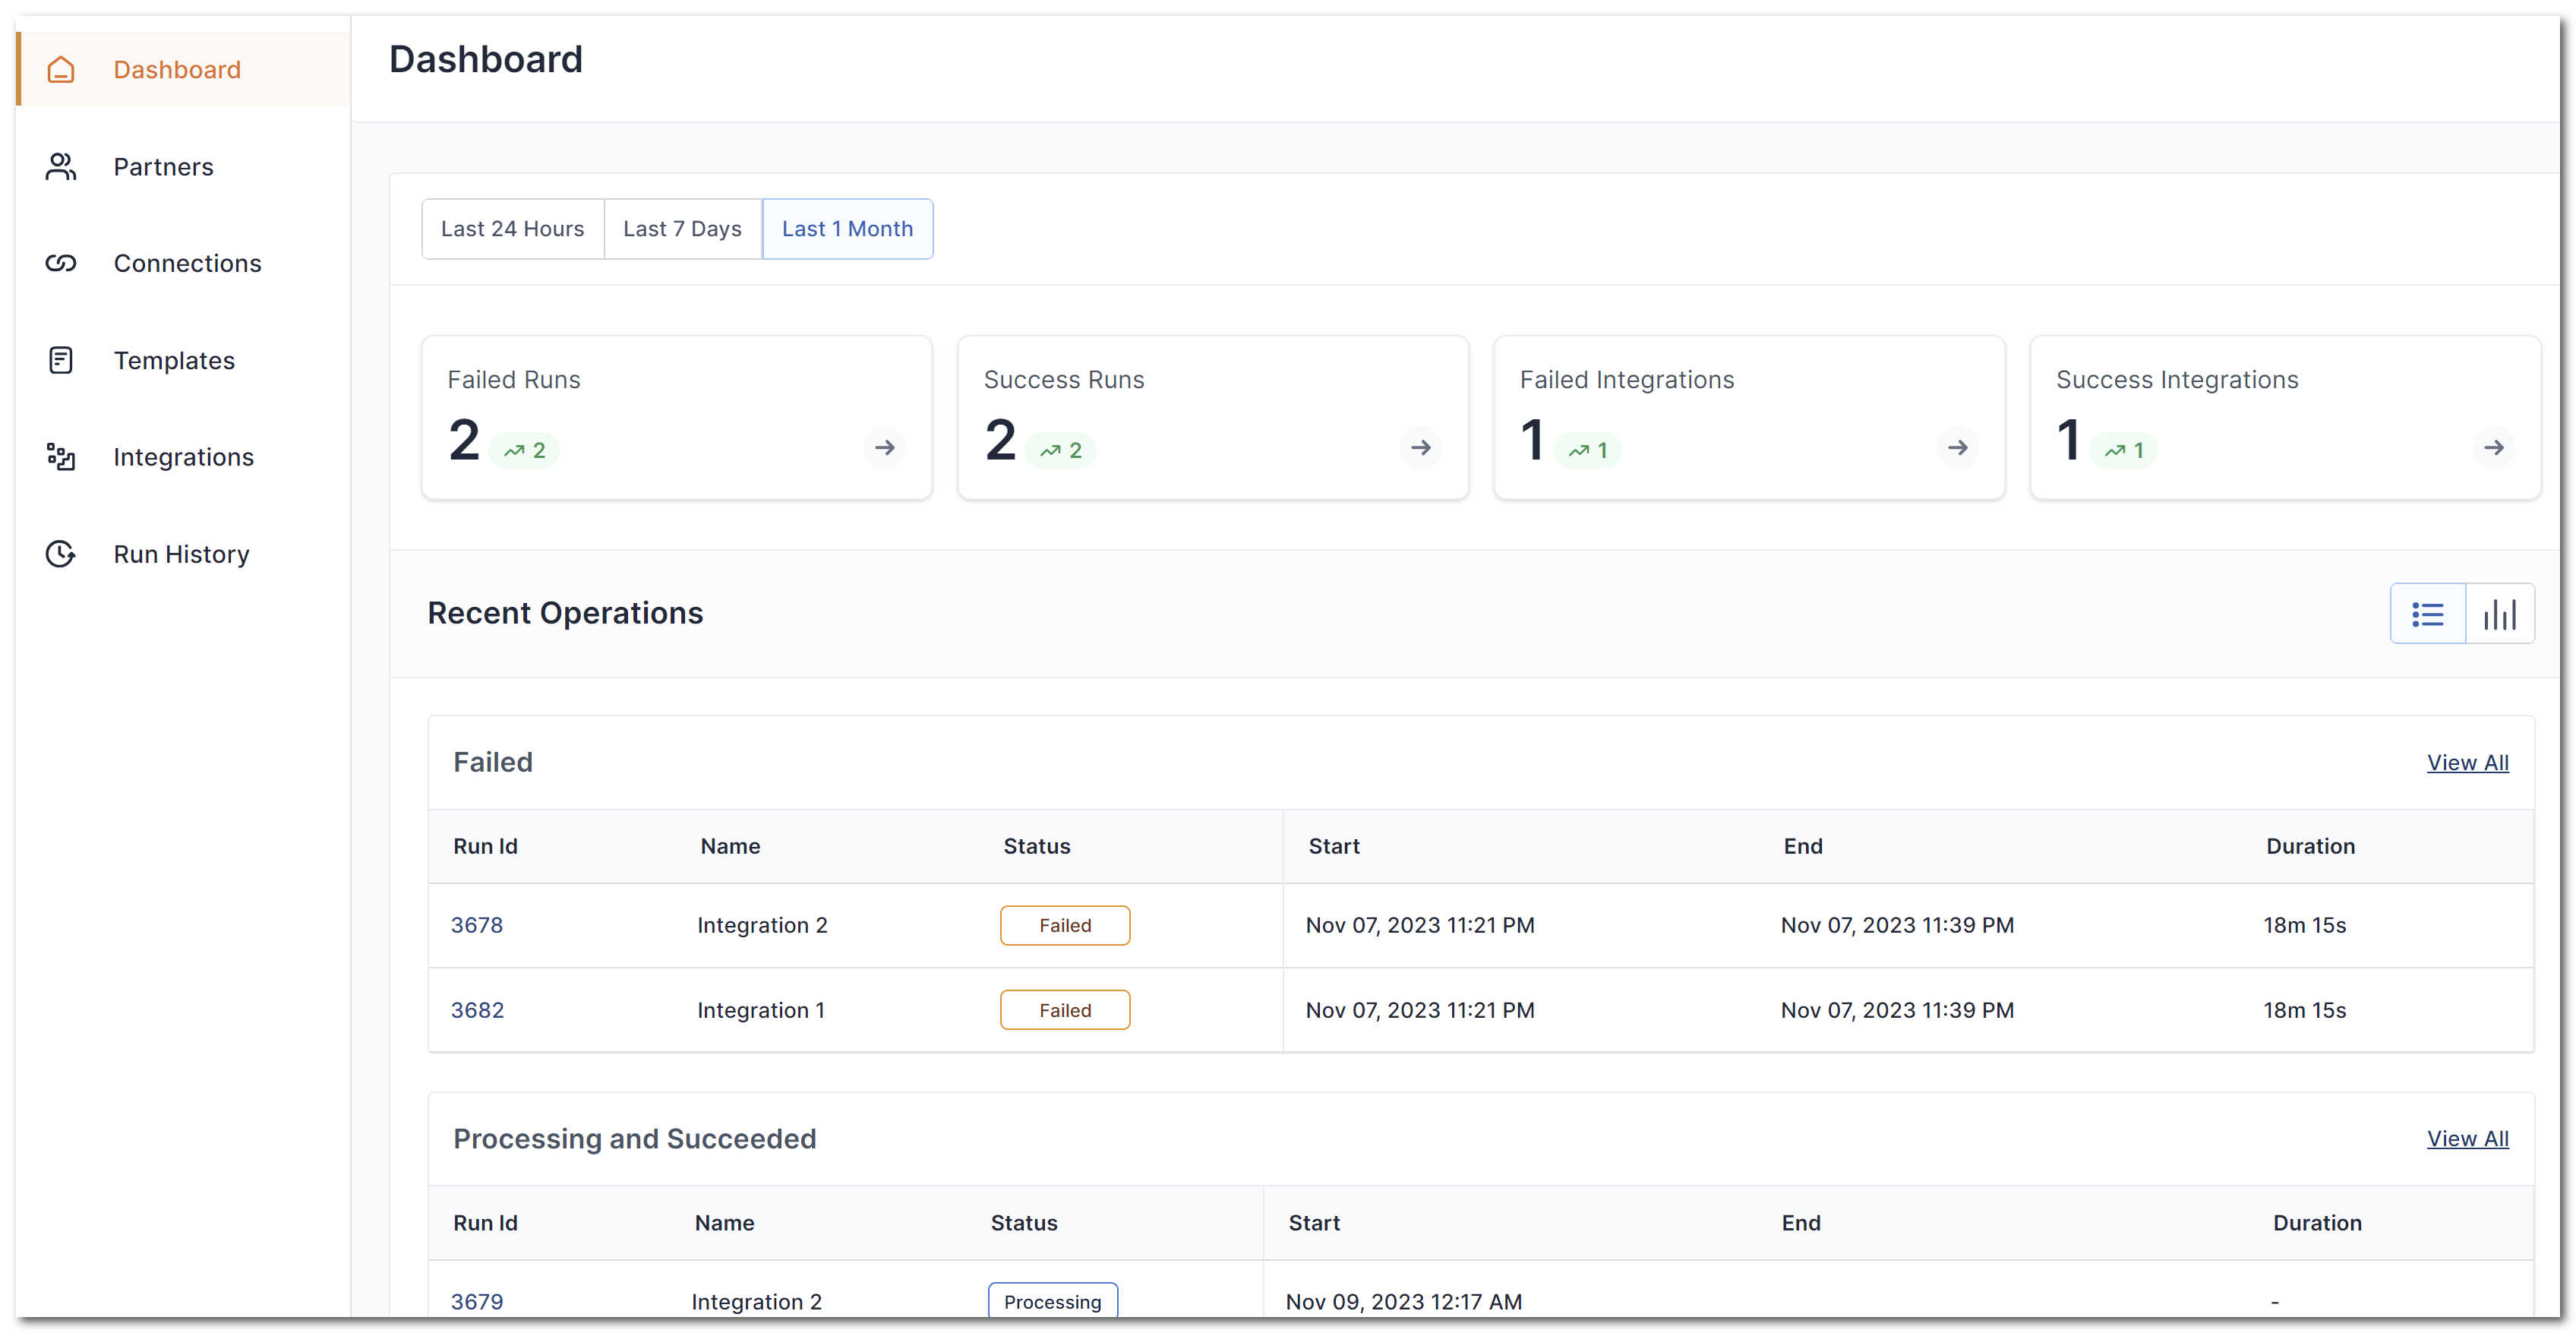 Figure 45. FeedXChange Operations Dashboard
The dashboard allows looking at recent integration runs for:
- The past day
- The past week
- The past month
The dashboard provides basic metrics and trends for the integration runs:
- Failed Runs - number of runs that failed to complete successfully.
- Success Runs - number of runs that completed successfully.
- Failed integration - number of integration that failed to complete successfully.
- Success integration - number of integration that completed successfully.
The dashboard also provides a list of the integration that have failed the most recently. Click the Run Id for a failed integration to navigate to Run History and look at the details of the failed run.
The dashboard also provides a list of the integration that have succeeded or are currently running. Click the Run Id for a successful integration to navigate to Run History and view run details.
Run History
The Run History is a list of all integration runs:
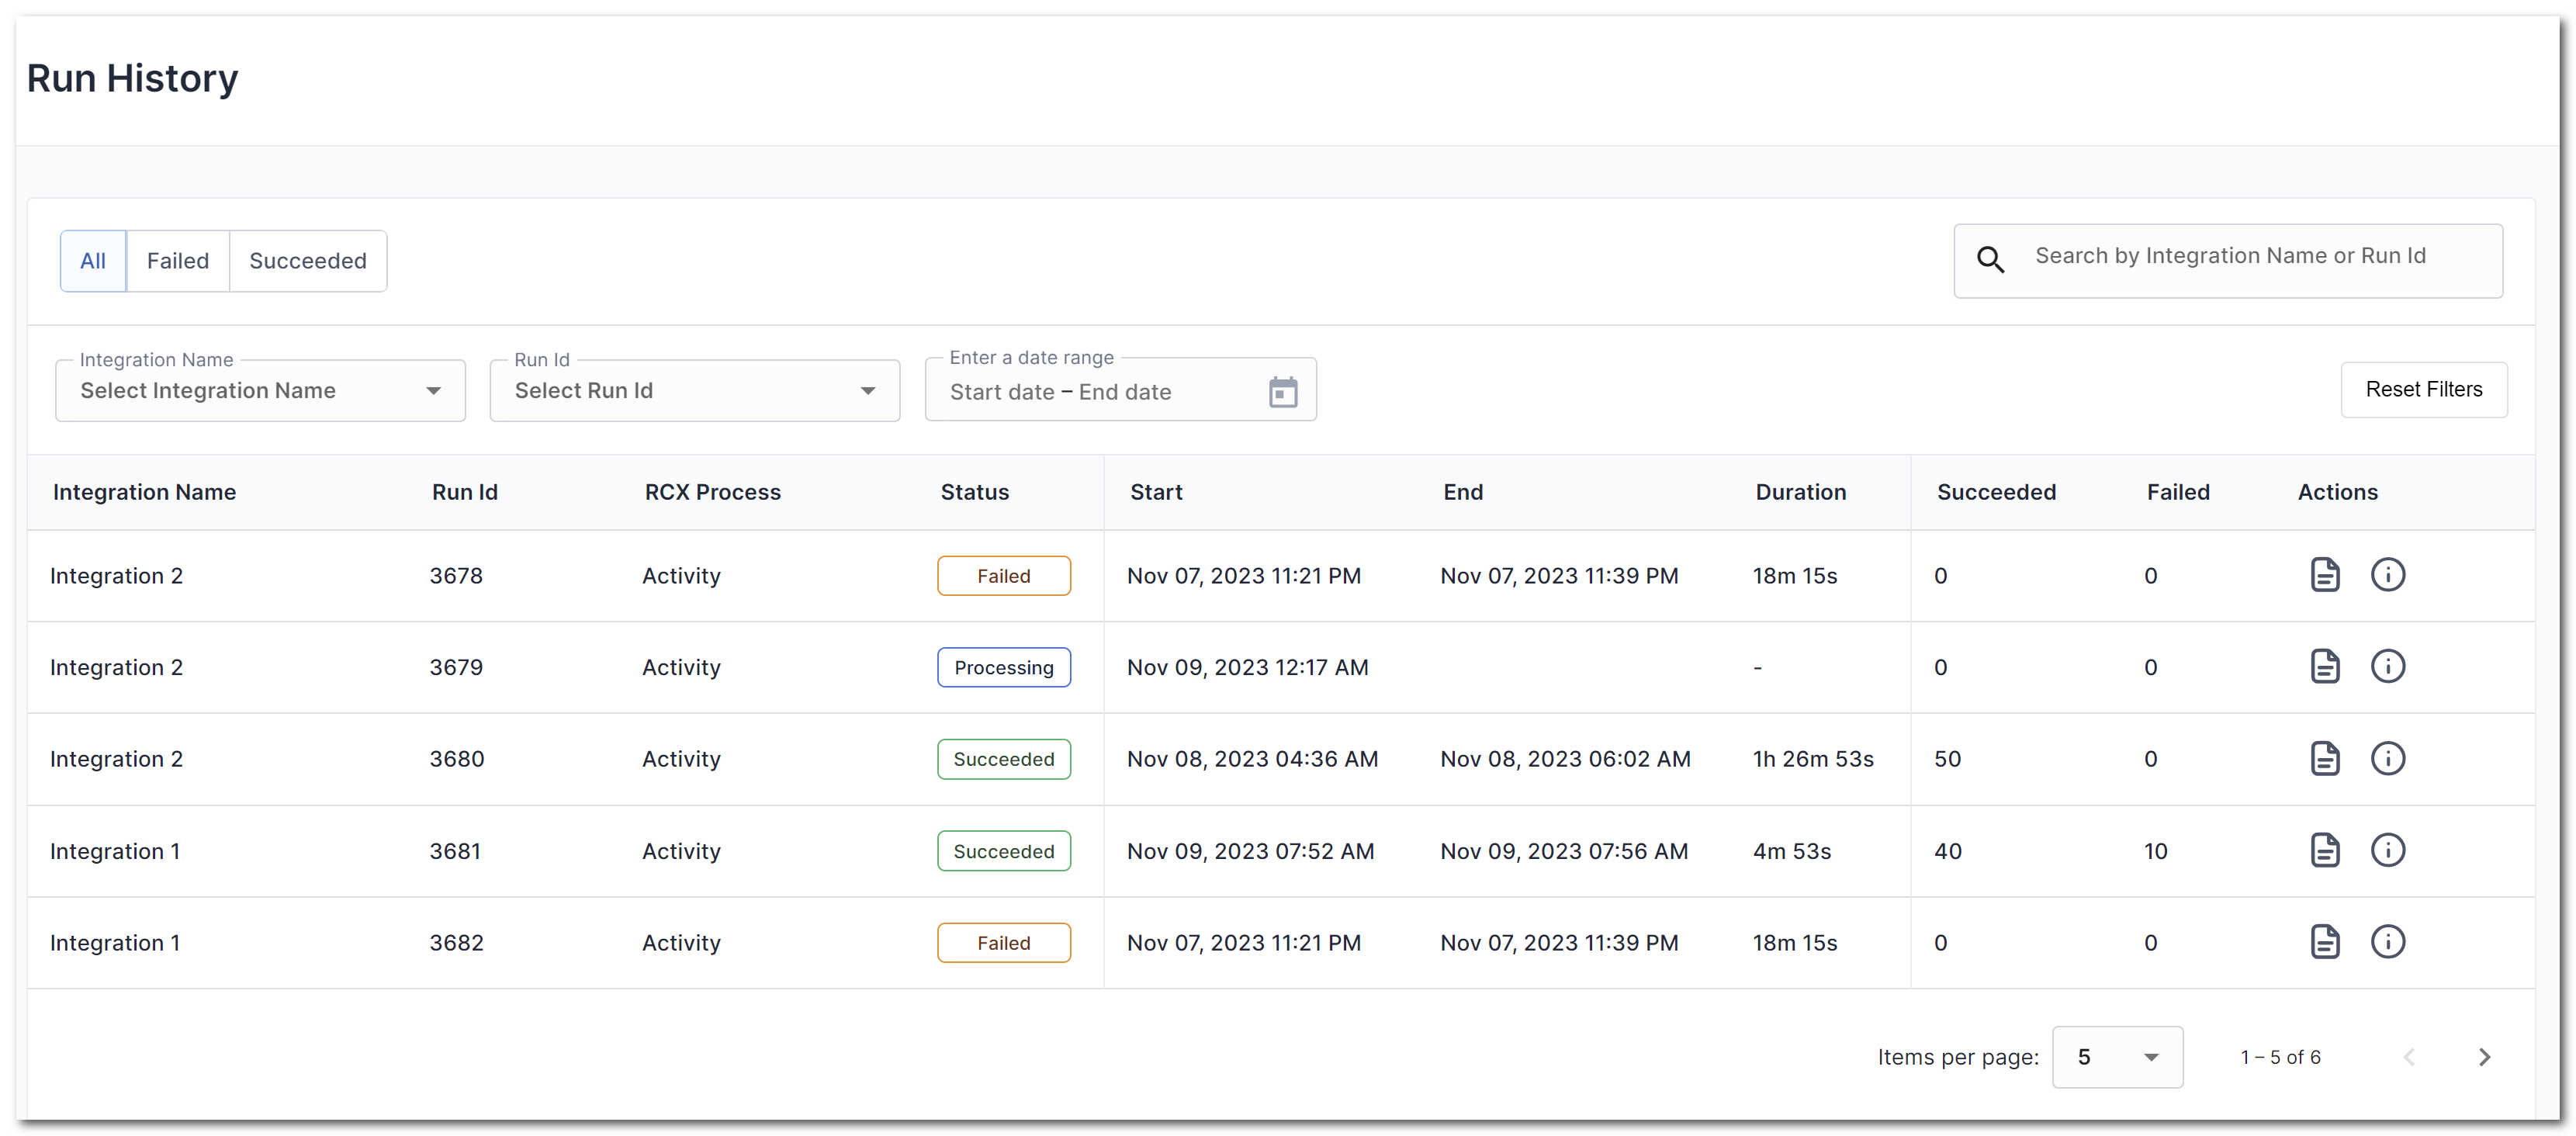 Figure 46. Run History
Filters can be set by status, run ID, integration name, and for a date range.
The following operations are available for each run via the Action Buttons at the end of each row:
| Button | Description |
|---|---|
 |
View Run Logs |
 |
View Run Details |
Viewing Run Logs
The run logs provide detailed information about the run, which can be used to troubleshoot any issues that may have occurred. You have a quick search option in the dialog box, or you can use Download to analyze with other tools and log viewers.
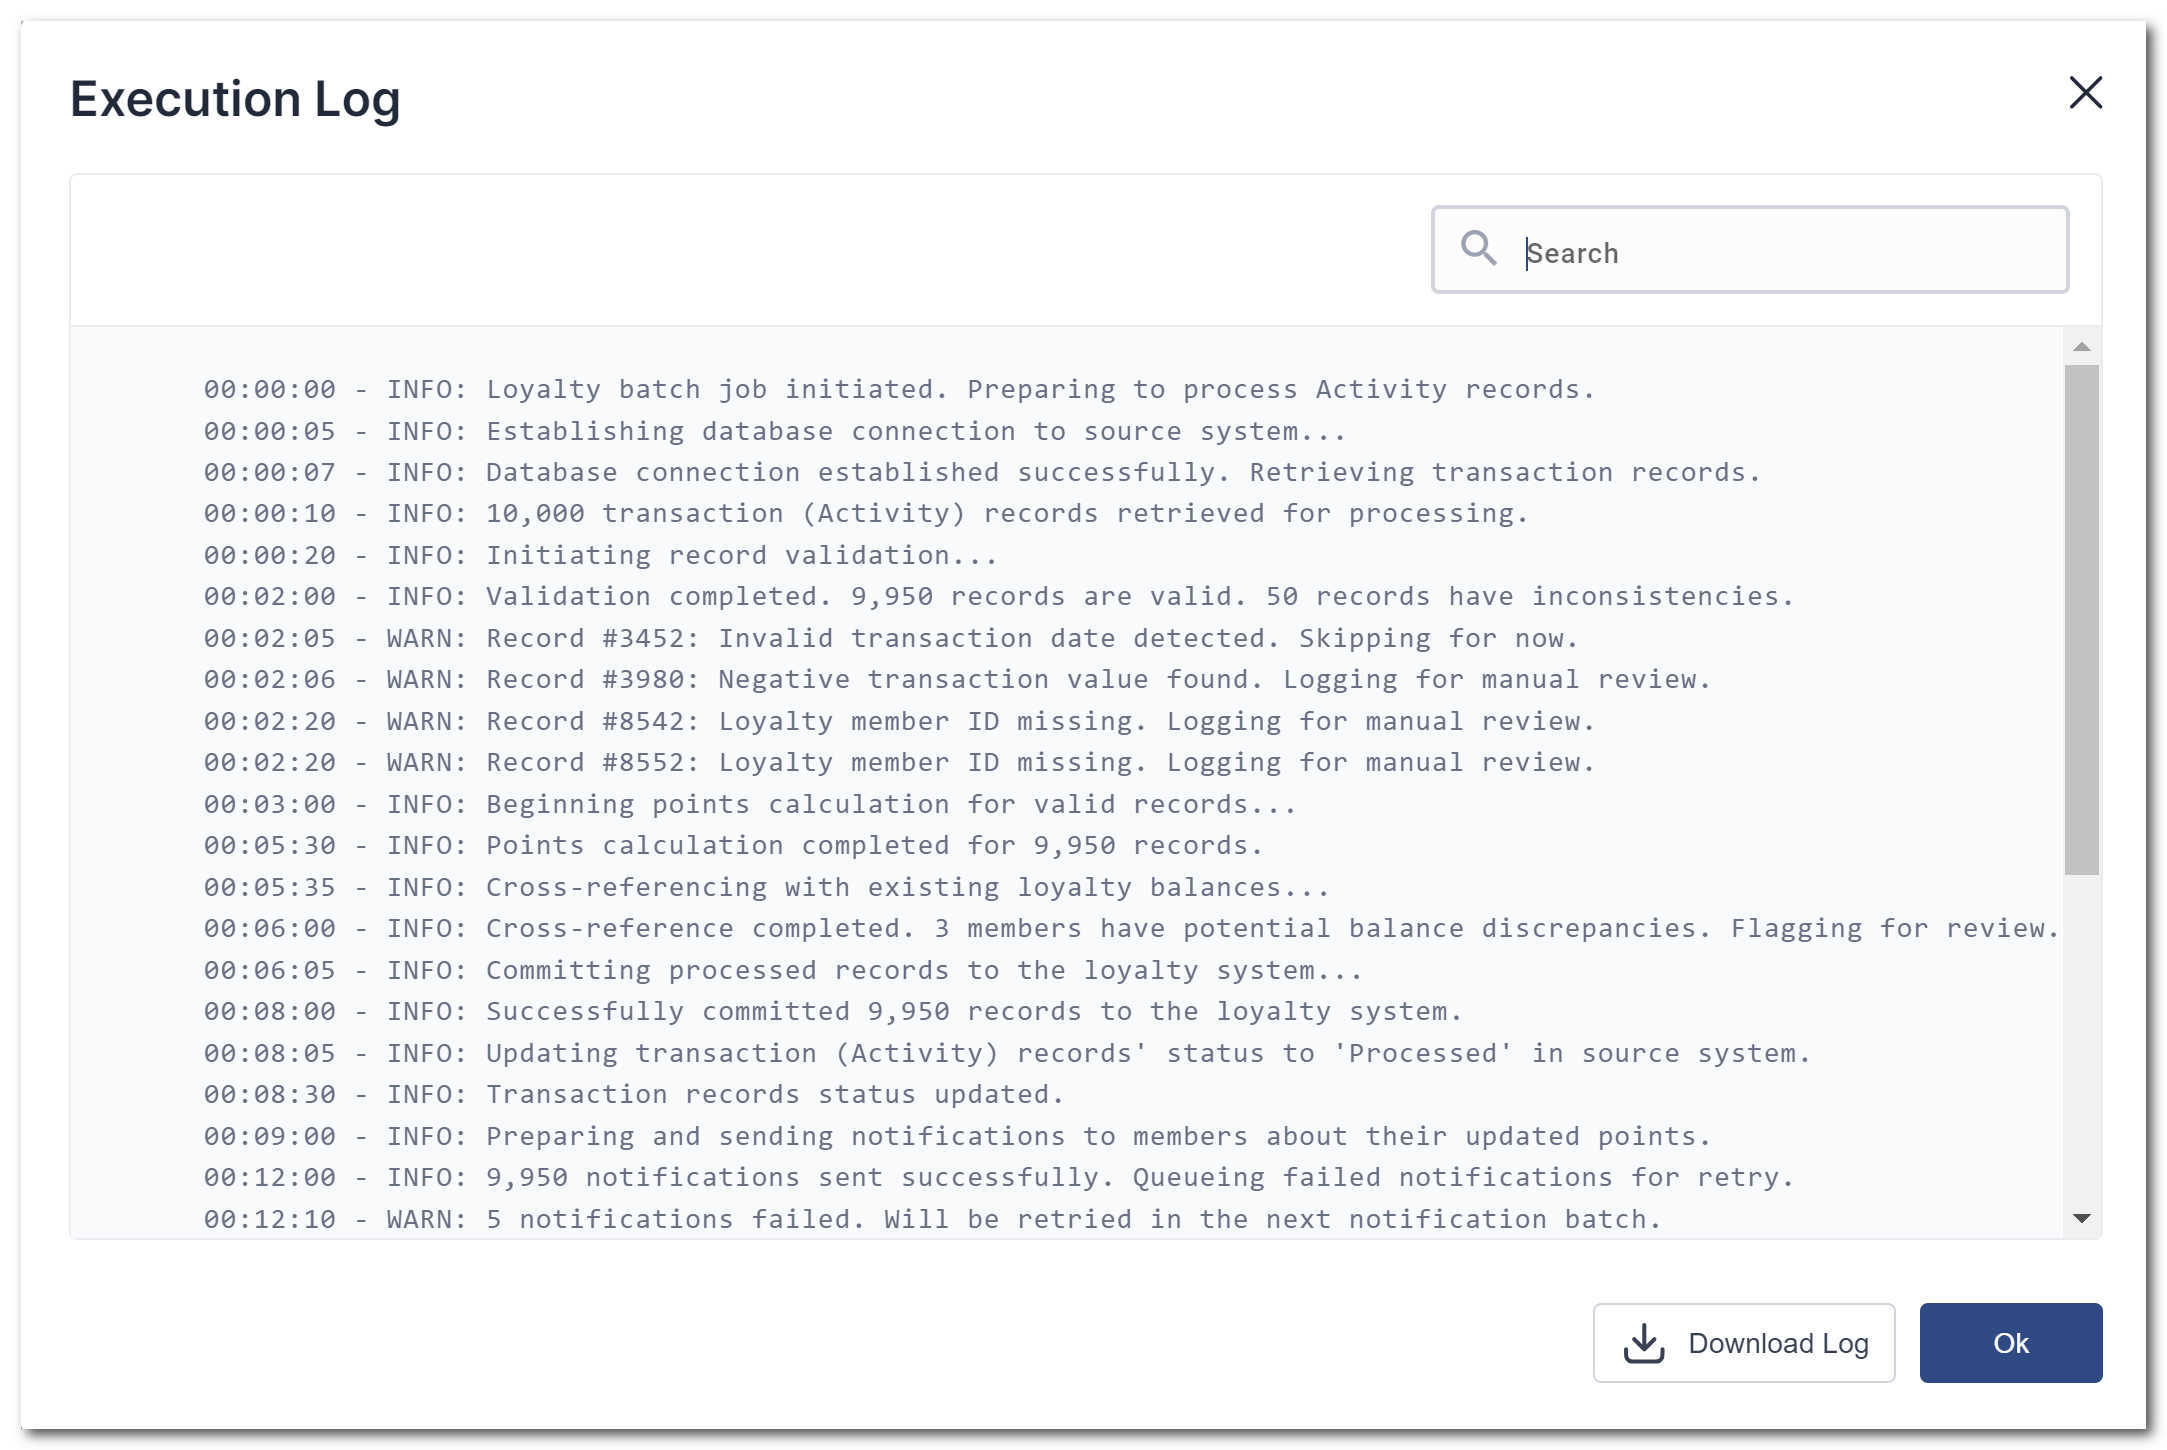
Figure 47. Run Logs
Viewing Run Details
Run details allows easy access to the Input and Response files, as well as the Run Id and associated integration Name.
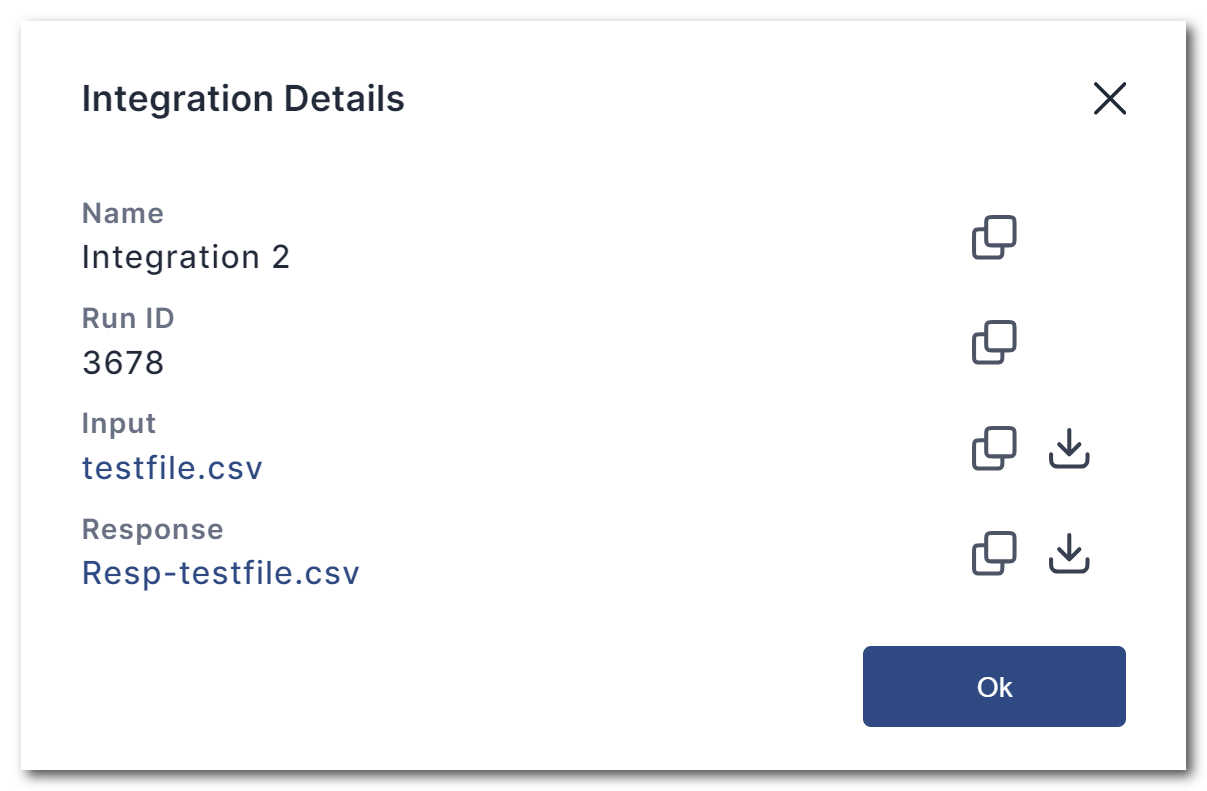
Figure 48. Run Details