ReactorCX Member Management Guide
Welcome to ReactorCX (RCX) Member Management. In this guide you learn how to inspect member and activity details, as well as perform administrative changes such as executing manual transactions, tier upgrades, and others.
Member Search
The Member List View in the home screen of ReactorCX you are able to search multiple different ways.
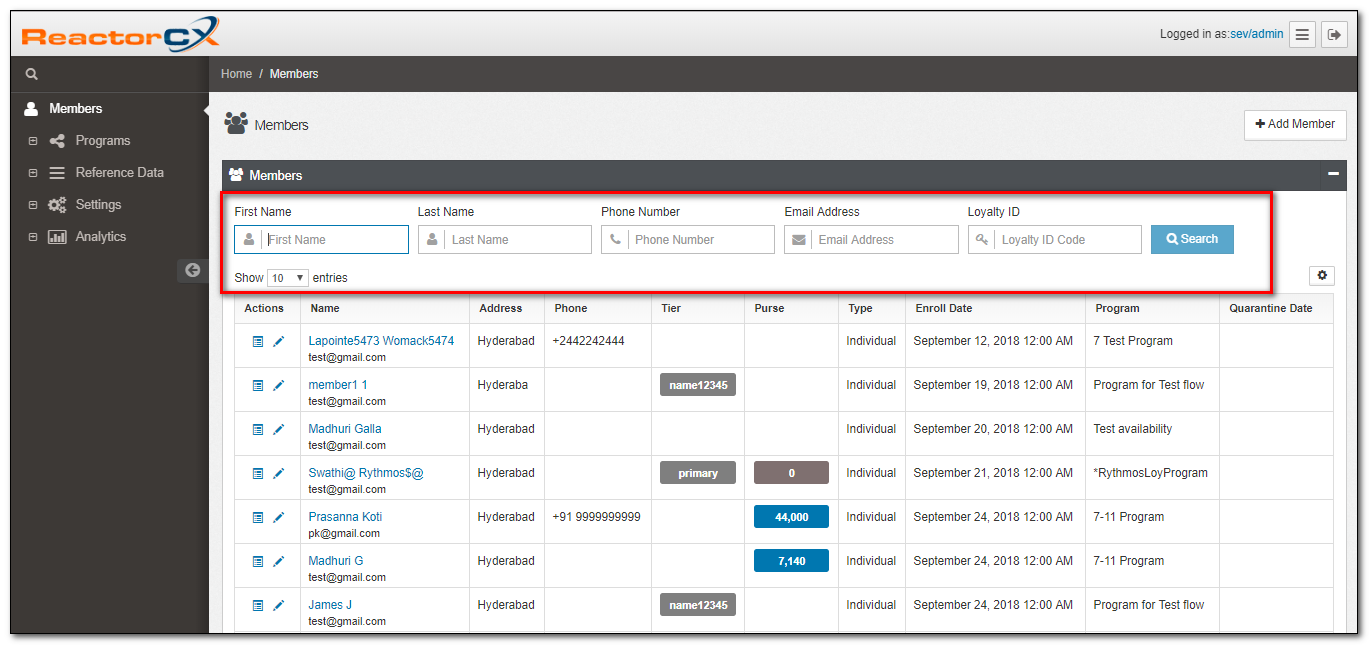
Figure 1. Member List View*
Supported Search Types
These search types allows you to search by typing in the value in the search box:
- First Name: enter the first name of the member you are trying to locate. For example,
fname:John - Last Name: enter the last name of the member you are trying to locate. For example,
lname:Smith - Phone Number: type the phone number of the member you are trying to locate. For example,
pn:9855544400 - Email Address: type the email id of the member you are trying to locate. For example,
email id:John.J@gmail.com - Loyalty Id: type the Loyalty ID of the member you are trying to locate. For example,
id:2062346816
If you want to search by multiple fields, only these searches are allowed:
- First name + Last name + Phone number
- Last number + Phone number
- First name + Last name
- Phone number
- Loyalty ID
- Email Address
Note
The Search is disabled unless one of these valid combinations is specified.
Enrolling New Members
Typically, new members enroll in a program through POS, mobile, or web channels. However, if these options aren't available, new members can be added to ReactorCX through the Member Management Portal.
To add a new member:
1.Click the Add Member button located at the top-right corner of the screen.
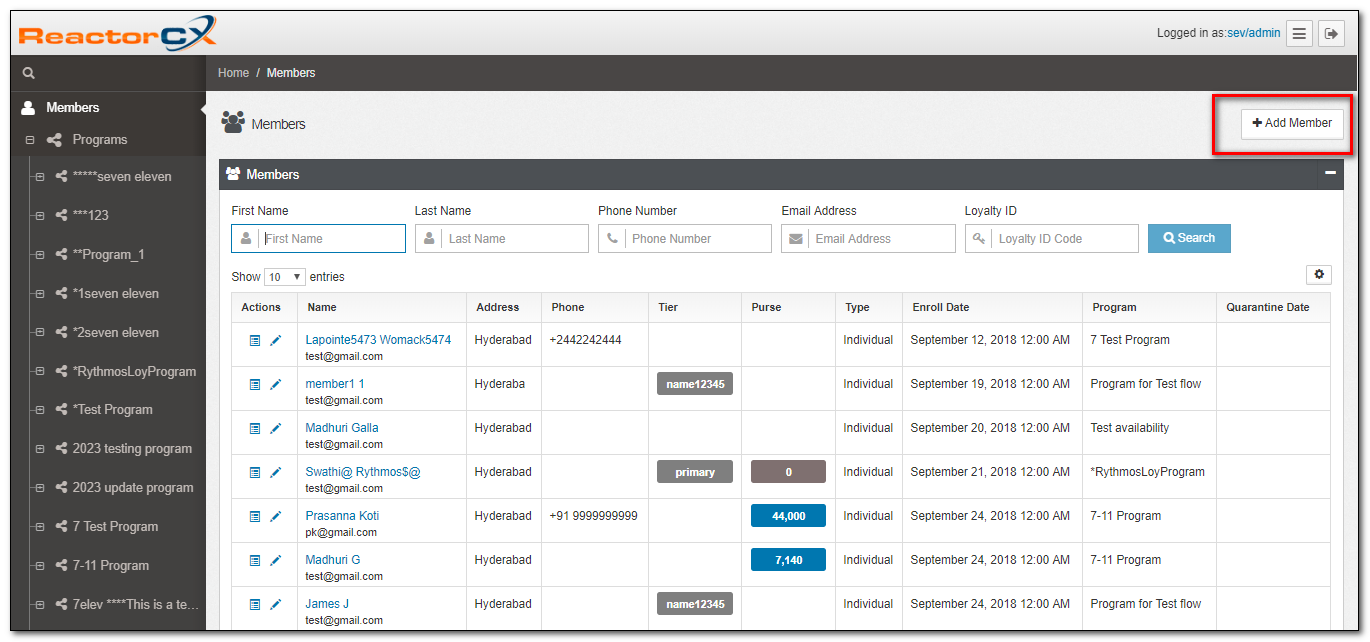
Figure 2. Add Member View*
2.Member dialog box is opened.
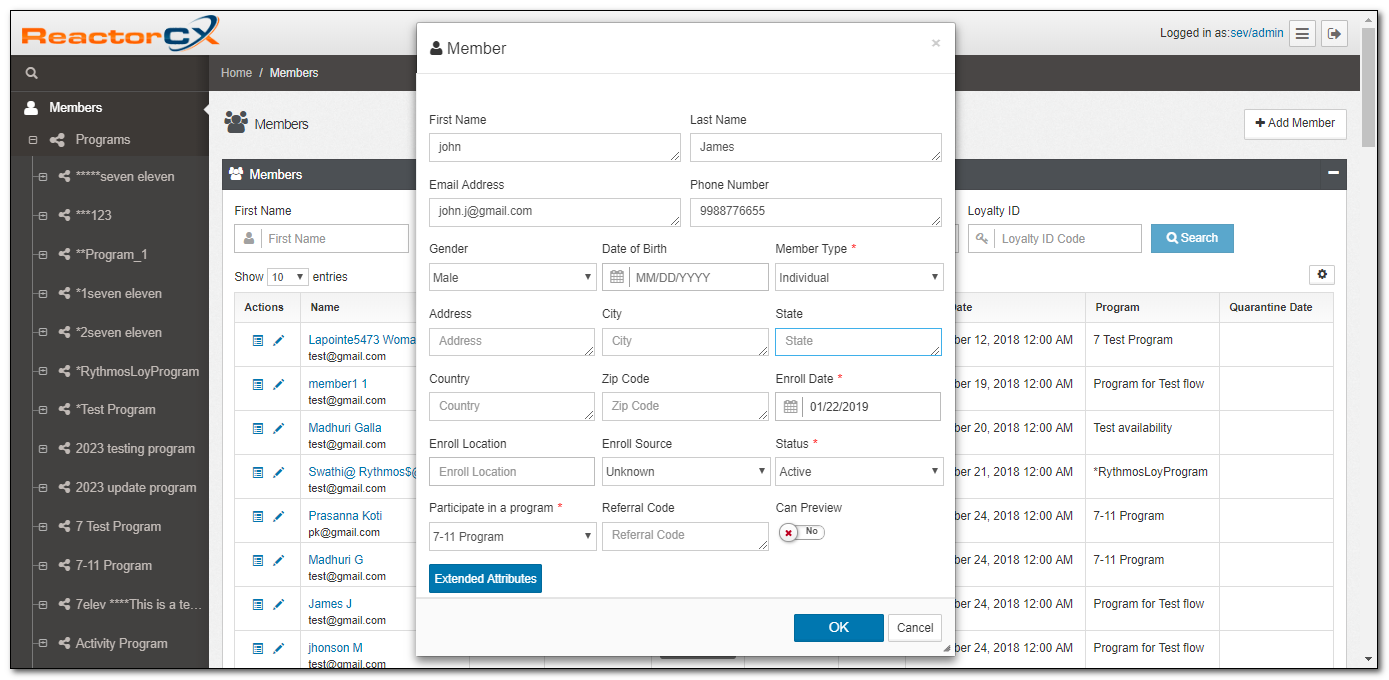
Figure 3. Member Dialog Box*
3.Enter a search string or combination of characters that are required. The search string could be the data in any of the attributes in members reference data. These are the most common attributes used to search:
- First Name, Last Name
- Phone Number
- Email Address
- Gender
- Date Of Birth
- City, State, Country
- Zip Code, and others.
Note
Comma-separated values, searches multiple records at once.
4.Click OK/Cancel to confirm or discard your changes.
Editing Member Details
You can edit member details from the Member List View by clicking on the Edit Action Button (little pencil icon) in the Actions column of the list, for the member which you want to edit.
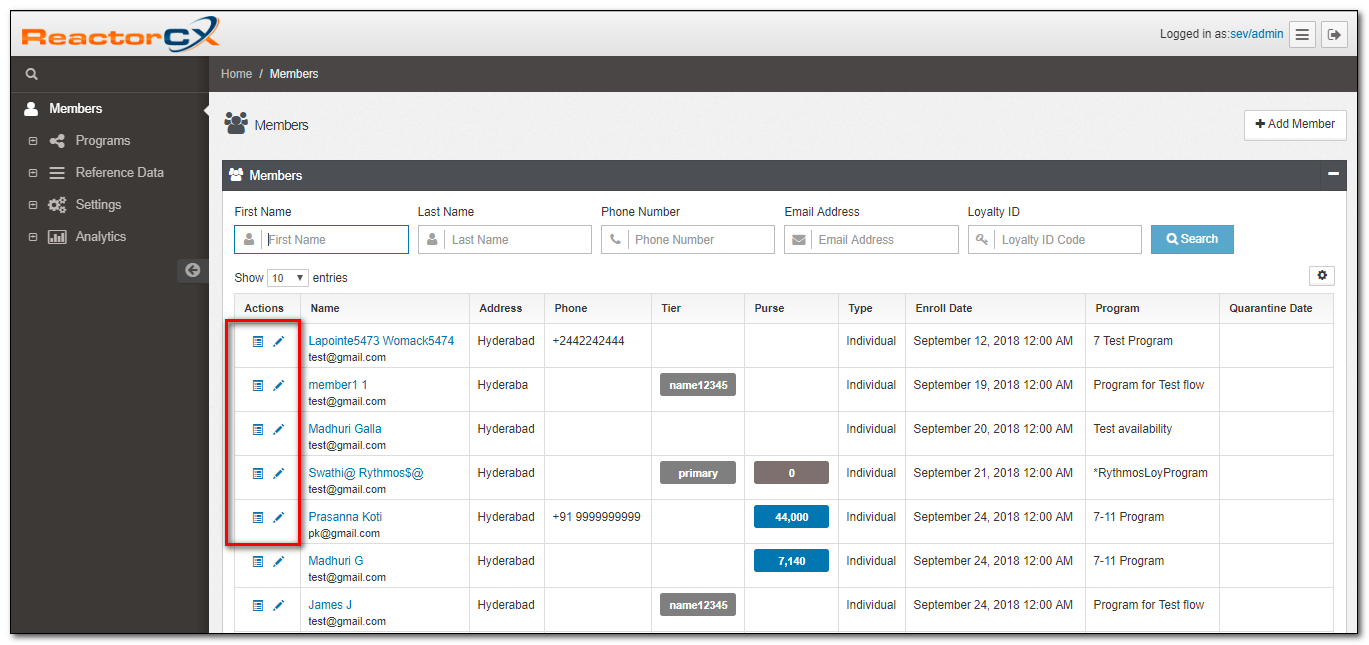
Figure 4. Edit Member's Details*
You can also edit member details from the Member Detail View once you drill-down into a specific member.
Drill-down to Member Details
To view a detailed set of member information, you need to drill down into the member record. The application includes multiple ways to do that:
- Click the Details Action Button in the
Actionscolumn of the list, for the member which you want to drill down into.
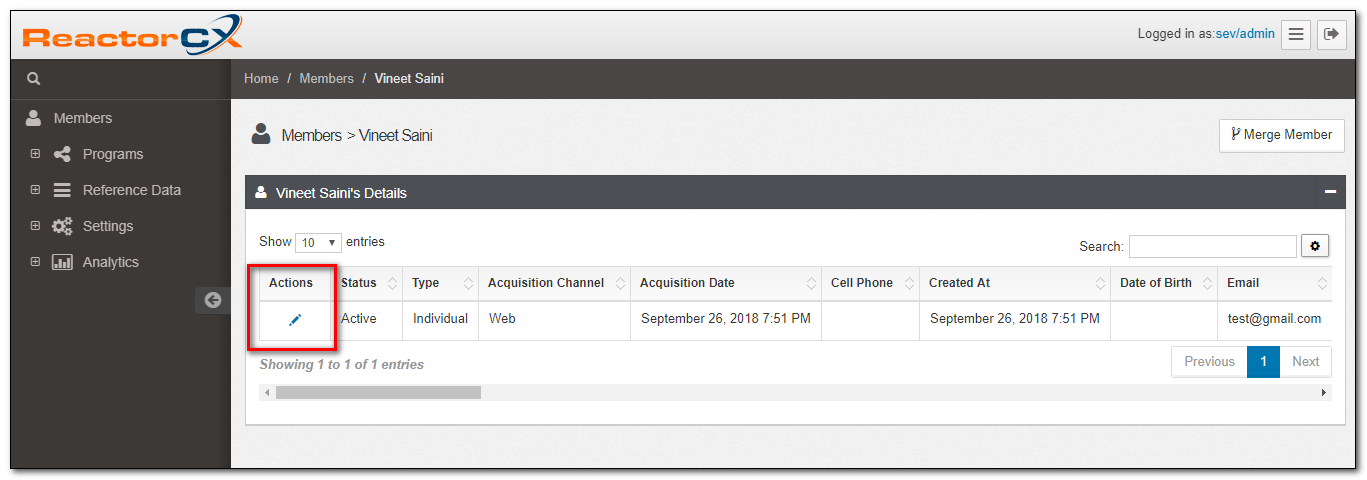
Figure 5. Edit in Member Details*
- Click anywhere on the actual member record in the Member List view.
Note
If you click the Tier or Purse column, you are taken to the Tiers/Purses tab, respectively, when you get to the Member Detail View.
Member Detail View
The Member Detail View has all the data available for a Member, it also allows for editing the information.
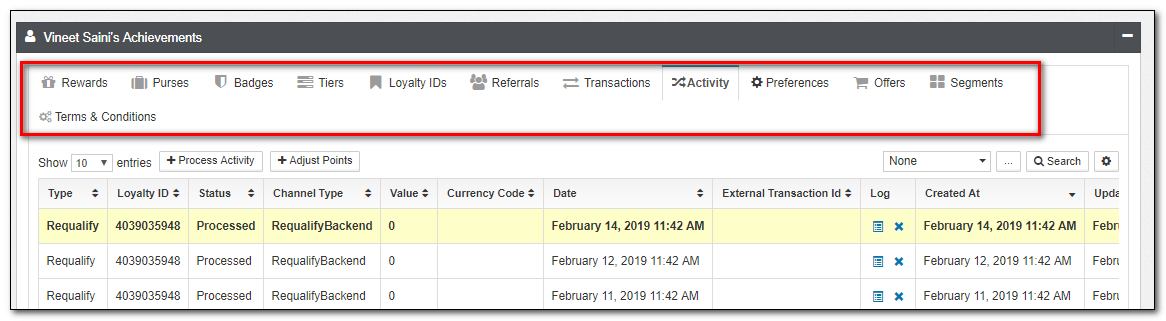
Figure 6. Member Detail View
The following categories of information are available through the tabbed views as shown in Figure 6:
| Category | Description |
|---|---|
| Rewards | This a list of member Rewards, expiration status, and uses left. Rewards can manually be edited from this view. |
| Purses | A list of all purses, including available balances, expired points, escrow, and expiration information, is visible here. Purses are accounting objects; therefore, they can't be directly altered here. Enter an activity within the Activities tab to change a purse. |
| Badges | This is a list of any badges earned through the program. Badges can be edited from this view. |
| Tiers | This is a list of Tiers, as well as their associated current level. You can upgrade/downgrade tiers from this view. Tier history is also shown in this view, indicating when tiers changed. |
| Loyalty IDs | The list of all Loyalty IDs associated with a member, such as cards, alternate IDs such as phone numbers, and others. The Loyalty IDs can be edited from this view. |
| Referrals | This is a list of all referrals and their fulfillment status. Referrals can be edited from this view, although in most cases they're done via mobile or web channels. |
| Transactions | This is a list of all transactions performed by this member, including ticket line item detail and tender information. This view doesn't allow editing, as transactions are immutable. |
| Activity | This is an alternate view of transactions, with a focus on loyalty activity such as accruals and redemptions. While you can't directly modify activities, you can submit new activities from this view. |
| Preferences | This is a list of preferences for a member. Preferences can be edited from this view. |
| Offers | This is a list of member Offers, expiration status, as well as uses left. Offers can manually be edited from this view. |
| Segments | This is a list of the segment to which a member currently belongs. Segments can be manually edited from this view. |
| Terms and Conditions | This is a list of Terms and Conditions for a member. Terms and Conditions can be edited from this view. |
Manual Activity Processing
Entering activities manually is possible to address missing credit. To enter a new Activity:
1.Navigate to Members>Activity>Process Activity.
2.Enter the required fields as described in the table below.
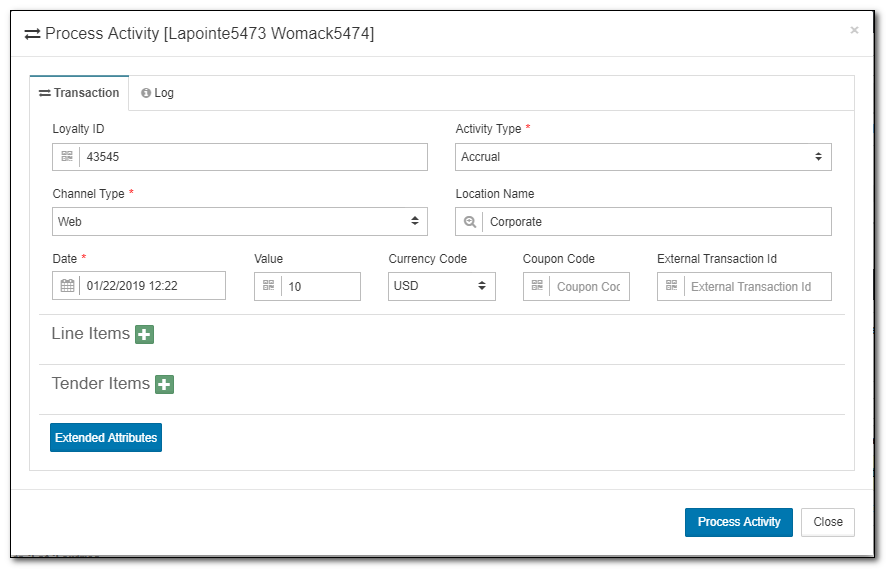
Figure 7. Process Activity Window
The fields required for successfully processing an activity are as follows:
| Field | Description |
|---|---|
| Loyalty ID | The default is the primary Loyalty ID for the member. If the member doesn't have a registered Loyalty ID, the field can be left blank, and the transaction still associates with the member. |
| Type | For missing credit, this must be Accrual or any specific type that your administrator has set up for this type of transaction. |
| Channel Type | Must be set to Staff for manually entered activities. |
| Date | Set this to the date when the transaction occurred. This may not be the current date and affect what promotions are/were effective at this date. |
| Line Items | Your administrator may setup a special Product that's used to provide missing credit. Please ensure you have selected the correct product if this is the case. |
| Value | The activity value must be according to the missing credit value you are trying to award. |
| Currency Code | Select the required currency code. |
| Coupon Code | Enter the reward or offer coupon code if any. |
| External Transaction ID | The transaction activity that isn't recorded within the application. Process activity done from external sources generates the Transaction ID. |
| Line Items | Your administrator may set up a special product that's used to provide missing credit. Please ensure you have selected the correct product if this is the case. |
| Tender Items | Select the mode of payment and enter the value of the activity performed. |
Note
This description is fairly general, because it's possible to set up the program differently. Please consult your system administrator for more details on how to enter the correct information in this dialog box.
Understanding Activity History
One of the most important aspects of viewing member details is to understand how transactions have resulted in earn/burn of rewards.
Viewing Activity Accruals
To understand what promotions were triggered for a specific activity, you can view the Accruals Applet:
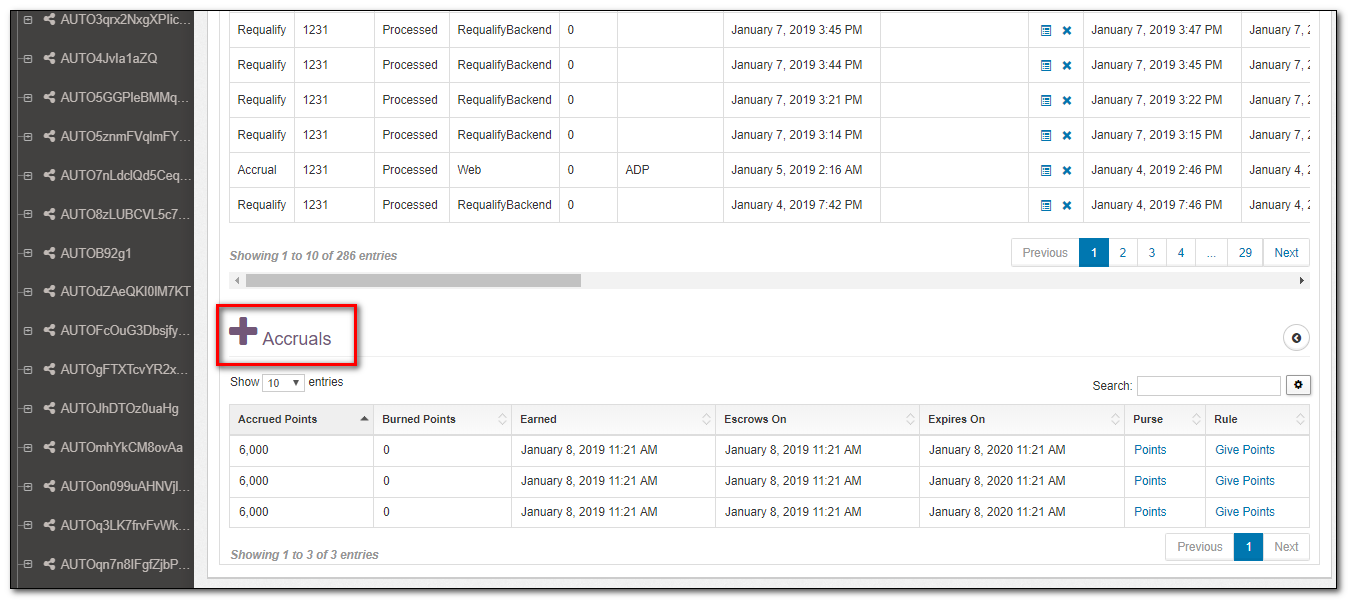
Figure 8. Activity Accruals
Hint
To expand the Accruals applet to the right, use expansion as shown in Figure 3.
For each activity, the Accruals applet shows what promotions (rules) were triggered in the Loyalty Engine. For each such promotion, you are able to see:
| Field | Description |
|---|---|
| Accrued Points | The number of points awarded for this particular promotion. |
| Burned Points | If a redemption has happened and some or all of the points in this accrual have been redeemed, then you see the number of points taken from this specific accrual in this field. |
| Earned | The date when the points were earned. |
| Escrows On | If the Loyalty Program has been configured to have an escrow period, then this field has the date when this accrual is available for redemptions. |
| Expires On | If the Loyalty Program has been configured to have point expiration, then this field has the date when this accrual expires. |
| Purse | The purse where these points were accrued. |
| Rule | The name of the promotion which resulted in this accrual. |
Viewing Activity Redemptions
To understand what redemptions were triggered for a specific activity, you can view the Redemptions Applet:
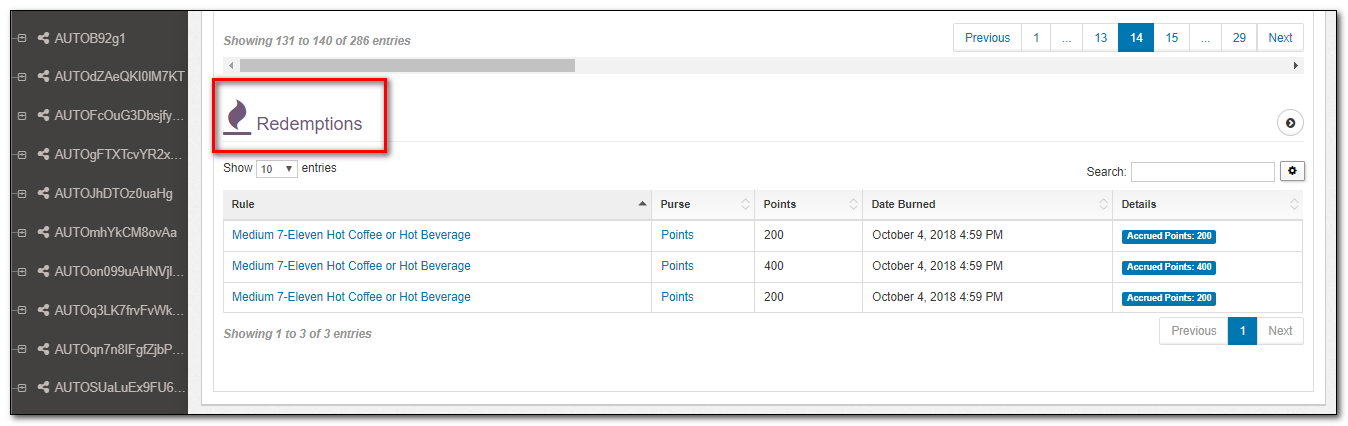
Figure 9. Activity Redemptions
Hint
To expand the Redemptions Applet to the left, use expansion as shown in Figure 3.
For each activity, the Redemptions applet shows what promotions (rules) were triggered in the Loyalty Engine. For each such promotion, you are able to see:
| Field | Description |
|---|---|
| Rule | The promotion (rule) which resulted in the redemption. |
| Purse | Which purse the points were deducted from. |
| Points | The number of points deducted from the purse for this redemption. |
| Date Burned | Shows the date the points deducted from the purse for this redemption. |
| Details | The balance of points earned in the Accrual from which this redemption is consuming points. |
Note
If a single activity requires points to be redeemed from multiple accruals, then you see one redemption for each accrual involved.
Adjustment Of Points
Points adjustments are made by the call center executives to alter the member purse balances manually for any transactions (process activities/activity history) that might have failed.
A rule with Conditions
- Activity.type equals to Adjustment
- Activity.couponCode equals to Purse Name
And Actions
- Add Points to Purse Name (Purse which needs points adjustments)
- Points value to Activity.value (Adjusted number of points)
Is required for the feature to work as intended.
1.Navigate to Members and select the member from the member list.
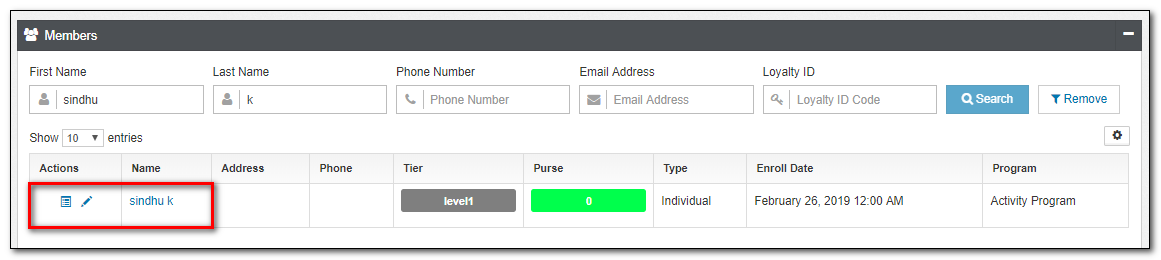
Figure 10. Members Tab
2.Click the Activity applet tab in members Achievements tab and then click Adjust Points command button to add the points to the defined Purse.
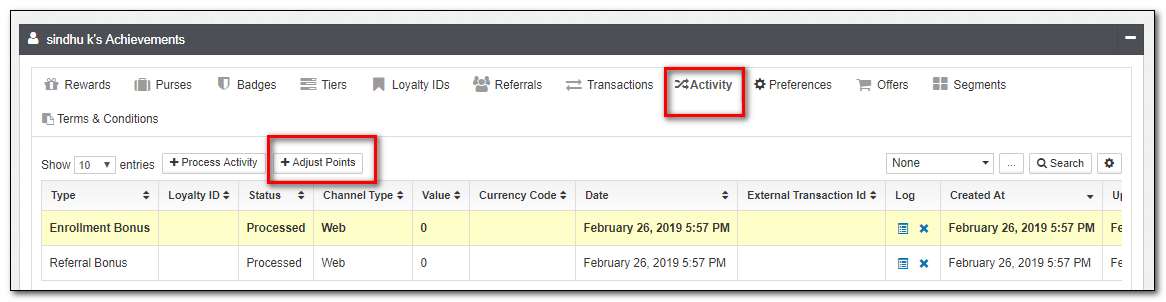
Figure 11. Members Details Window
3.Adjust Points dialog box is displayed.
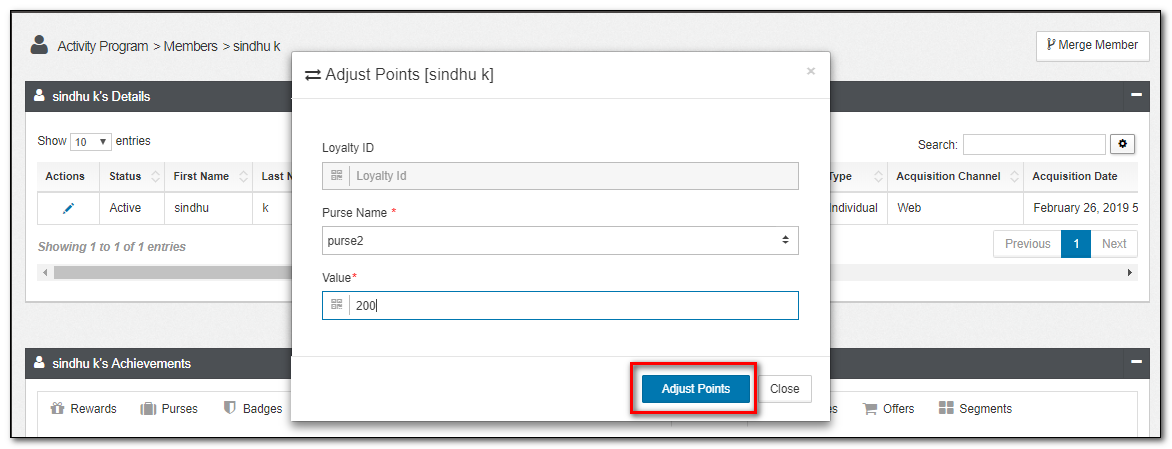
Figure 12. Adjust Points Dialog Box
4.Provide all the details as per the attributes mentioned above, and Click Adjust Points button.
-
Loyalty ID: Gets auto-populated by the primary loyalty ID of the member.
-
Purse Name: This is the drop-down to select the Purse name to which the points get added.
-
Value: Enter the number of points.
5.The Activity Applet tab shows the Adjustment type activity processed in the activity history.
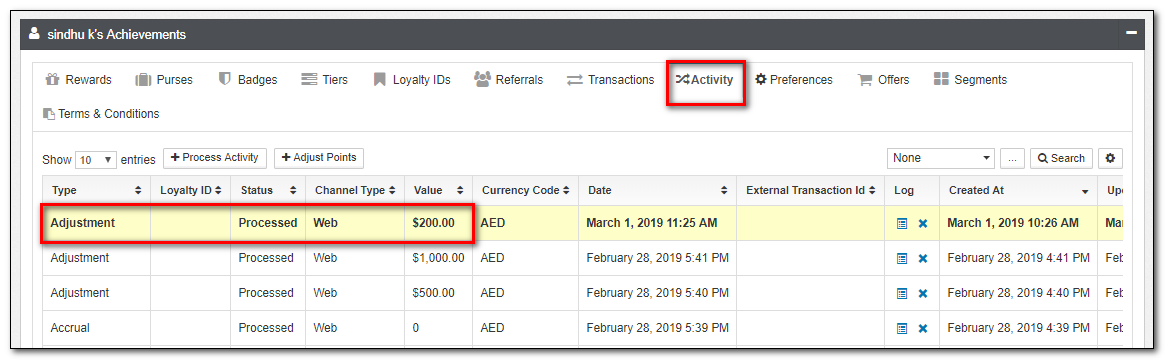
Figure 13. Adjustment Type Activity
6.Click the Purses Applet tab to check the points added to the purse selected in the Adjust Points dialogue box in the previous steps.
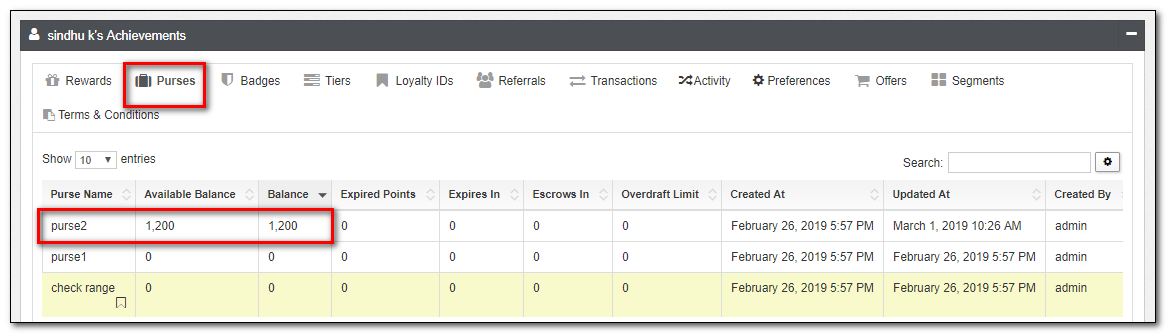
Figure 14. Points Added in Purses Tab
Member Rewards
To check the Rewards in Member's achievements:
1.Navigate to Members>Rewards to check the rewards added to the Member.
2.The Reward usage history shows which Reward got triggered as part of the selected actions in the Loyalty Engine.
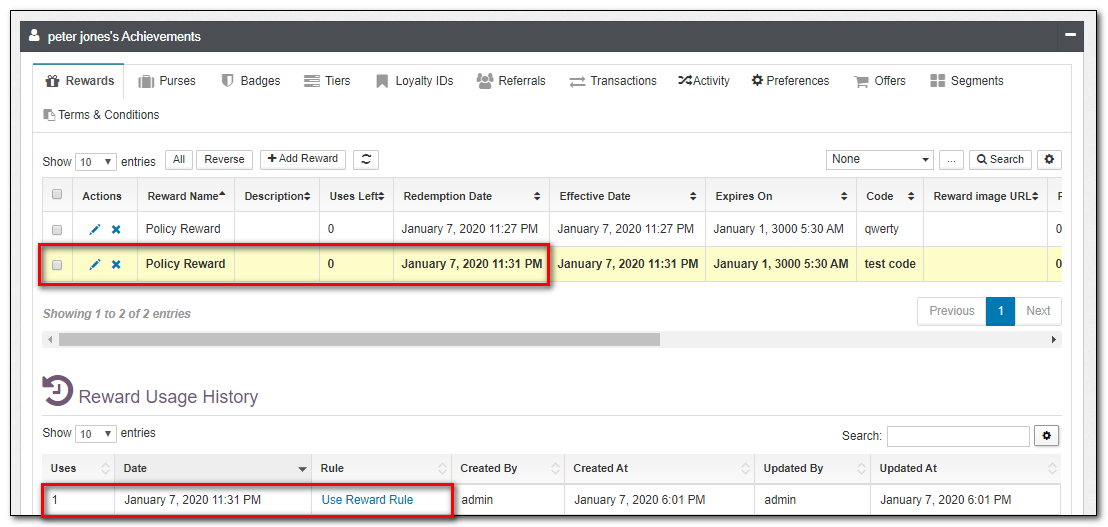
Figure 15. Rewards added to the Member
Requirements to add the Reward to the member and the Member able to use the reward, include the following:
-
A Reward policy and the member associated with the Reward policy.
-
Give Reward with low priority (smaller number), Use Reward rule with high priority (higher number) using the reward policy specified above.
Manual Tier Changes
Note
To change the Tiers manually the following are required:
-
A tier policy and the member associated with the tier policy.
-
Upgrade Tier, Downgrade Tier, Set Tier rules using the tier policy specified above.
To manually change the tier levels follow these steps:
1.Navigate to Members and select the member from the member list from the same program in which the tier policy is configured, and Rules added.
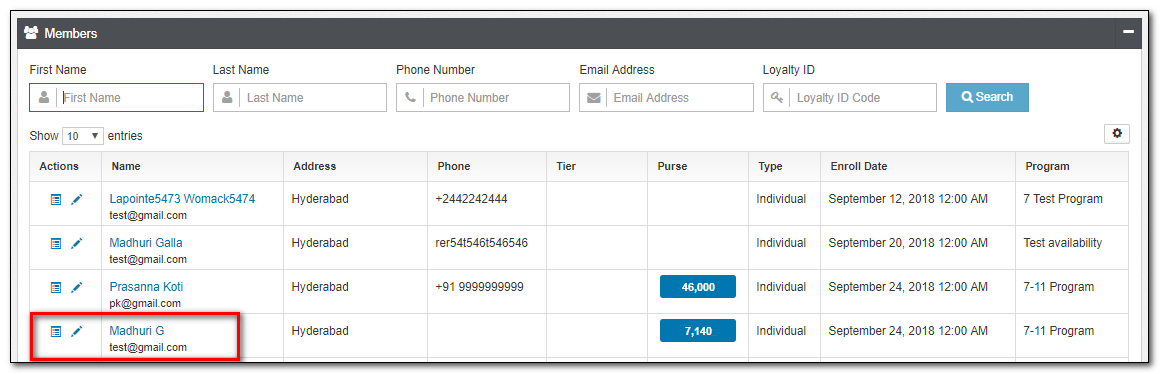
Figure 16. Members Tab
2.Click the Activity applet tab in the members' Achievements tab, and again click the Process Activity command button for manually processing the activity to trigger rules configured in Rules.
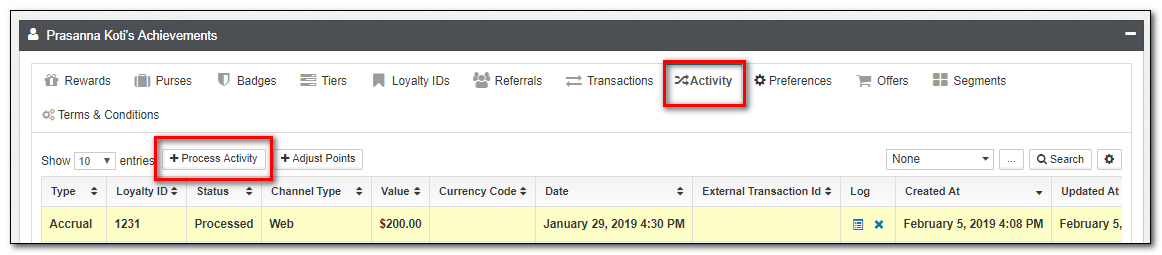
Figure 17. Members Details Window
3.Redirects to Process Activity page. Fill the fields required for successfully processing an activity. Refer Process Activity.
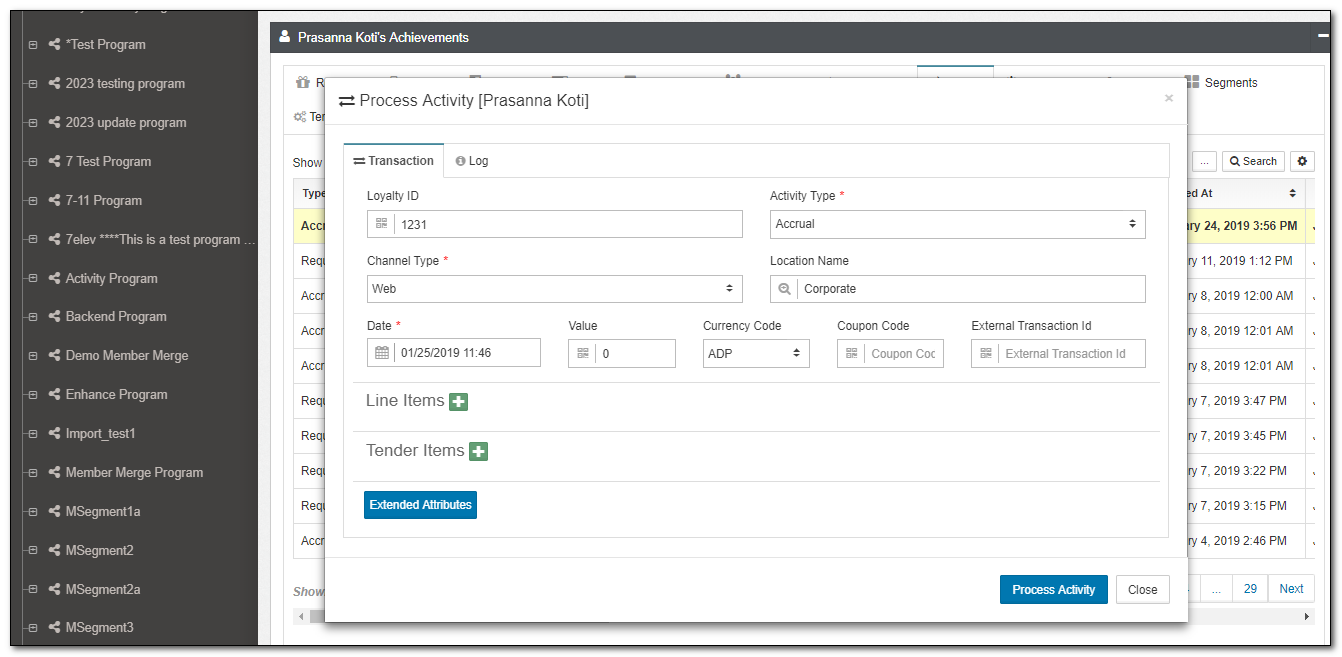
Figure 18. Process Activity Window
4.Process Activity dialog box is displayed with the confirmation of rule executed details.
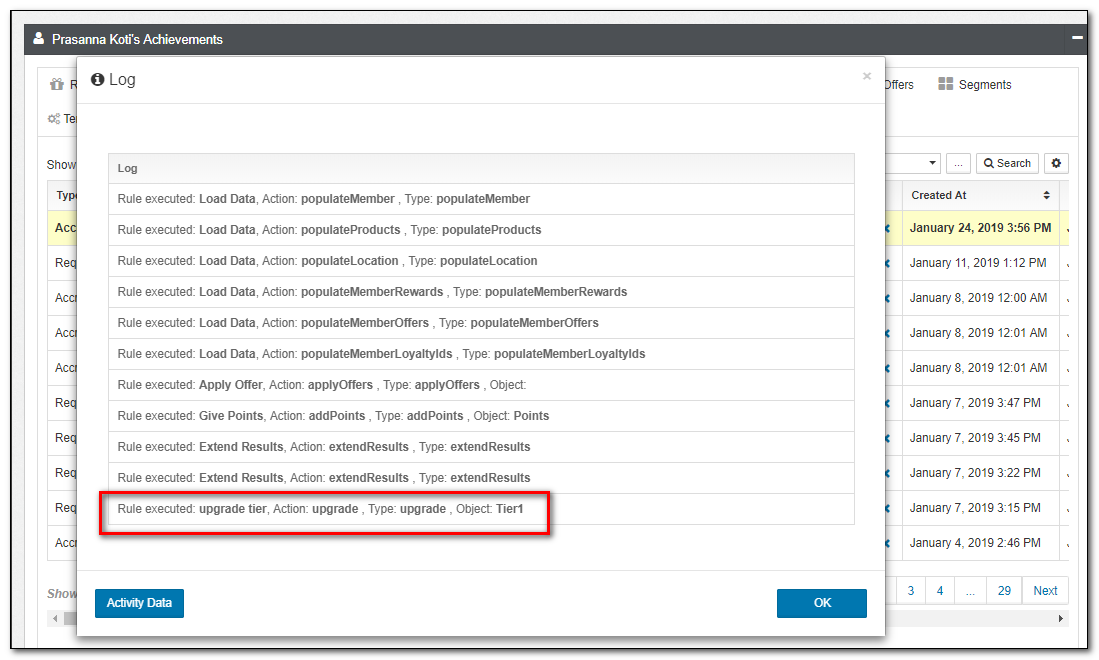
Figure 19. Process Activity Log Window
5.Click the Tiers applet tab to check the upgraded level and click the upgrade/Downgrade record action buttons under the actions field to change the Tiers level manually from this view. Tier history is also shown here, indicating when tiers changed.
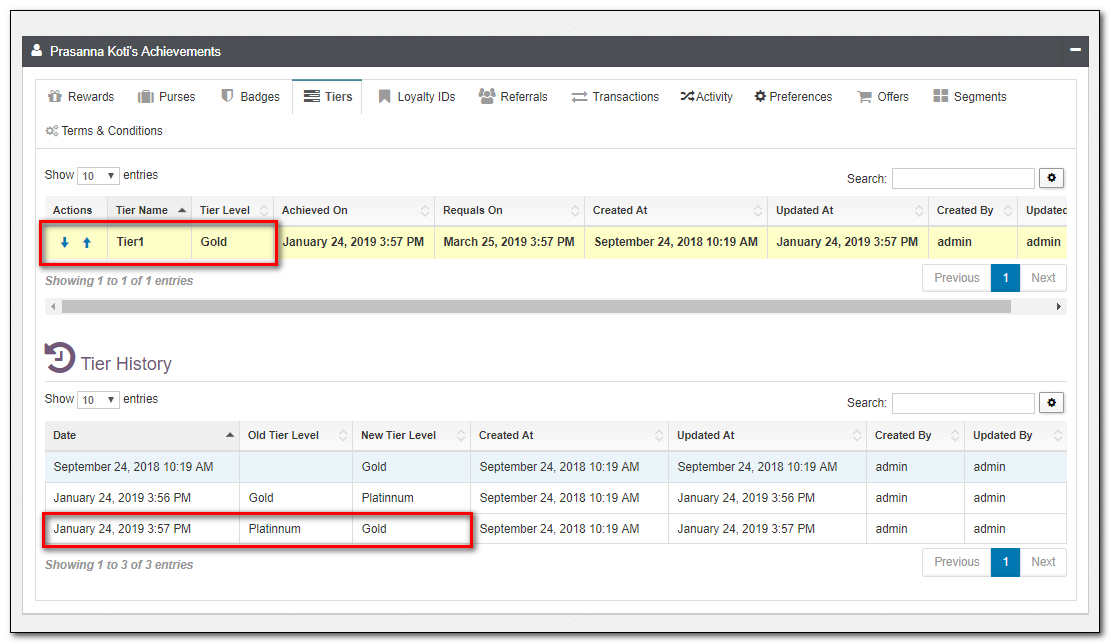
Figure 20. Members Tiers Tab
Add Loyalty IDs
To manually add the Loyalty ID, follow these steps:
1.Navigate to Members and select the member from the member list.
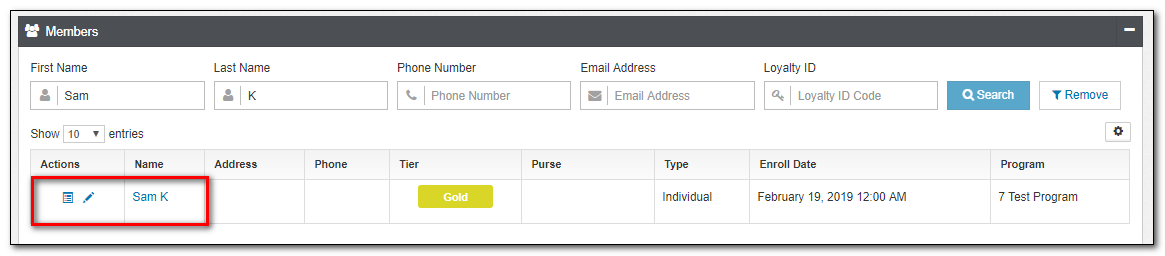
Figure 21. Members Tab
2.Click the Loyalty IDs applet tab in the members' Achievements tab, and again click the Add Loyalty ID command button to add the unique identification code to the member manually.
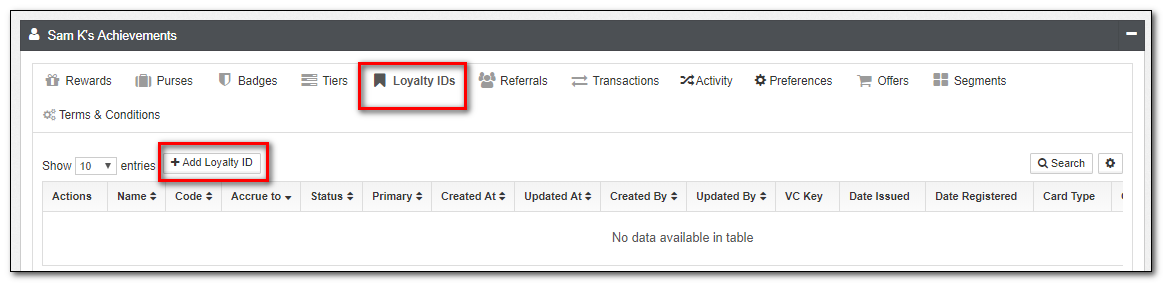
Figure 22. Members Loyalty IDs Tab
3.Loyalty ID window is displayed.
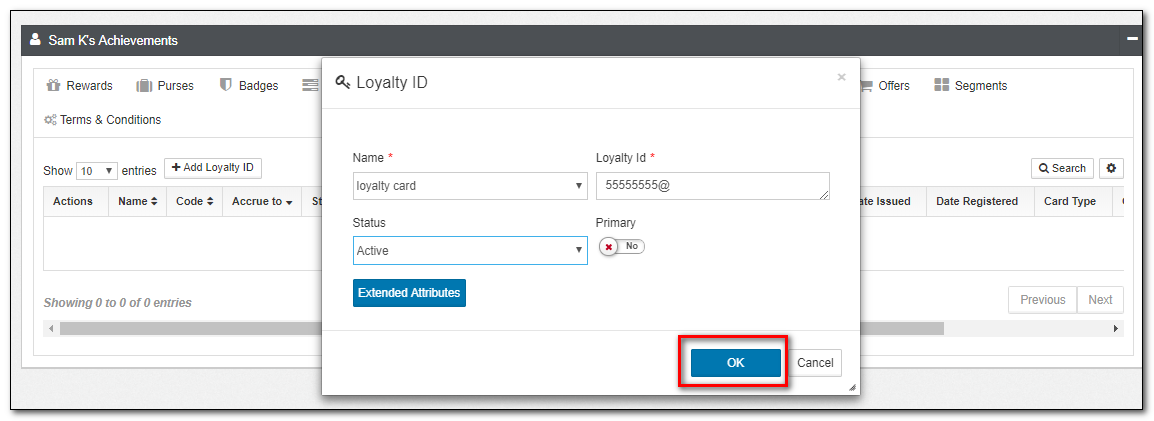
Figure 23. Loyalty ID Window
4.Provide all the details as per the attributes mentioned below for adding a Loyalty ID.
-
Name: This is the drop-down to select the name of the loyalty ID to be created.
-
Loyalty ID: Enter the unique identification code. The Unique Id can be a combination of numerical, special characters, alphabets, and others.
-
Status: This is the drop-down to select the status of the Loyalty ID.
5.Click OK/Cancel to confirm or discard your changes.
6.Click the Loyalty IDs applet tab to check the Loyalty ID given to the member.
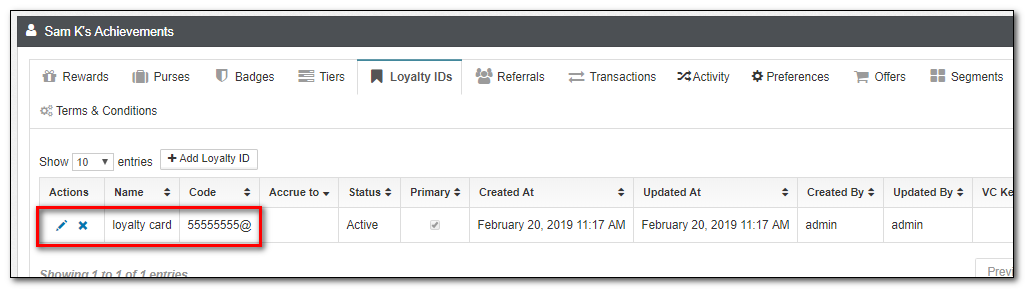
Figure 24. Loyalty ID Applet Tab
Give Badge
Note
To add the Badges manually, A Give Badge rule should be associated with the member.
To manually add the Badge, follow these steps:
1.Navigate to Members and select the member from the member list from the same program in which the Rule is added.
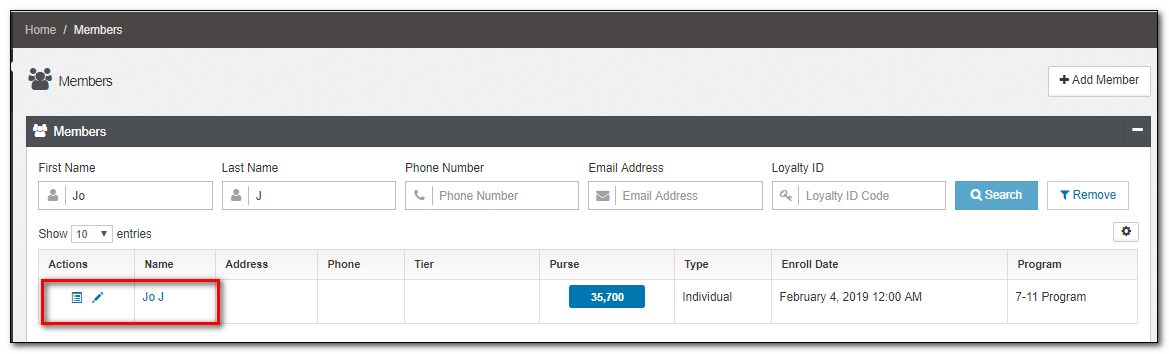
Figure 25. Members Tab
2.Click the Activity applet tab in the members' Achievements tab, and again click the Process Activity command button for manually processing the activity to trigger rules configured in Rules.
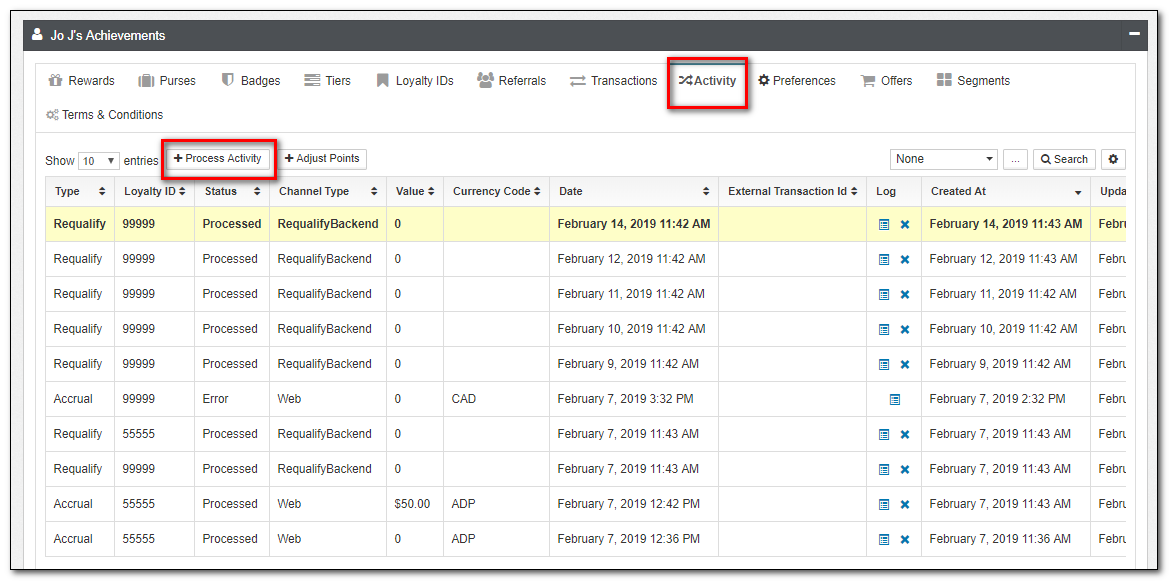
Figure 26. Members Details Window
3.Redirects to Process Activity page. Select the Activity Type = Accrual, And fill all the fields required for successfully processing the activity and Click Process activity button. Refer Process Activity for more information.
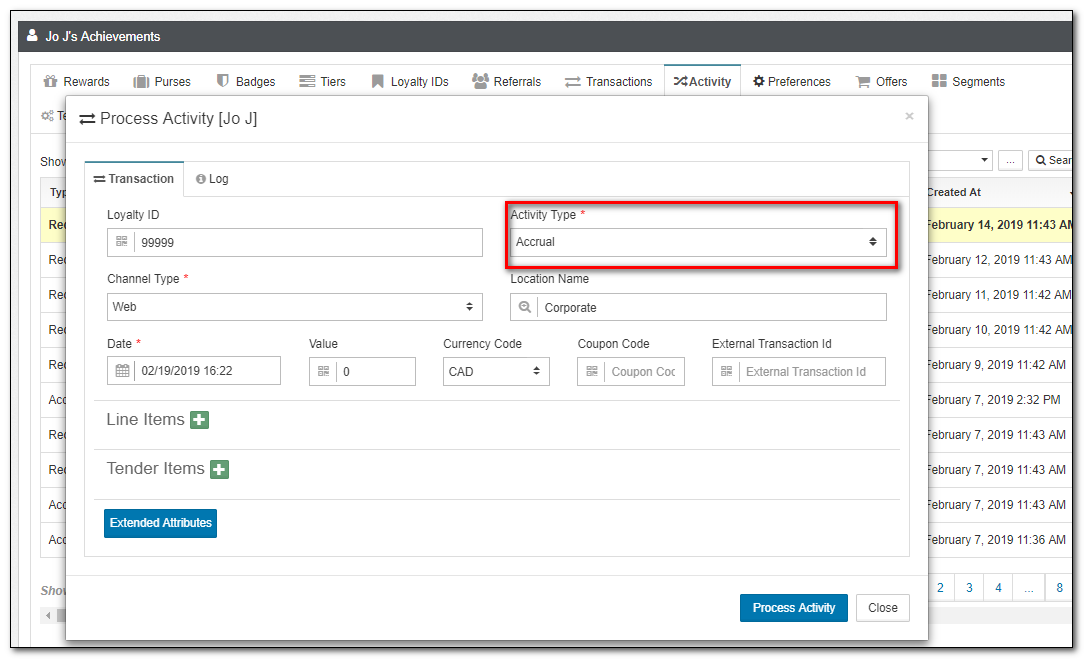
Figure 27. Process Activity Window
4.Process Activity dialog box is displayed with the confirmation of rule executed details.
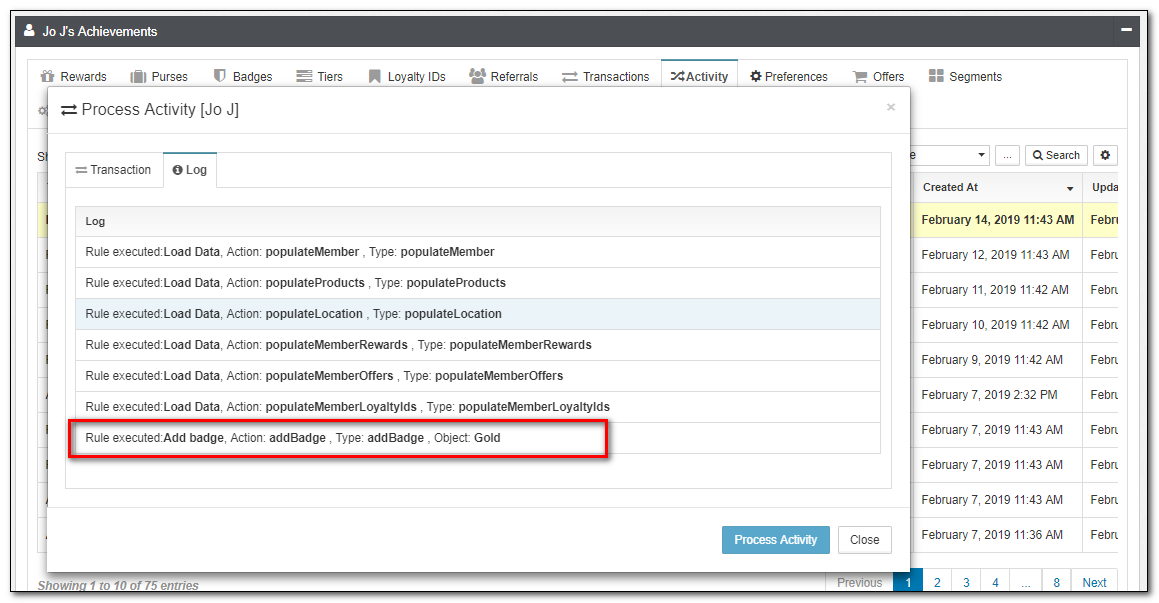
Figure 28. Process Activity Log Window
5.Click the Badges applet tab to check the Badge given to the member.
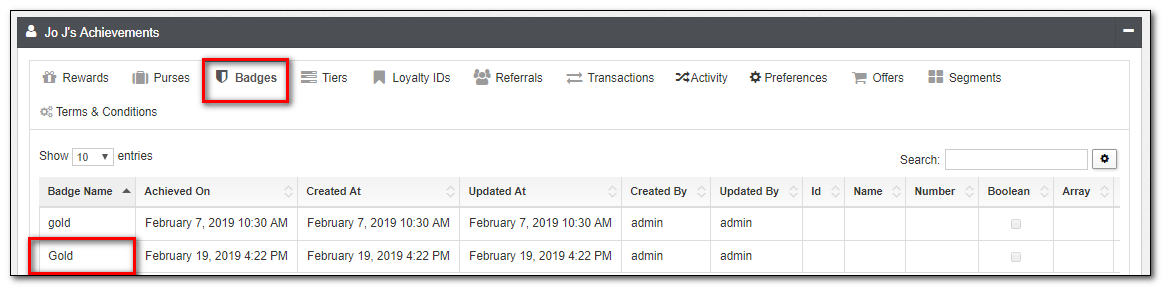
Figure 29. Members Tiers Tab
Processing of Point Accrual and Redemptions
Requirements for completing point accruals and redemptions include the following:
- A Purse Policy at the policy level, the purse defined in the purse policy must be associated with the member.
- A base point rule or a bonus promo rule to add points to the purse outlined above.
- A redemption rule to redeem points from the purse defined above.
To manually add the points to purses, follow these steps:
1.Navigate to Members and select the member from the member list from the same program in which the Purse policy is configured, and Rules added.
Figure 30. Members Tab
2.Click the Activity applet tab in the members' Achievements tab, and again click the Process Activity command button for manually processing the activity to trigger rules configured in Rules.
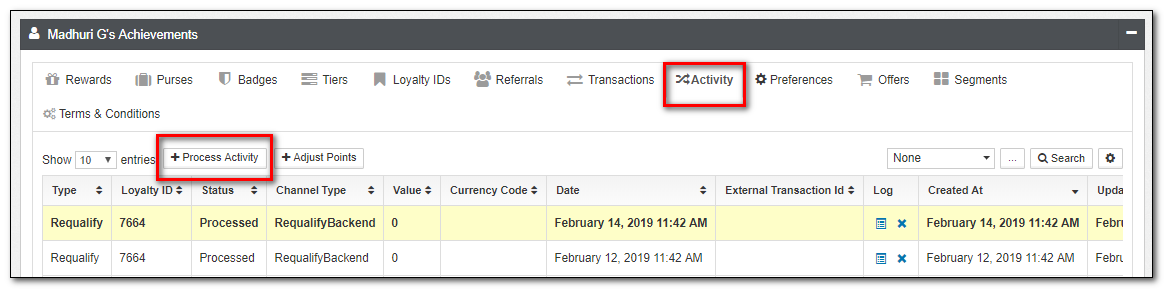
Figure 31. Members Details Window
3.Redirects to Process Activity page. Select the Activity Type = Accrual. Add the line items and fill in all the fields required for successfully processing the activity, then click the Process activity button. Refer to Process Activity for more information.
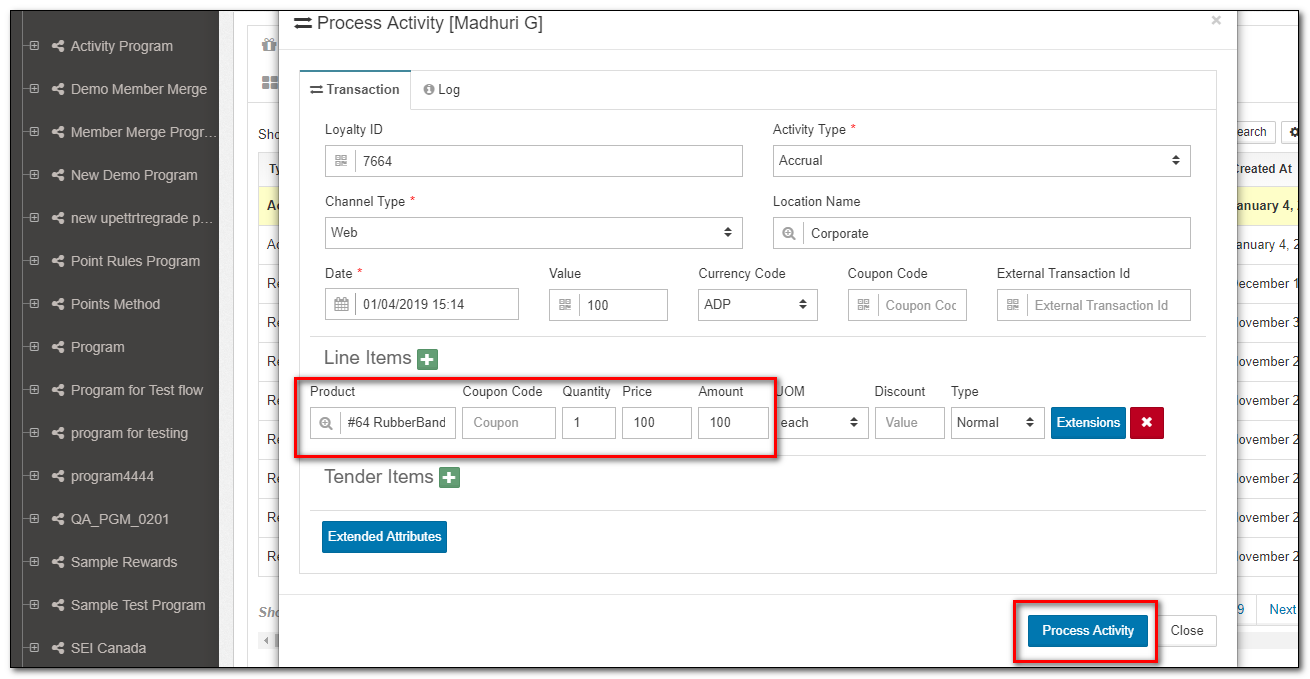
Figure 32. Process Activity Window
4.Process Activity dialog box is displayed with the confirmation of rule executed details.
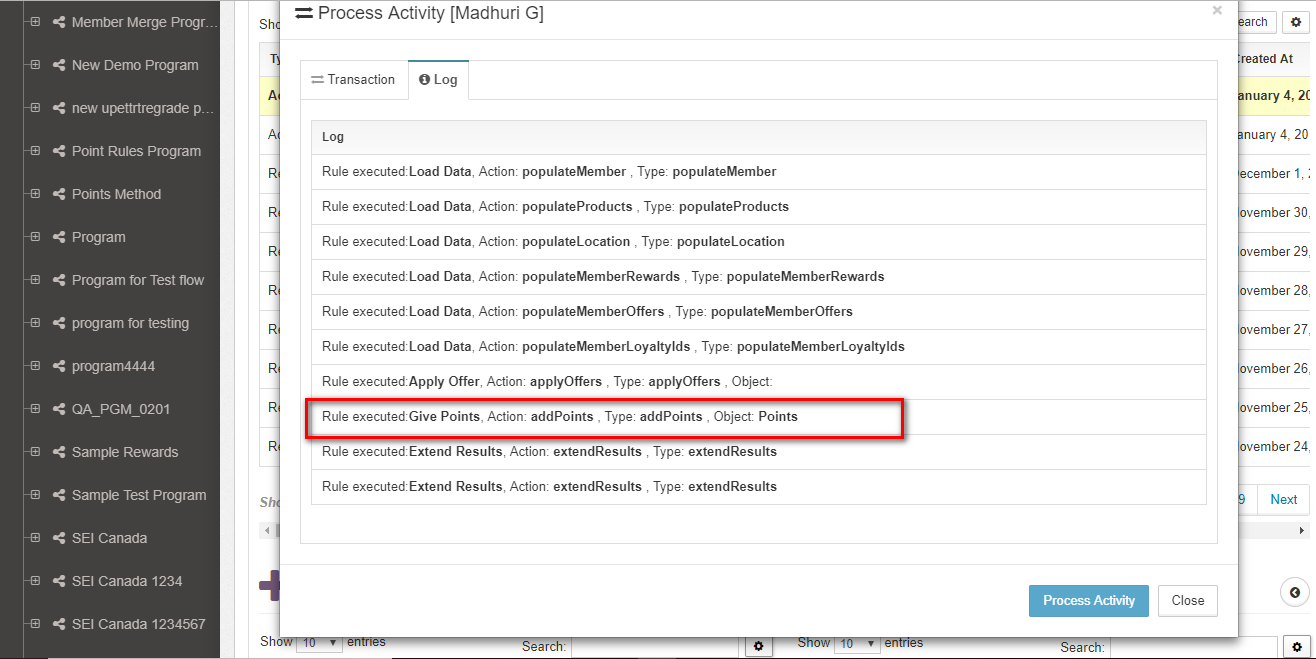
Figure 33. Process Activity Log Window
The Accruals Applet shows which promotion (Bonus Promo Rule) was triggered as part of the Accrual activity in the Loyalty Engine. Refer to Process Activity History for more information.
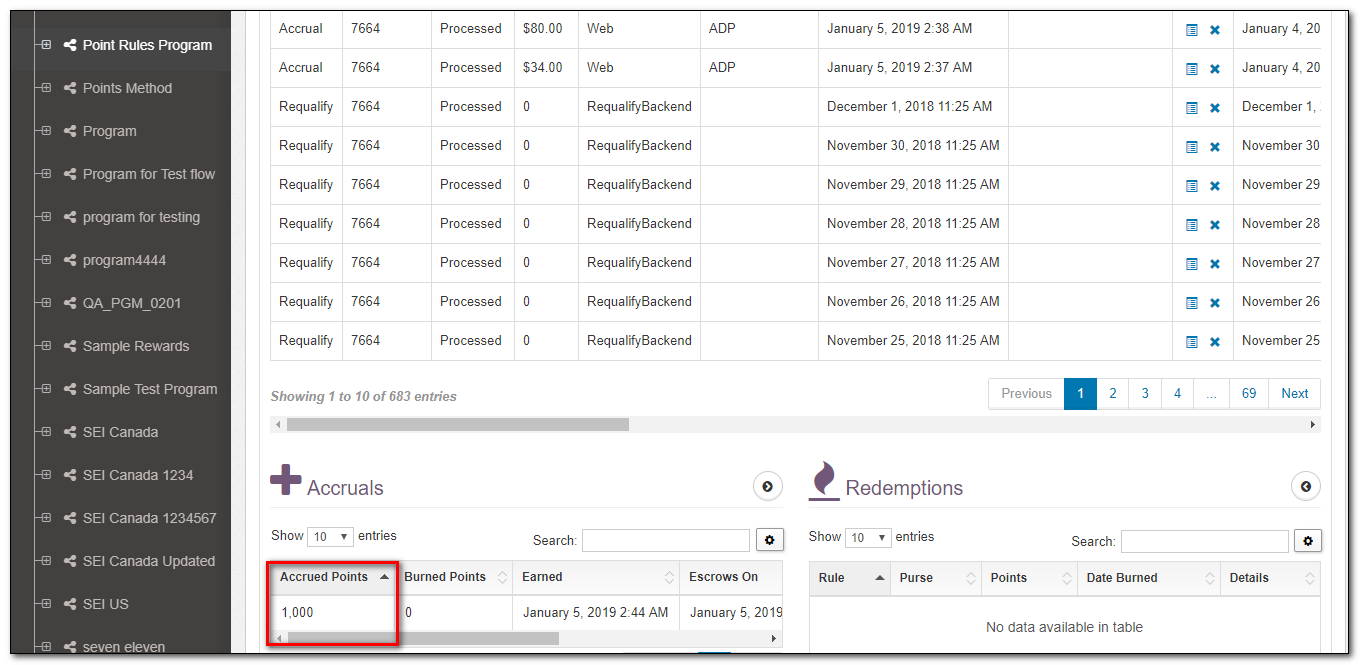
Figure 34.Accrued Points in Accruals Window
6.Click the Purses applet tab to check the available balance.
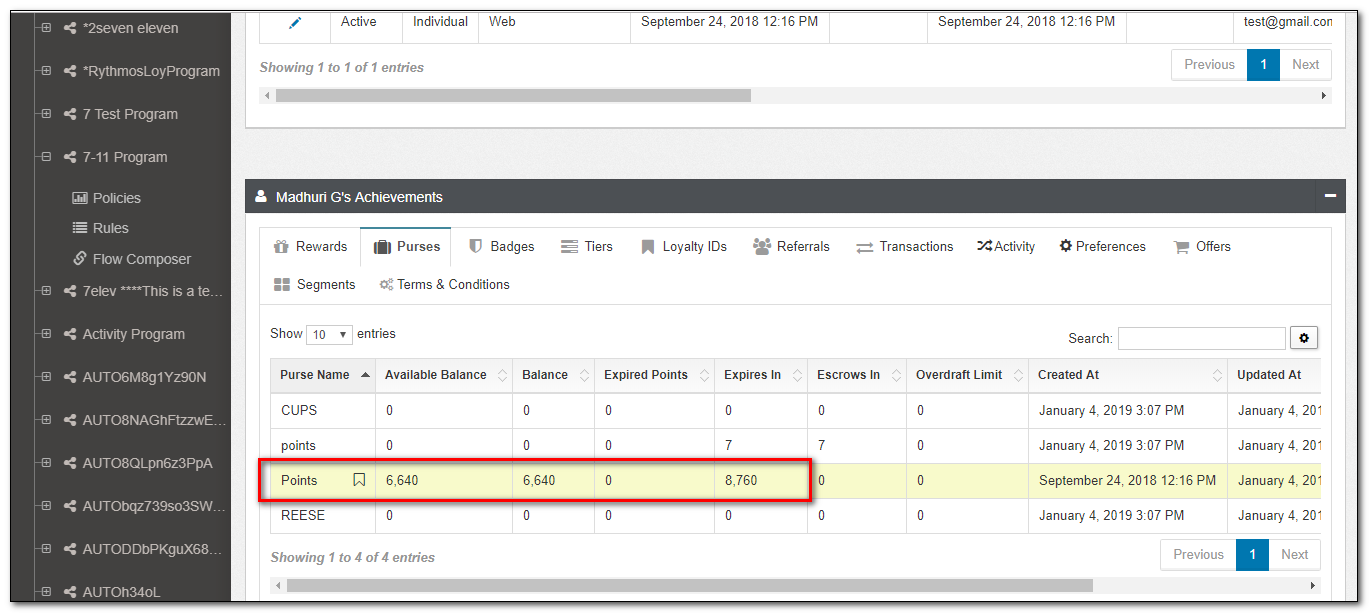
Figure 35. Member Purses Tab
To manually Redeem the points from purses, follow these steps:
1.Navigate to Members>Activity>Process Activity to check the activity of the Member.
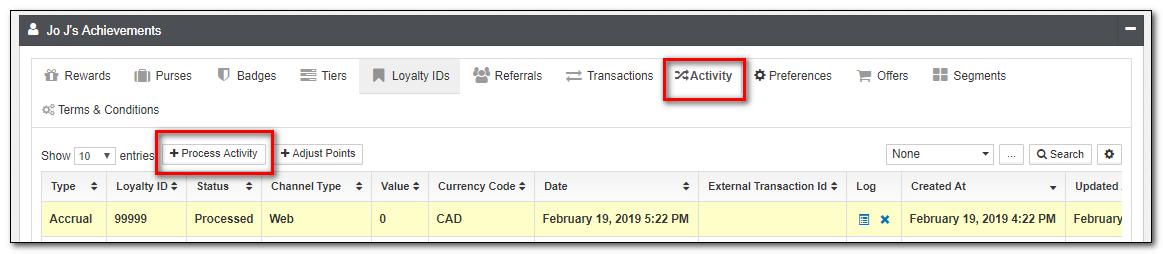
Figure 36. Members Tab
2.Select the Activity Type = Redepmtion. Add the line items and fill all the fields required for successfully processing the Activity, then click the Process activity button. Refer to Process Activity for more information.
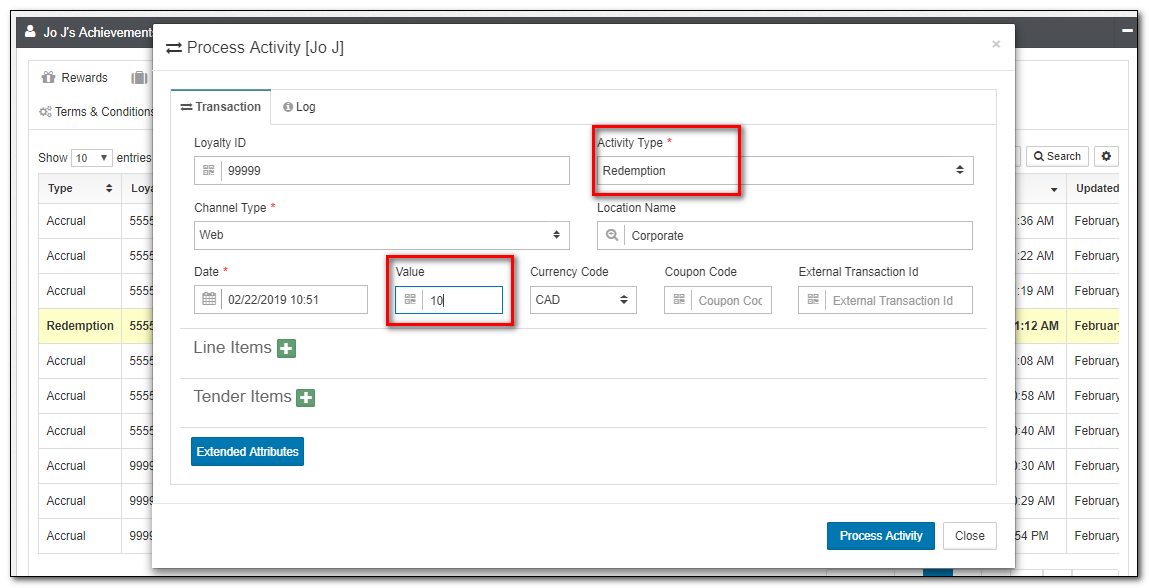
Figure 37.Line items in Process Activity Window
3.Process Activity dialog box is displayed with the confirmation of rule executed details.
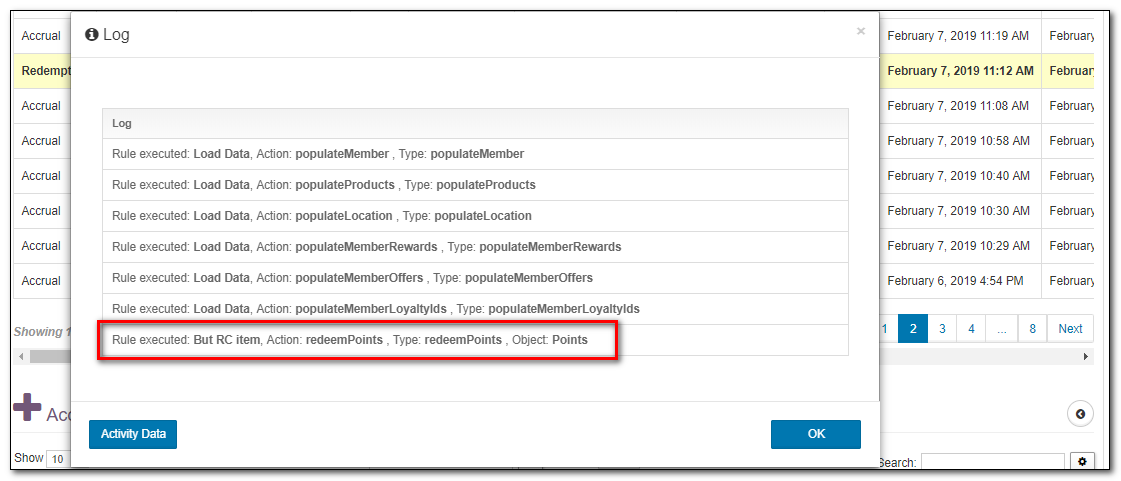
Figure 38.Process Activity Confirmation Window
The Redemptions Applet shows what promotions (rule/rules) are triggered as part of the Redemption activity in the Loyalty Engine.
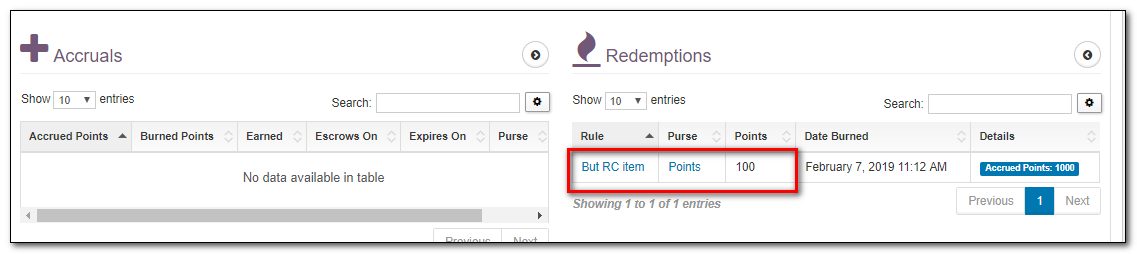
Figure 39.Points redeemed from the purse Window
4.Click the Purses applet tab to check the available balance.
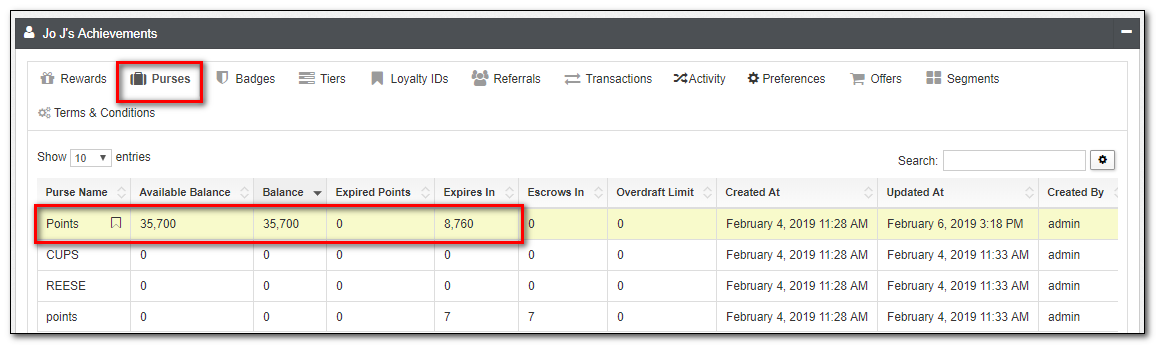
Figure 40.Available balance in the Purse Window
Transactions History
When an activity is performed, Transactions are displayed along with Line items and Tender items information.
To add the line items and Tender Items, follow these steps:
1.Navigate to Members and select the member from the member list from the same program in which the Rules are added.
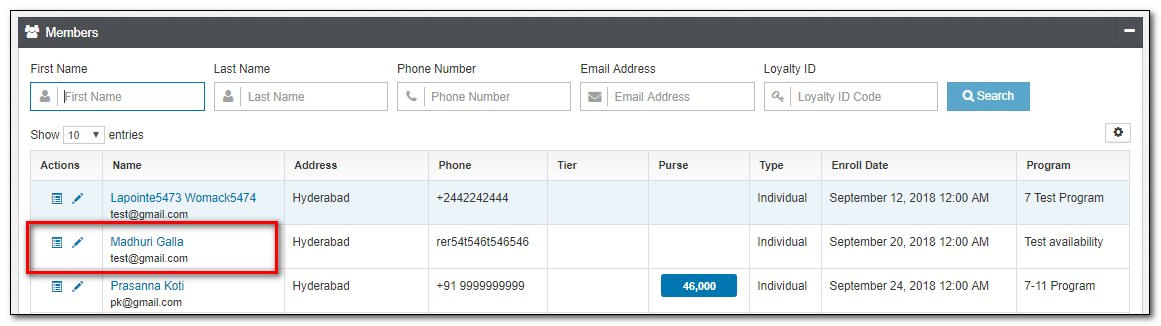
Figure 41. Members Tab
2.Click the Activity applet tab in the members' Achievements tab, and again click the Process Activity command button for manually adding line items and tender items.
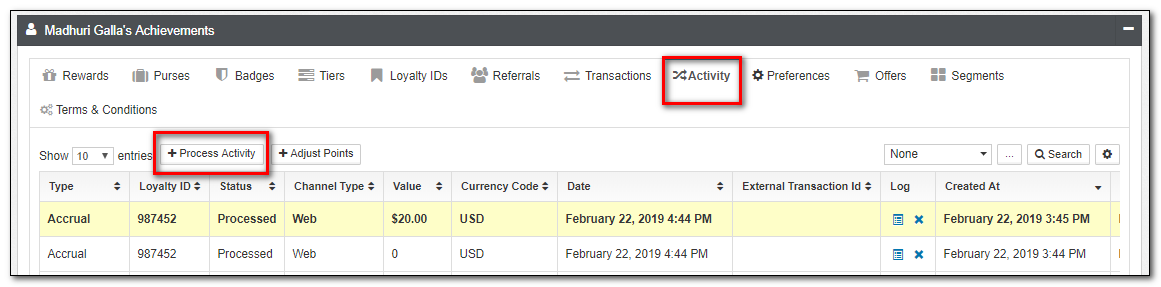
Figure 42. Members Details Window
3.Redirects to Process Activity page. Select the Activity Type = Accrual or Redemption. Add the line items, tender items, and fill in all the fields required for successfully processing the activity, then click the Process activity button. Refer to Process Activity for more information.
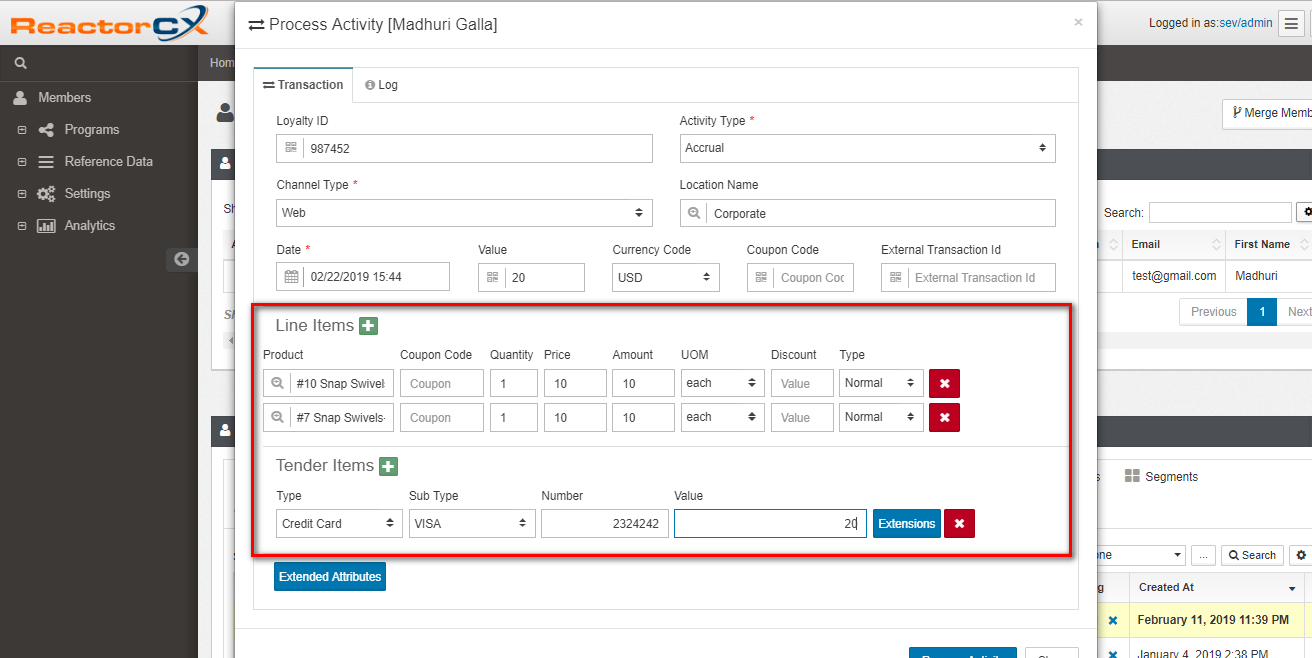
Figure 43. Process Activity Window
4.Process Activity dialog box is displayed with the confirmation of rule executed details.
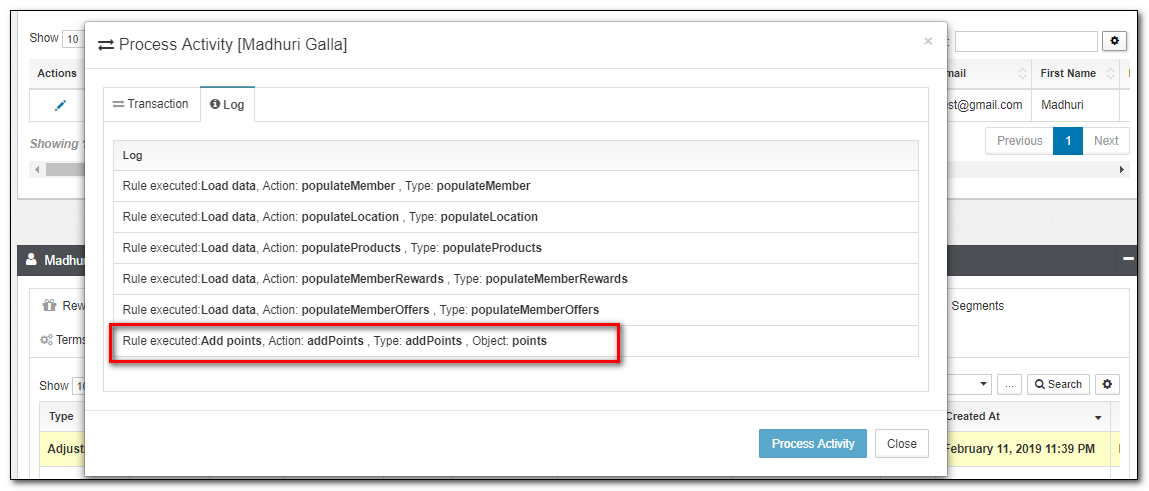
Figure 44. Process Activity Log Window
5.Click the Transactions applet tab to check the Transactions History.
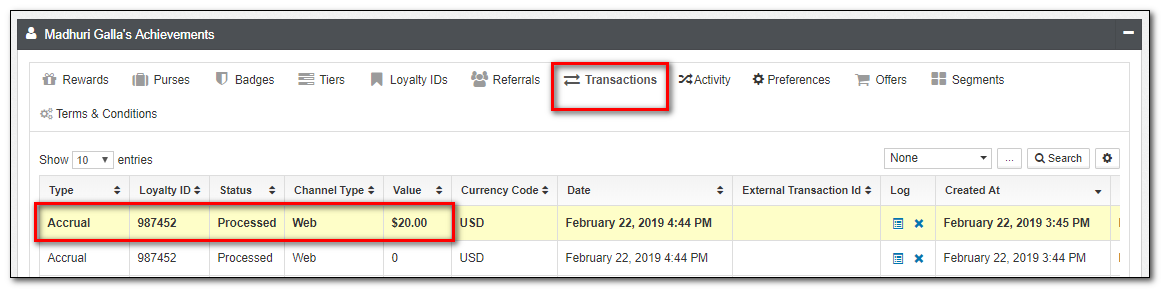
Figure 45. Transactions Window
Viewing Line Items
Line Items Applet shows the products and quantities purchased within a specific activity.
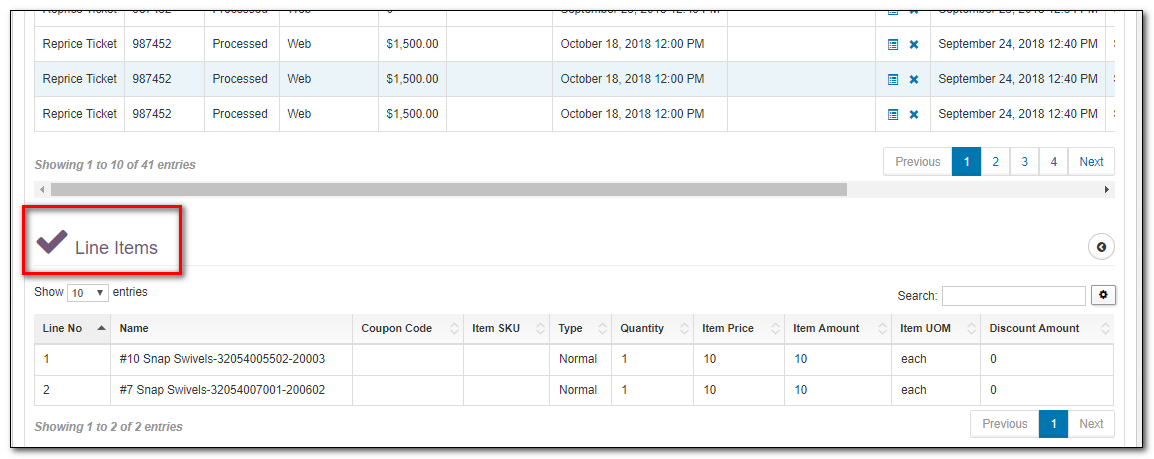
Figure 46.Line Items in Transactions Tab
| Field | Description |
|---|---|
| Line No | Represents the line order number. |
| Name | Shows the name of the product. |
| Coupon Code | Optional coupon to be applied directly to the item. |
| Item SKU | Shows the Stock Keeping Unit number, which matches with the SKU field of Product reference data. |
| Type | Shows the different types of line items like normal, void, discount, return, card, tax, fuel. |
| Quantity | Shows the quantity of the item. |
| Item Price | Shows the price of the single item. |
| Item Amount | Shows the total value of an item. By default the item Price is multiplied by item Quantity. |
| Item UOM | Shows the units of measurement. |
| Discount Amount | Shows the Pre-applied line item discount. |
Viewing Tender Items
Tender Items represents a payment made with a specific tender.
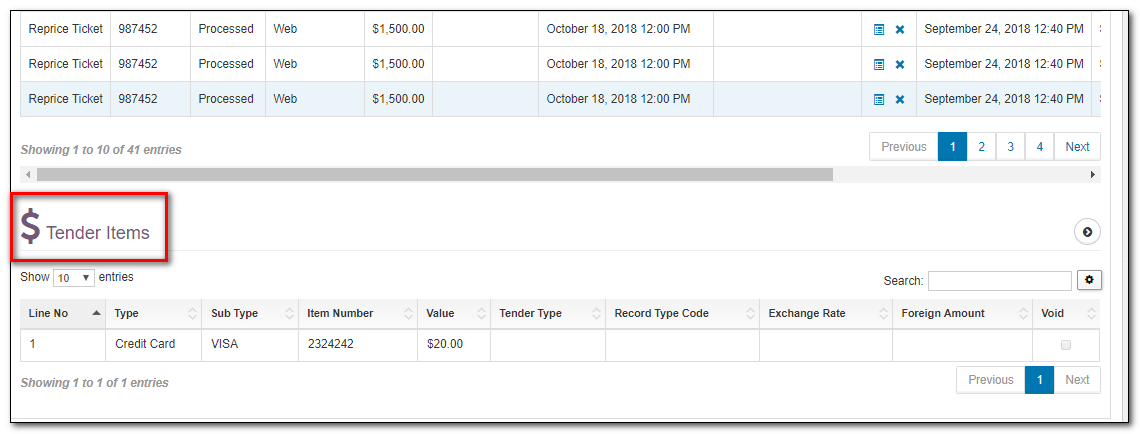
Figure 47.Tender Items in Transactions Tab
Tender Items:
| Field | Description |
|---|---|
| Line No | Represents the line order number. |
| Type | Shows the mode of payment selected. |
| Sub Type | Shows the Sub type of a tender item. |
| Item Number | Shows the stored credit card hash or an SVC number. |
| Value | Shows the amount of currency for paying |
| Tender Type | Shows the type of tender item. |
| Record Type Code | The code gets populated for the type of payment selected from the POS PMB request. |
| Exchange Rate | The value of one nation's currency versus other nation's currency. |
| Foreign Amount | Shows the currency of another country. |
| Void | shows the one that isn't available anymore. |
Hint
To expand the Redemptions applet to the left, use expansion as shown in Figure 7.
Referrals
Referrals are the unique codes, which a member can give to non-members and when the non-members enroll:
-
Referral Bonus gets added to the member as a reward for the first time referral.
-
Referral Bonus and Enrollment Bonus gets added to the newly enrolled member as a reward.
To get Enrollment Bonus and Referral Bonus Points added to the member, include the following:
-
A Referral Bonus rule to add points to the purse defined.
-
A Enrollment Bonus rule to add points to the purse defined.
1.Navigate to Program and select the Options icon to open the program options dialog box.
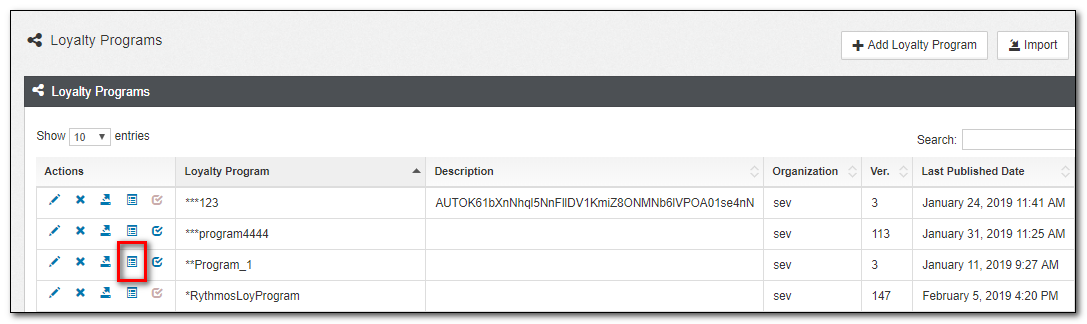
Figure 48. Programs Tab
2.Select the Generate Enrollment Bonus option to set the program to get the Enrollment Bonus as a reward for new member.
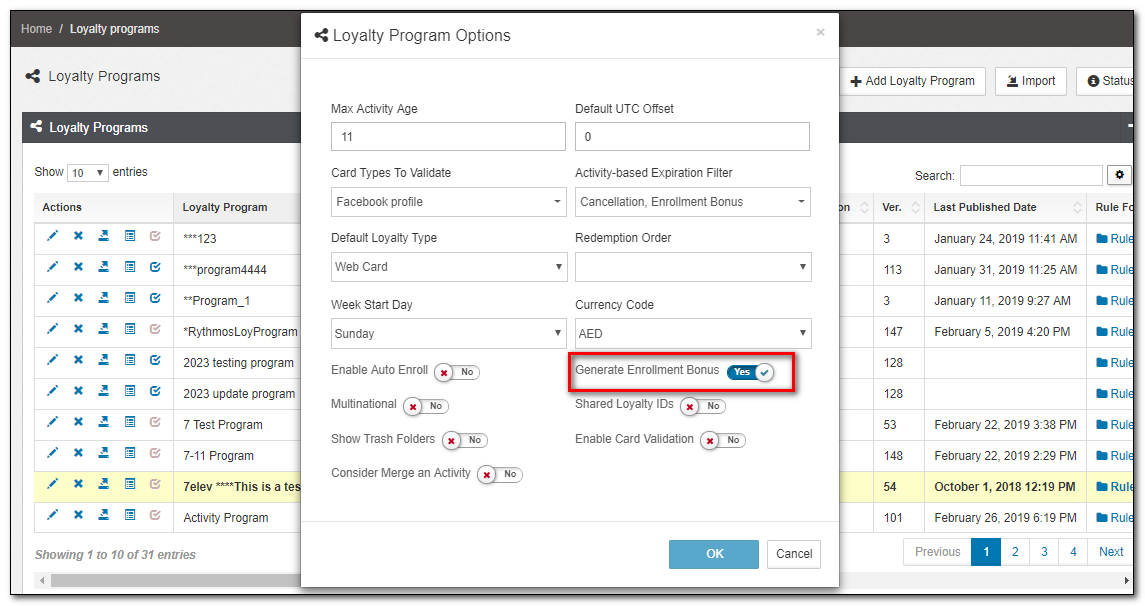
Figure 49. Program Options Tab
To add the Referral Id, follow these steps:
1.Navigate to Members and select the member from the member list.
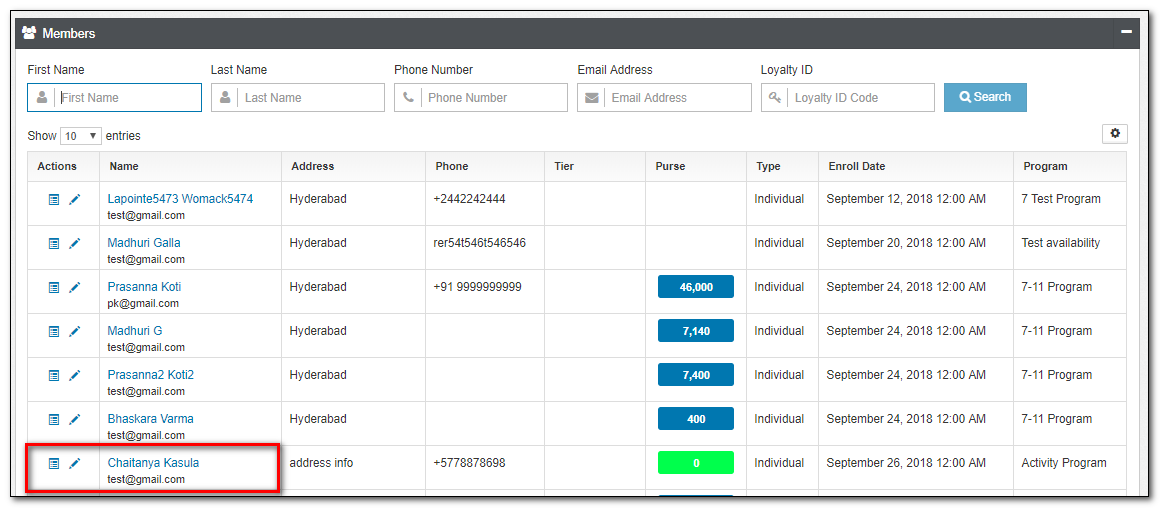
Figure 50. Members Tab
2.Click the Referrals applet tab in the members' Achievements tab, and again click the Add Referral ID command button to add the Referral ID.
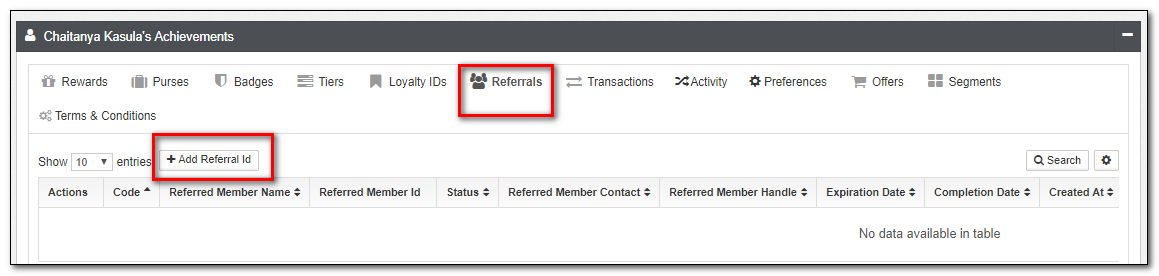
Figure 51. Member Details Window
3.Referral Member window is displayed. Enter the name and contact number of the non-member to be referred.
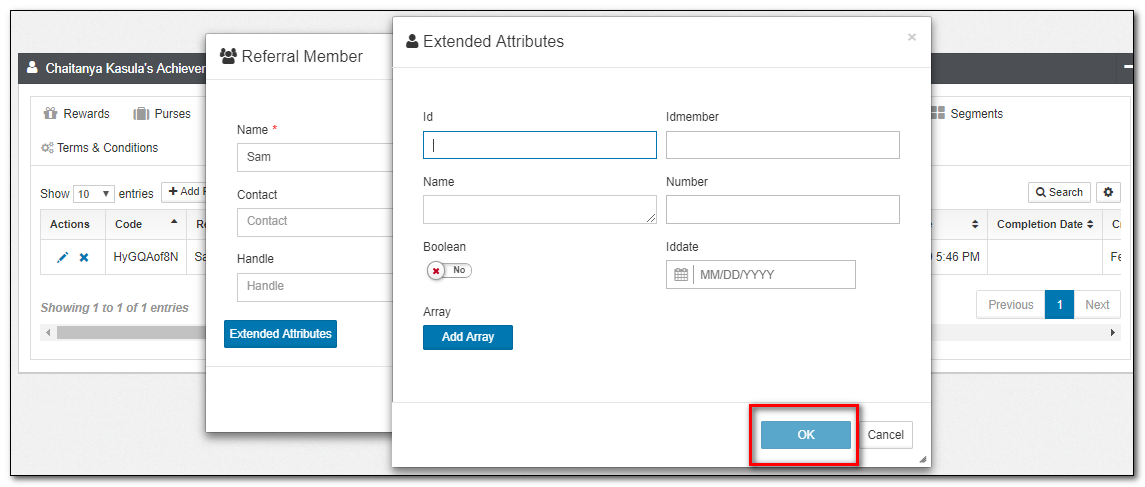
Figure 52. Referral Member Window
4.Click OK or Cancel to confirm or discard your changes.
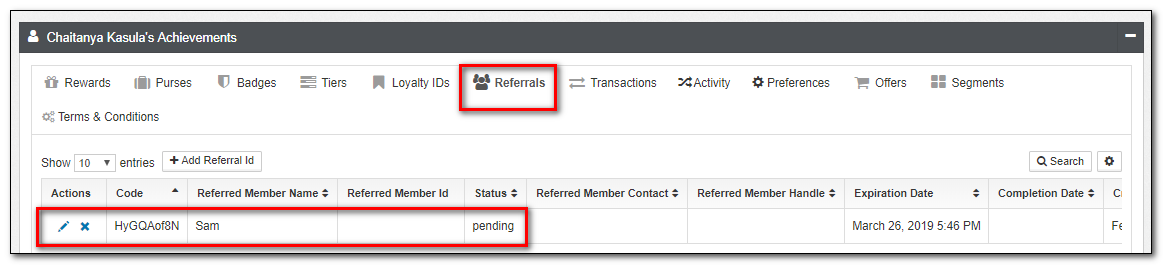
Figure 53. Member Details Window
New Referral Id gets generated under the code with the code status as Pending.
5.Add the new member to the program with the above-generated Referral Code. Click OK or Cancel to confirm or discard your changes.
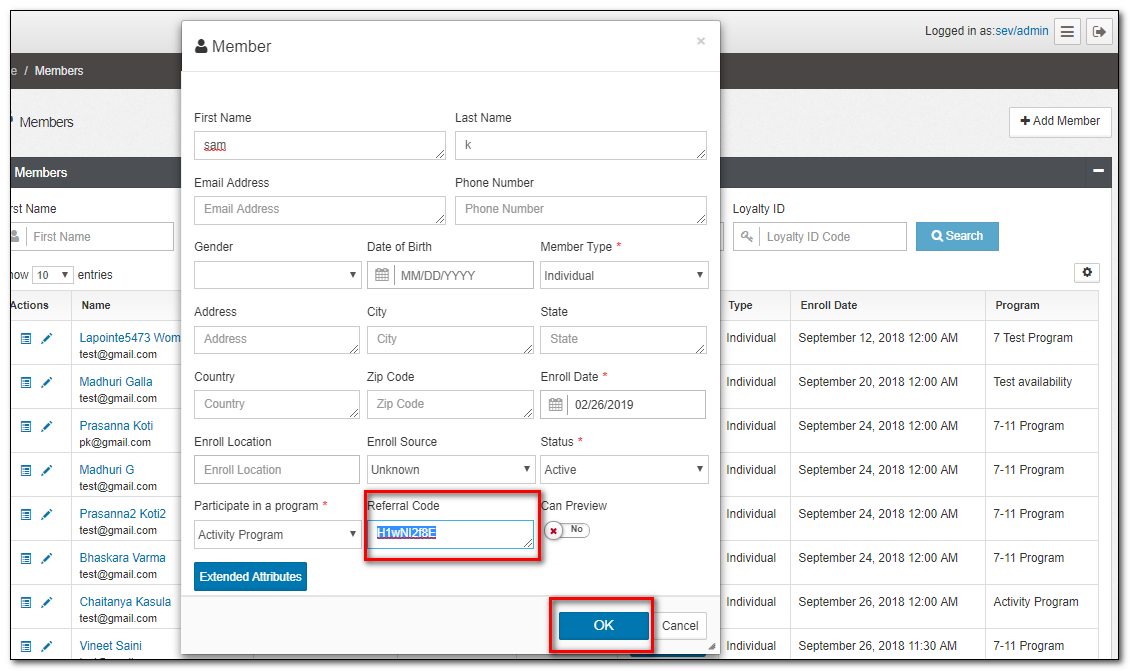
Figure 54. Add New Member Details
6.Click the Referrals applet tab of the Member. The status is now changed from Pending to Completed.
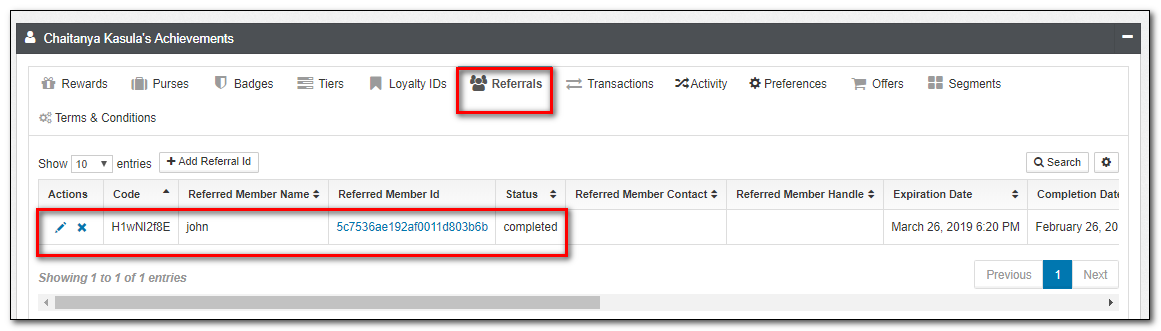
Figure 55. Referrals Tab
Viewing Referred Member Details:
7.Click the Activity Applet tab to check the Referral Bonus activity.
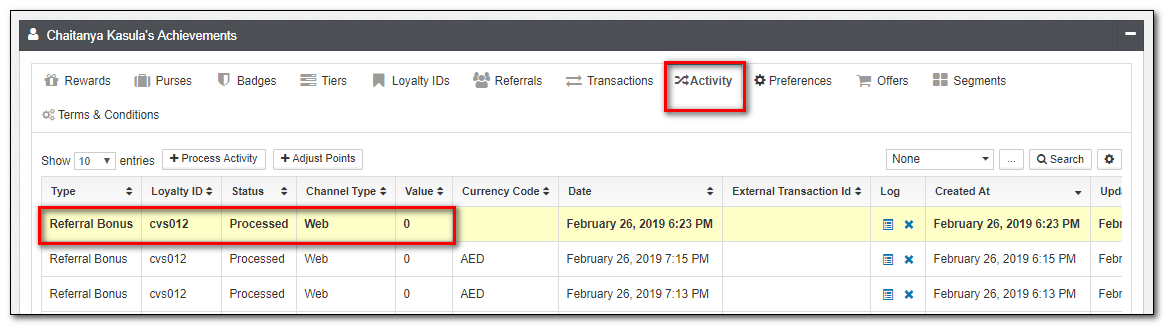
Figure 56. Activity Tab of Referral Member
8.Click the Purses applet tab to check the Referral Bonus points added to the member in the defined Purse.
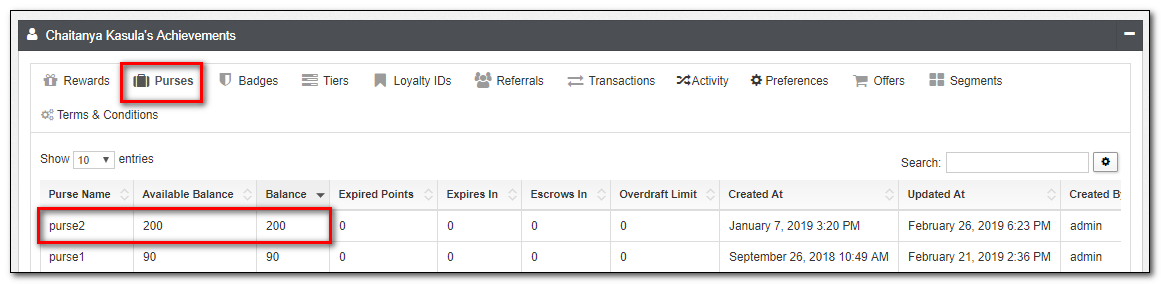
Figure 57. Purses Tab of Referral Member
Viewing Newly Enrolled Member Details:
9.Click the Activity Applet tab to check the Enrollment Bonus and Referral Bonus activity.
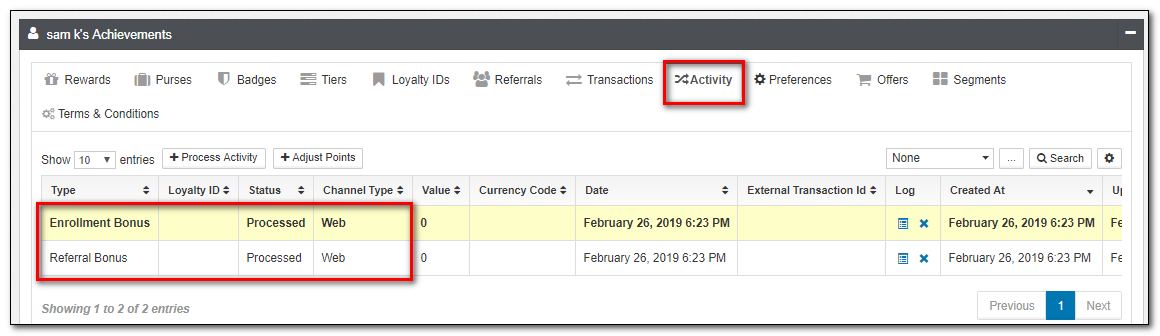
Figure 58. Activity Tab of Newly Enrolled Member
10.Click the Purses applet tab to check the Enrollment Bonus points and Referral Bonus points added to the member.
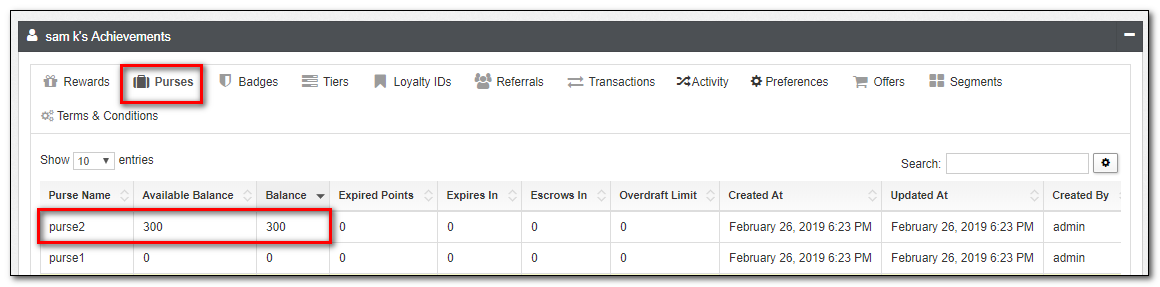
Figure 59. Purses Tab of Newly Enrolled Member
Segments
Segments are named member groups divided to identify members by what they do, using insights derived from member's actions as they interact with the loyalty program or make a purchasing decision such as buying coffee every day.
These member segments are equipped to address the particular needs or desires of a named group of members, discover opportunities to optimize the member journeys and quantify their potential value to the business.
1.Navigate to Members and select the member from the member list.
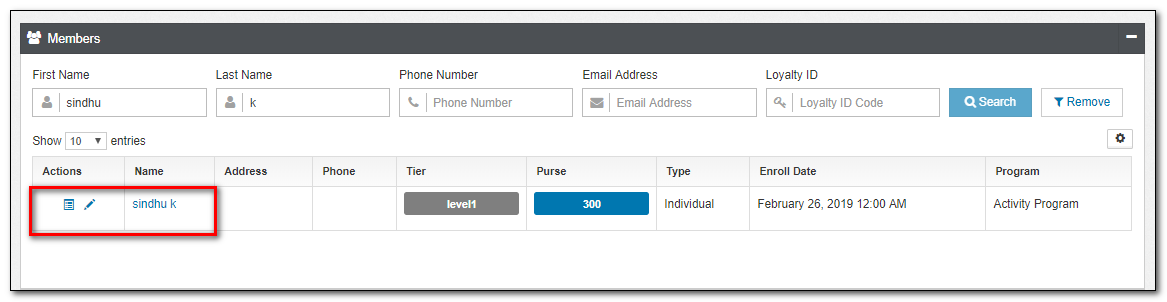
Figure 60. Members Tab
2.click Segments applet tab in member Achievements tab and again click the Add Member Segment command button to add the particular Segments for an individual.
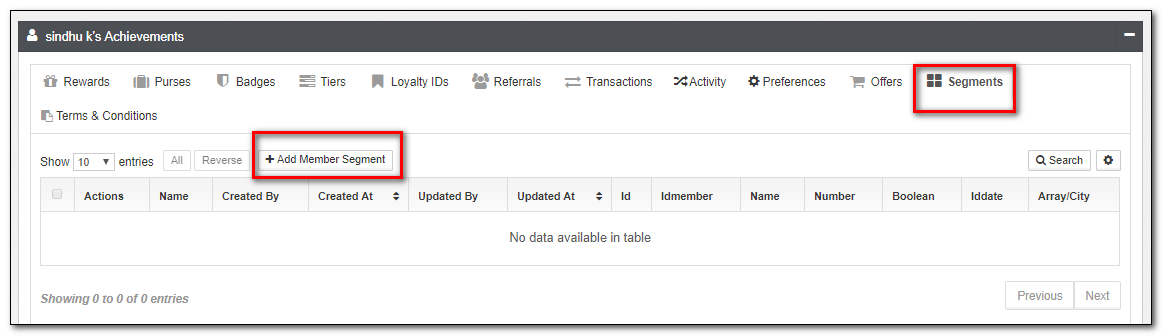
Figure 61. Add Segments Tab
3.Member Segments window is displayed.
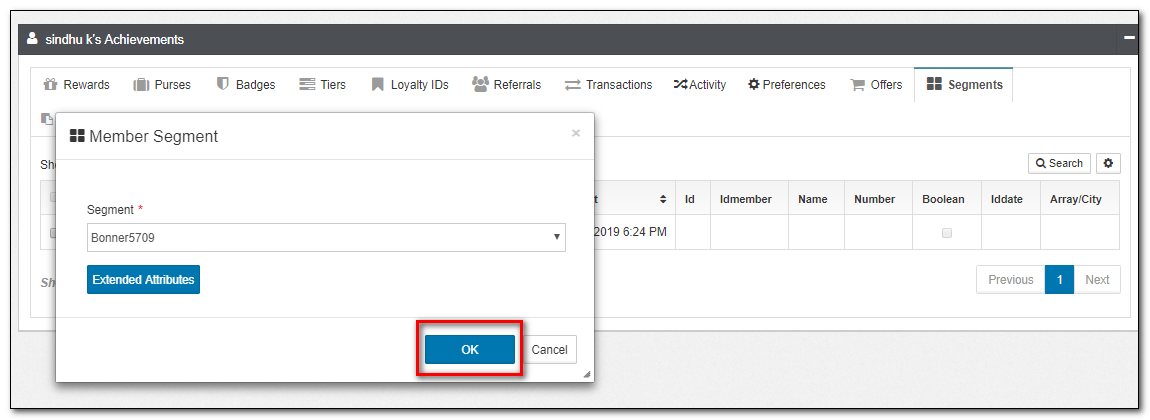
Figure 62. Member Segments Window
5.Click OK/Cancel to confirm or discard your changes.
6.Click the Segments applet tab to check the Segments added to the member.
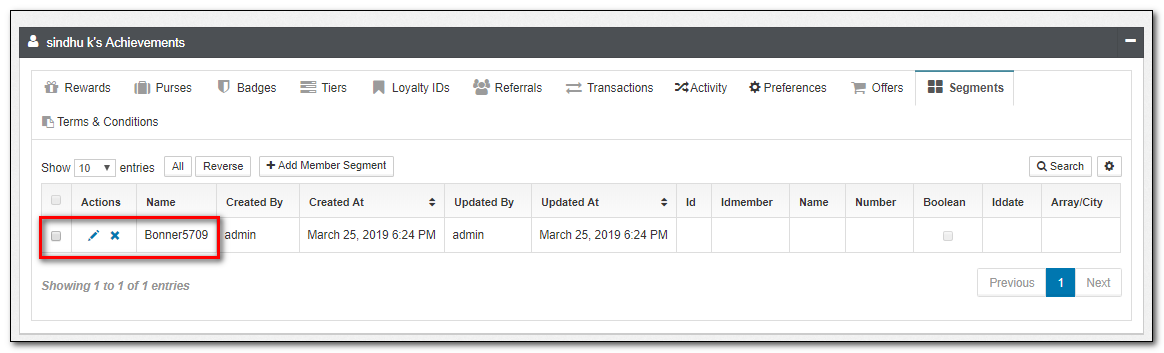
Figure 63. Segments Applet Tab
Segments added to the member act as an eligibility check for the segments in the rules and reward policies of the loyalty program when they're applied or triggered as part of an activity.
Terms and Conditions
Terms and Conditions govern the use of the loyalty program services that are made available by the business. These Terms and Conditions represent the whole agreement and understanding between the business and the individual or entity who subscribes to the loyalty program (members in RCX). They can also be used for making any disclosures required by law.
Terms and Conditions in RCX are Member Preferences with Category set to T&C. By selecting the preference names from the drop-down in Terms and Conditions, the loyalty member has agreed to abide by them.
Member Merge
Member merge is the act of merging two member records into one. Only members who enrolled in the same program are eligible for merging.
- An account is eligible for a merge if someone enrolls in the same Program twice using different Loyalty IDs and accrues points in both the member accounts associated with those loyalty IDs. The Merge Member can be used to fuse these two accounts into one.
During the Member Merge, there are two types of members:
Surviving Member – The member that remains after the merge is completed.
Victim Member – The member that no longer exists after the merge is completed.
The application includes two types of members configured in the program:
Individual Member – A member gets added to the program with only one profile.
Group Member – A group member added to the program can donate their earned points or rewards to different member (selected charities or a group of members like a Family) which gets reflected in Accrue To field in Loyalty ID tab.
If the surviving member is an individual, then all victim members must be individuals. If the surviving member is a group type, then the victim members must also be a group type member.
Merging two accounts:
1.Navigate to Members>Surviving Member>Click Merge Member button provided in the top-right corner of the surviving member's window. A dialog box appears as Merge Member into the selected member.
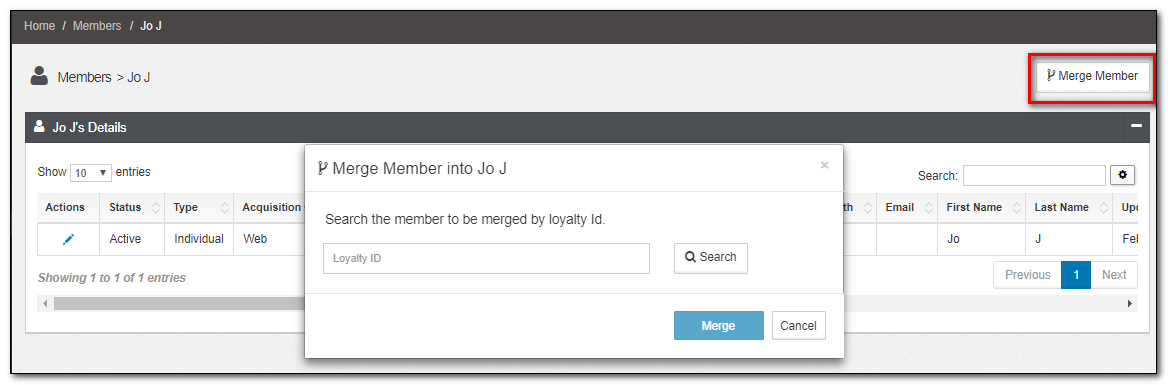
Figure 64. Merge Member Dialog Box*
2.Enter the Loyalty ID of the Victim and click Search button. It displays with the details of the member to be merged.
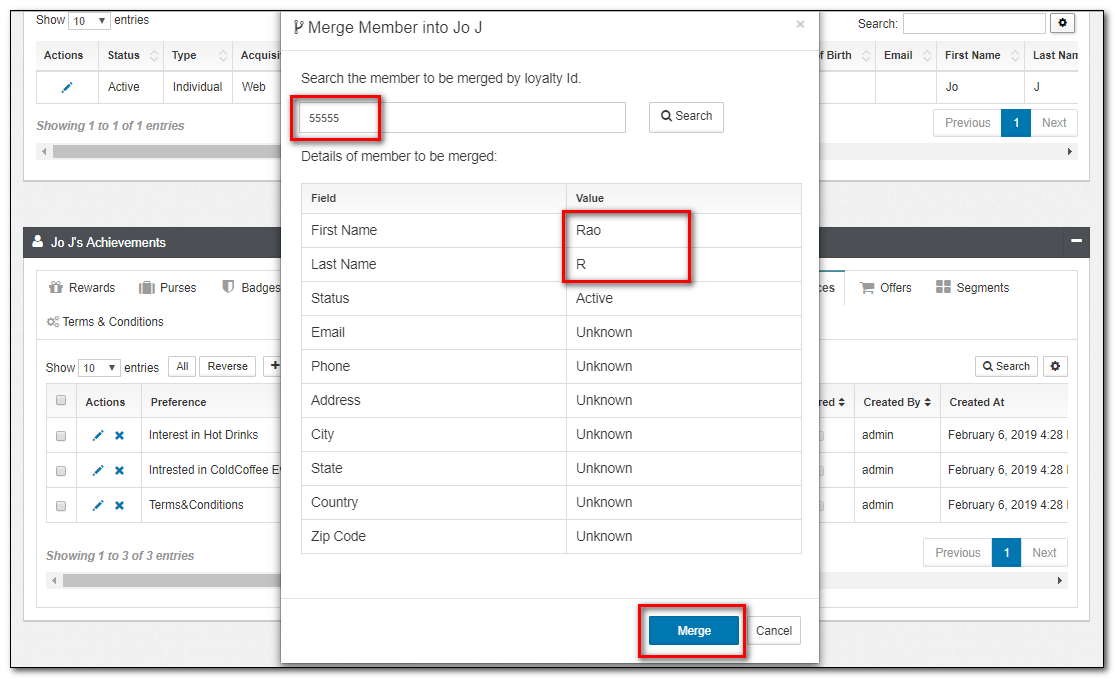
Figure 65. Member Details to be merged Dialog Box*
3.Click Merge/Cancel to Merge or discard your changes. A pop-up message displays as The merge was performed successfully. Click OK.
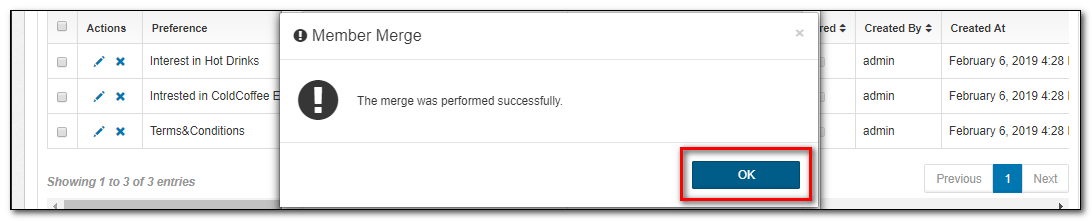
Figure 66. Member Merge Dialog Box*
After the Merge, below the listed Victim Member details are updated to the Surviving Member. The Victim Member no longer exists.
- Rewards
- Purse balances
- Tiers
- Loyalty ID's
- Activity history
- Accrual Items
- Redemption Items
- Offers
- Segments
- Reward Usage History
- Offer Usage History
- Terms and Conditions
- Preferences
All the Accrual Items, available Balance, expired Points of the Victim Member is added to the Surviving Member.
Tiers and tier levels of the surviving member qualify again for the subsequent or higher tier level if the victim member has a tier level higher than the surviving member. The qualifying again tier activity triggers the renewed qualification for the surviving member.
Note
A rule to requalify tier should exist in the program for updating the surviving member's tier level.
A Merge Activity is also triggered for the surviving member if the program options have the setting Consider Merge an Activity set to true.
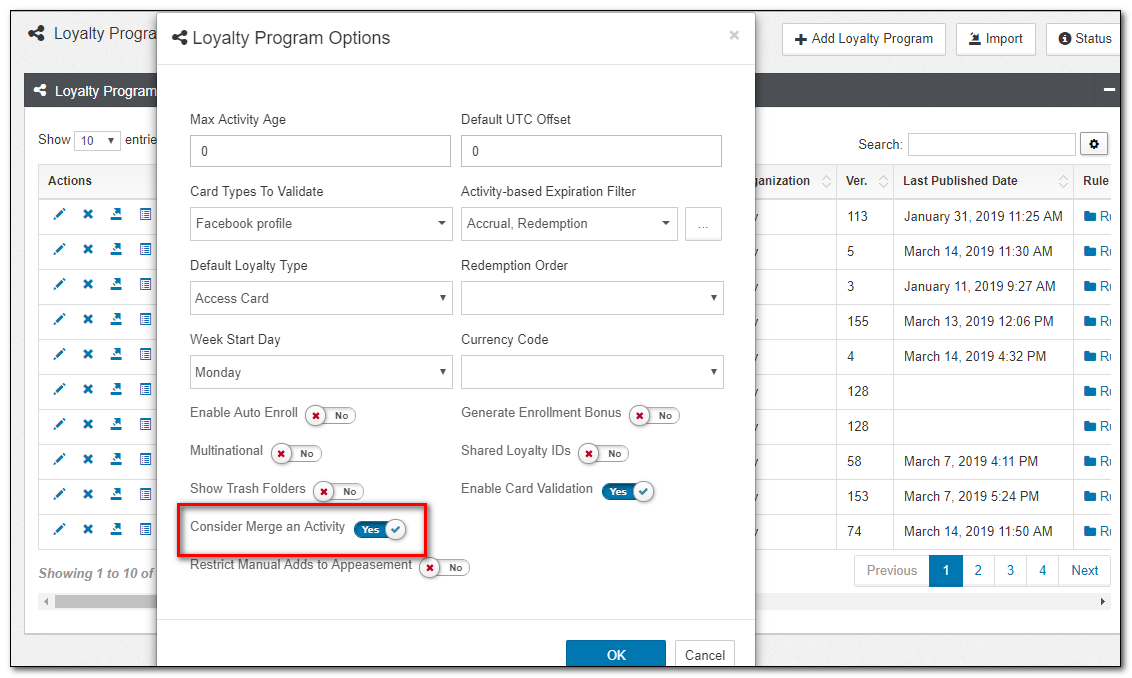
Figure 67. Member Merge Dialog Box*
If the purse structure of the victim member has more purses than the surviving member, then the purses that don't exist in the surviving member are dynamically added.
Note
If the Surviving Member has the same preference as the victim Member, Then the preferences of the Surviving Member are retained.
Preferences
Member preferences are expectations, likes, dislikes, motivations, and inclinations that drive members purchasing decisions. Preferences complement member needs in explaining the member's behavior.
Preferences in RCX are captured as name-value pairs for a member.
To manually add the Preferences, follow these steps:
1.Navigate to Members and select the member from the member list.
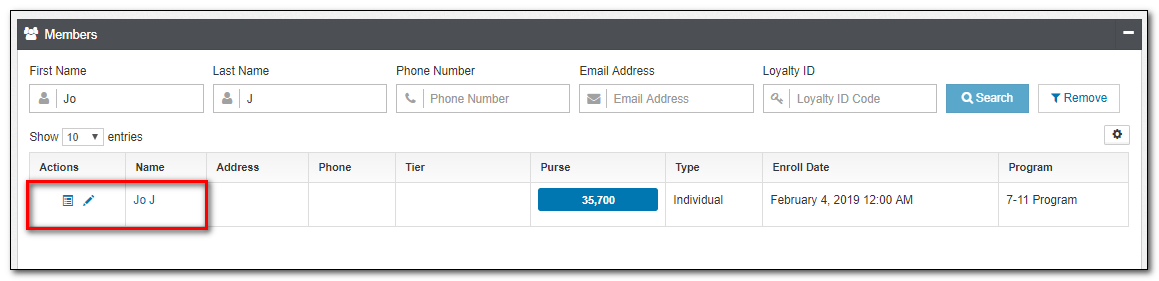
Figure 68. Members Tab
2.Click the Preferences applet tab in the members' Achievements tab, then click the Add Preference command button to add the particular preference for an individual.
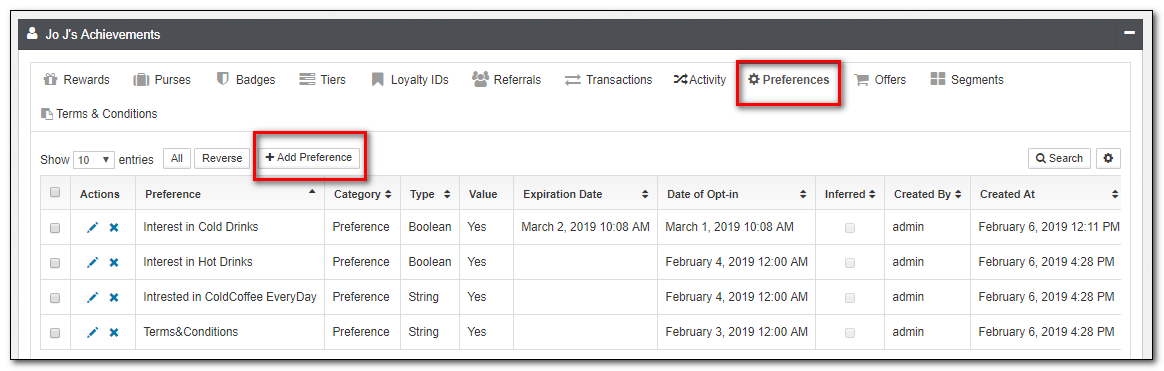
Figure 69. Add Preference Tab
3.Member Preference window is displayed.
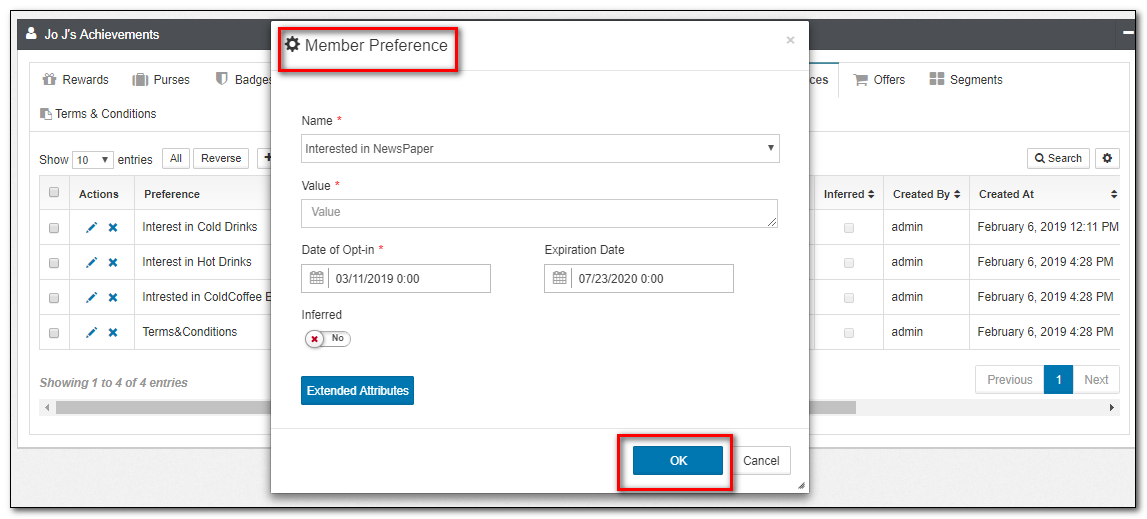
Figure 70. Member Preference Window
4.Provide all the details as per the attributes mentioned below for adding a Preference.
-
Name: This is the drop-down to select the member Preferences.
-
Value: Enter the required Preference value as YES or NO.
-
Date of Opt-in: Select the date when the preference opt-in was received.
-
Expiration Date: The Date after which the preferences setting is no longer valid.
-
Inferred: Select this option to conclude that the preferences are true from the available information.
5.Click OK/Cancel to confirm or discard your changes.
6.Click the Preferences applet tab to check the Preferences given to the member.
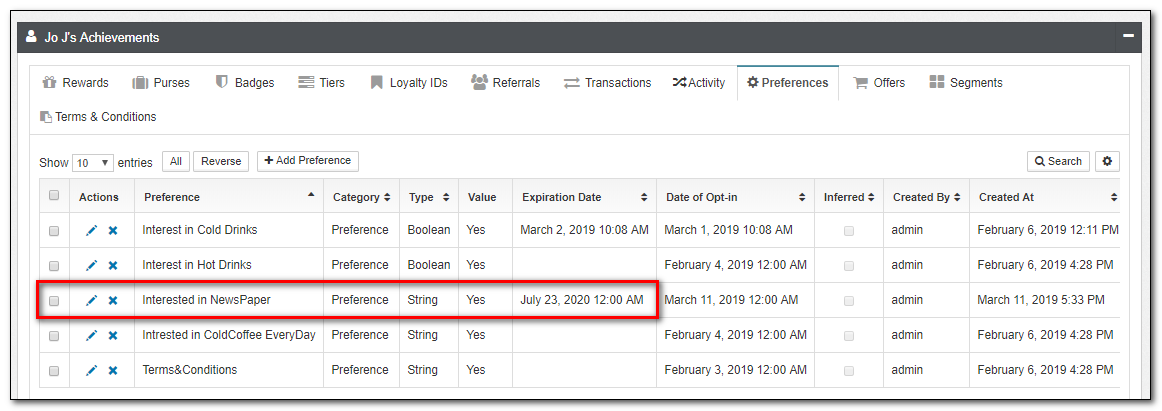
Figure 71. Preferences Applet Tab
Offers
Offers are like rewards which are given to specific members as decided by the b2b client.
- A reward policy with intended use as an offer is added to a member based on the client's decision.
To manually add the Offers, follow these steps:
1.Navigate to Members and select the member from the member list.
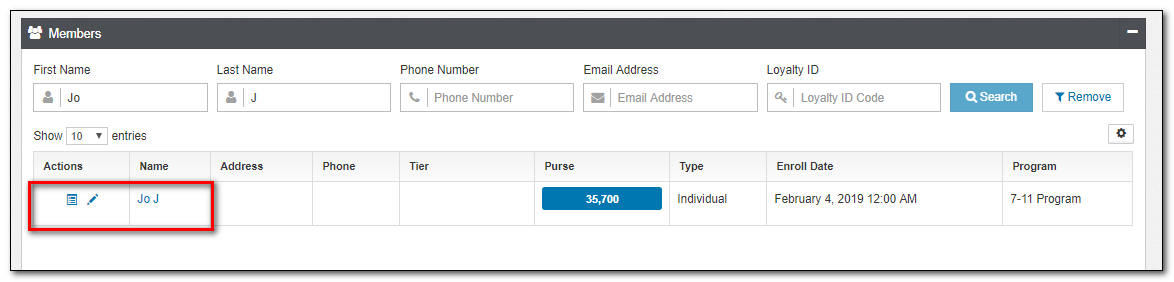
Figure 72. Members Tab
2.Click the Offers applet tab in the members' Achievements tab, then click the Add Offers command button to add the particular offer for an individual.
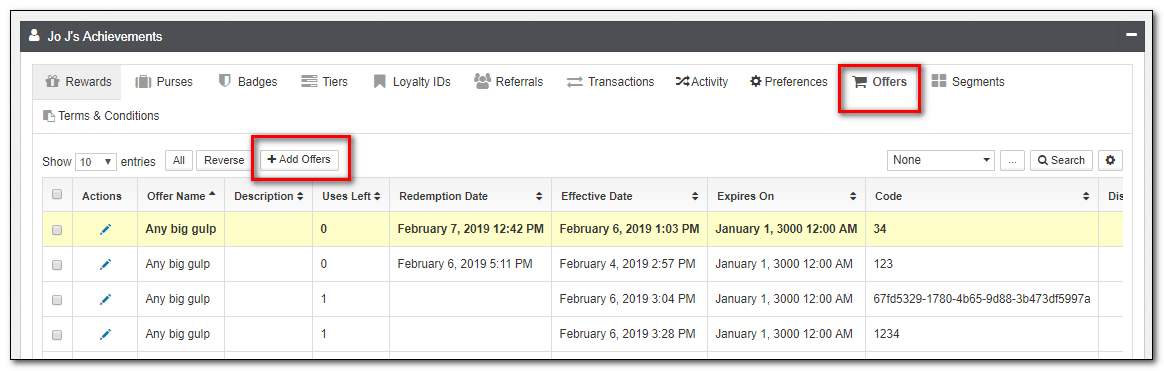
Figure 73. Add Offers Tab
3.Offer window is displayed.
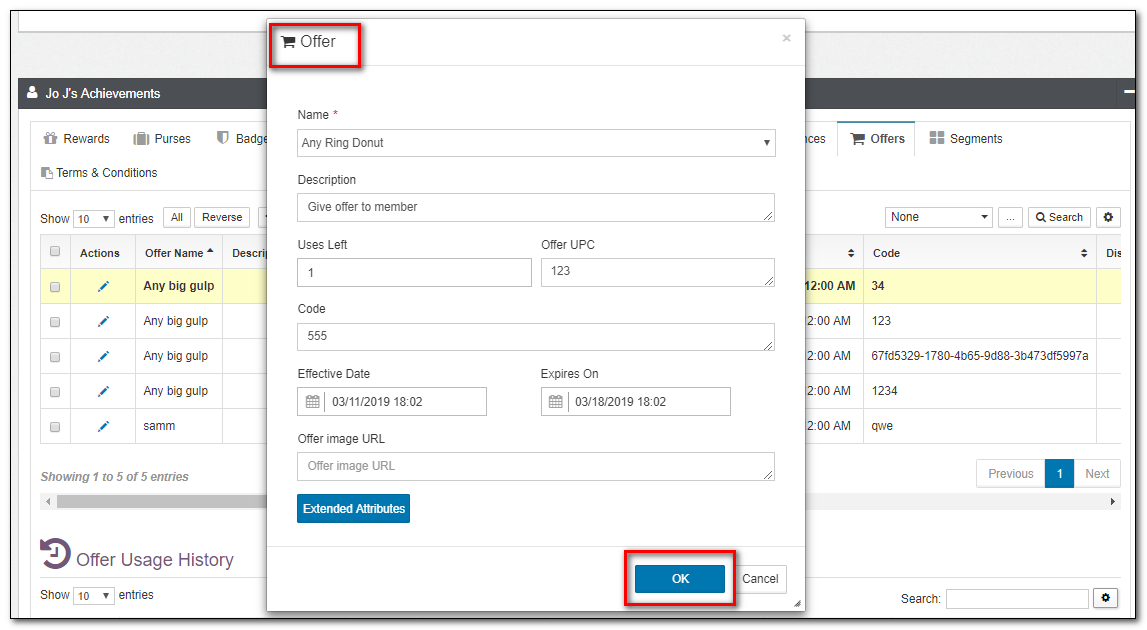
Figure 74. Member Offers Window
4.Provide all the details as per the attributes mentioned below for adding an Offer to the Member.
-
Name: Select the offer from the drop-down, which is auto-populated by reward policies with the intended use an offer.
-
Description: The description is auto-populated based on the offer selected, from the description defined in the reward policy.
-
Uses Left: The number of times the Offer could be used by the member.
-
Offer UPC: The UPC code is populated from the Discount UPC field mentioned in Reward Policy.
-
Code: it's the unique identifier for each instance of the offer. If the field is left blank, the Code is auto generated.
-
Effective Date: Select the date when the offer is effective or active. It's also auto-populated based on the effective date of the reward policy.
-
Expires On: Select the date when the offer ceases to be active. it's also auto-populated based on the expiration snap to in the reward policy.
-
Offer Image URL: It's a text field that accepts an image URL, representing the offer.
5.Click OK/Cancel to confirm or discard your changes.
6.Click the Offers applet tab to check the Offer given to the member.
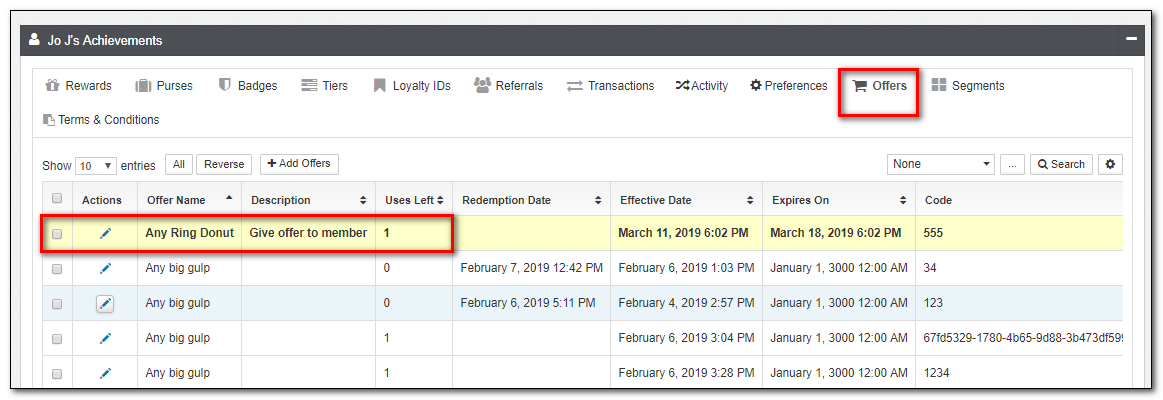
Figure 75. Offers Applet Tab