MCP User Guide
Introduction
Member Care Portal (MCP) is part of the RCX platform and is designed to allow staff to provide loyalty services for a specific program. The MCP portal allows looking up members, answering questions regarding the details of loyalty accounts, making adjustments to point balances, rewards, coupons, tier levels and other loyalty services.
Note
The RCX Administration Console also allows viewing and manipulating members, however, that's targeted at technical users and program rule administrators who may require more complex functionality and introspection into the objects than is required for servicing member requests.
Member Search
The home view of the MCP allows searching for Loyalty member accounts by a number of attributes as shown in the screenshot below:
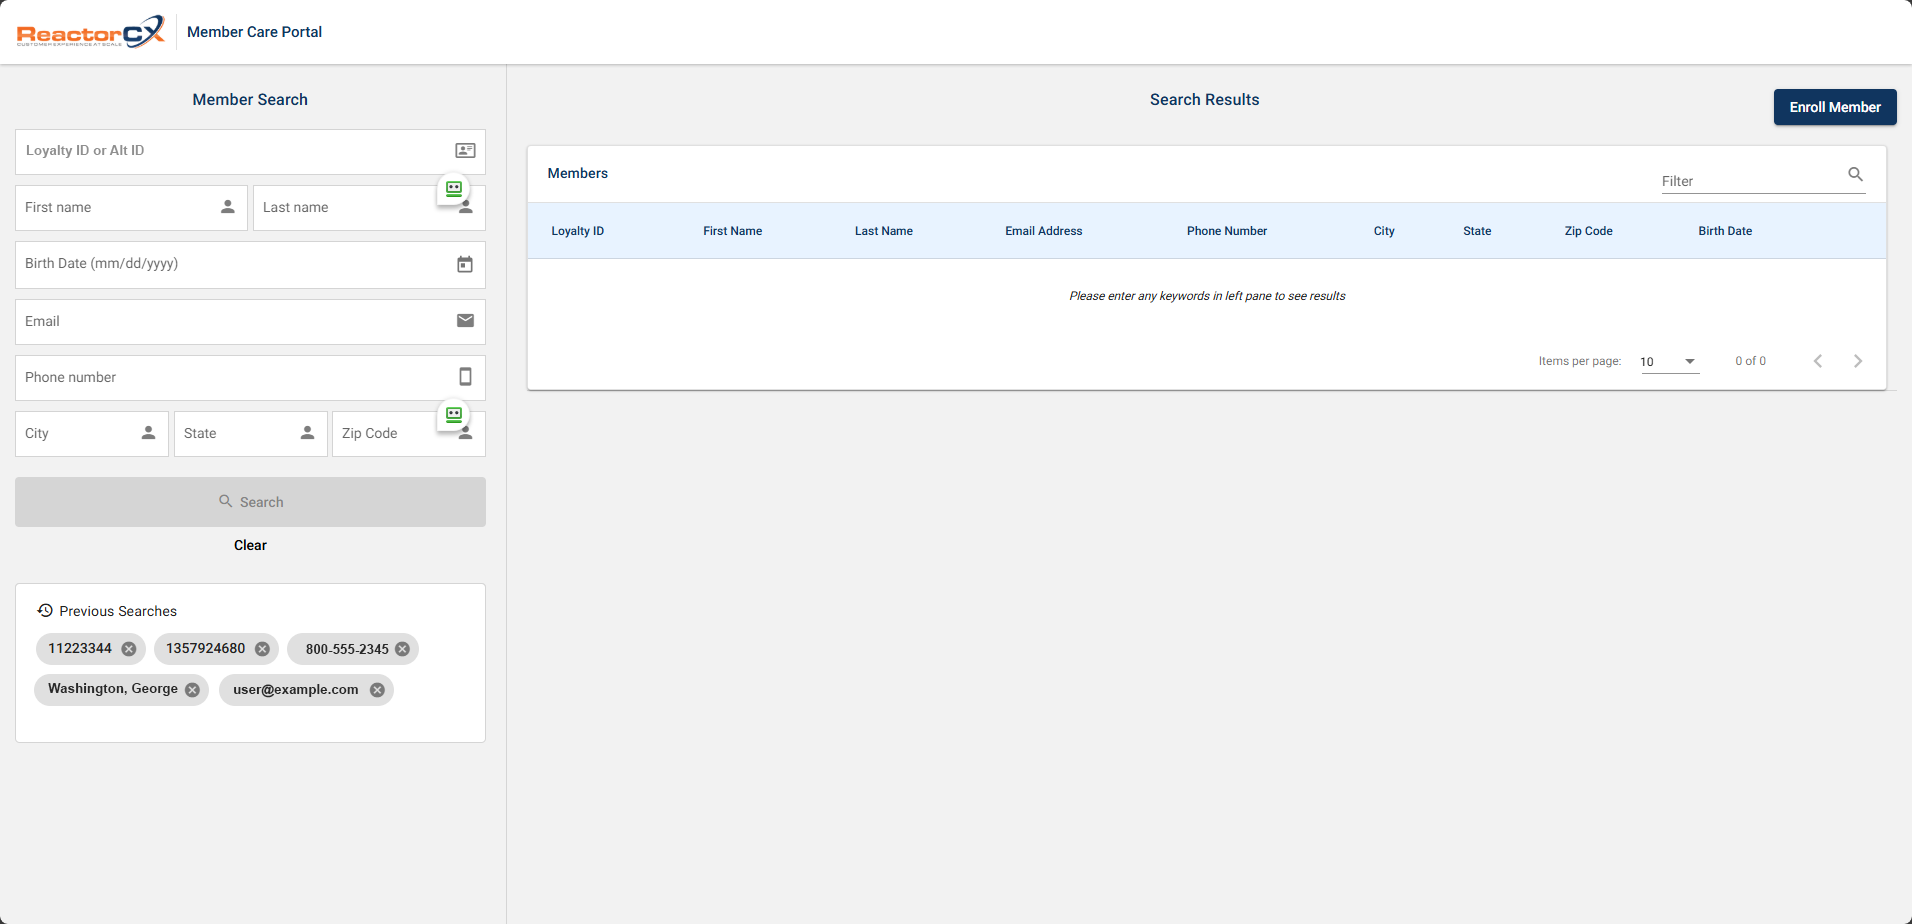
Figure 1. Member Search
The following fields can be searched:
| Field Name | Description |
|---|---|
| Loyalty ID or Alt ID | Search by any loyalty id which is registered with the member. The loyalty id is a unique identifier which is used to identify the member. |
| Username | Search by the username which is used to log in to the member portal or mobile app. |
| Search by the email address which is associated with the member. | |
| Phone Number | Search by the phone number which is associated with the member. |
| First name | Search by the first name of the member. |
| Last name | Search by the last name of the member. |
| City | Search by the city where the member is registered. |
| State | Search by the state where the member is registered. |
| Zip Code | Search by the zip code where the member is registered. |
- To search based on the criteria entered, click the
Searchbutton. - To clear the search criteria and enter new ones, click the
Clearbutton.
When you perform a search, any matching results appear in the Search Results pane to the right. You can use the filter on the top right to filter the results further.
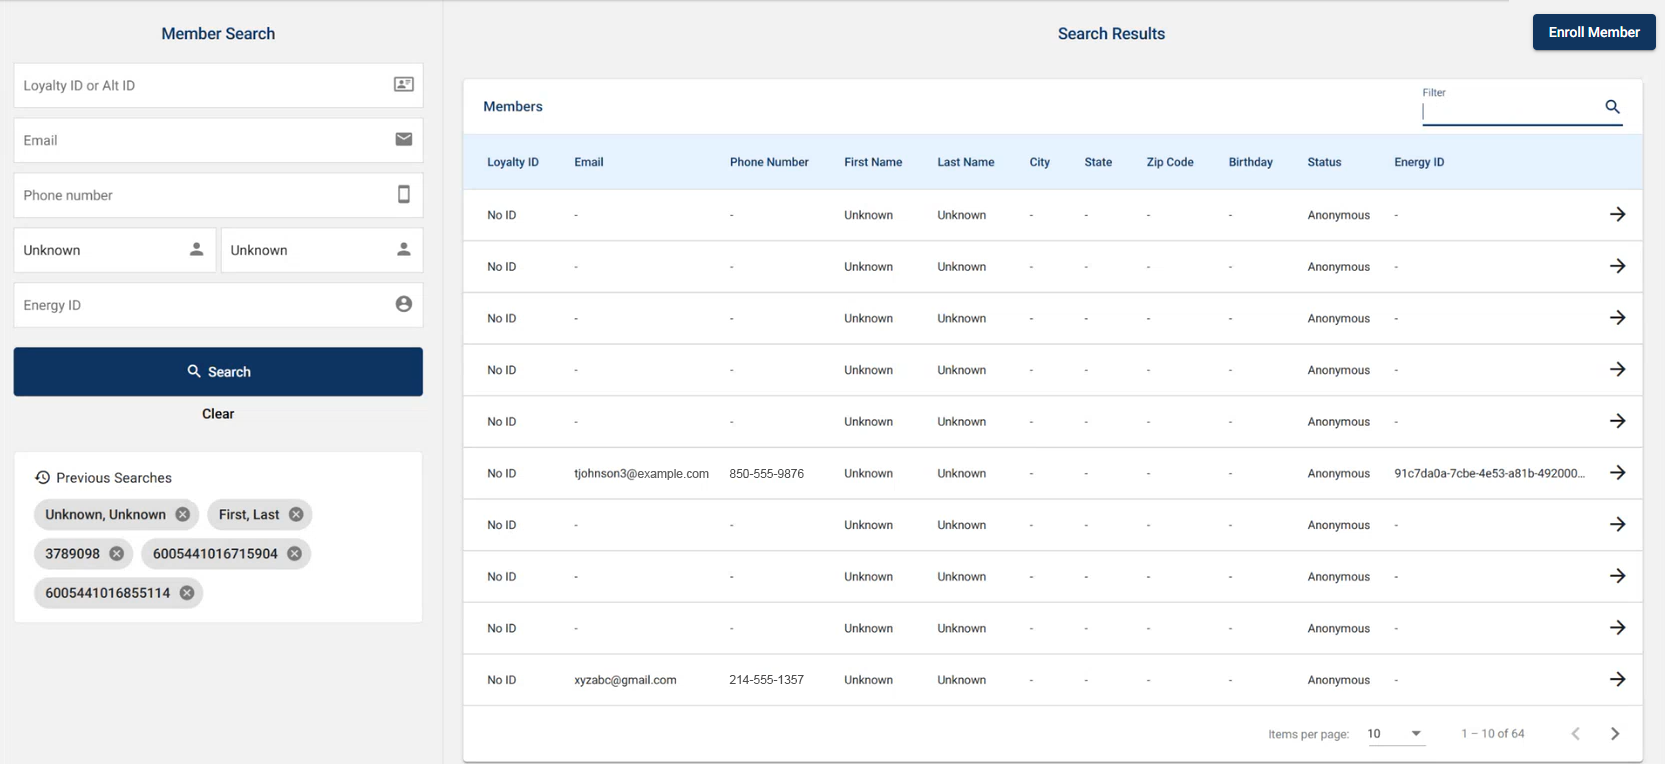
Figure 2. Search Results
- To select a member and view their account details, click the arrow to the right of a search result.
Account Summary View
When you drill down from the search results, you are taken to the Account Summary view. This view shows the details of the loyalty account for the member.
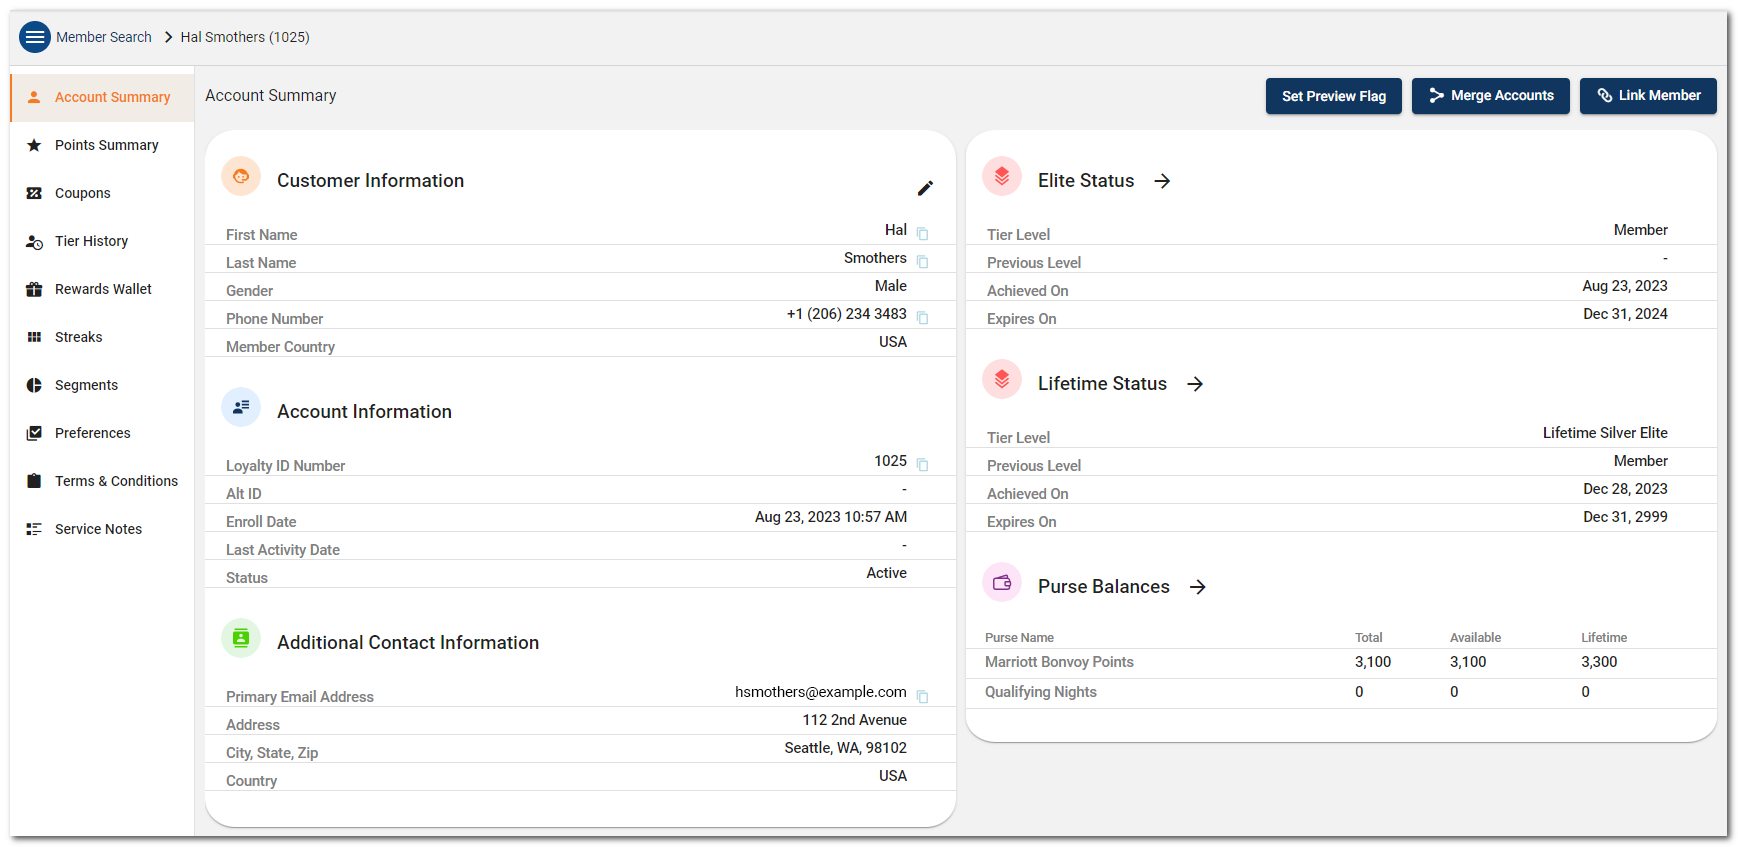
Figure 3. Account Summary
The account summary view provides a wealth of information designed to be a snapshot of the member, their status, and currency balances. The information is shown in sections called panels, covering the following types of information:
| Panel | Description |
|---|---|
| Customer Information | Provides personal information for the customer, such as first and last name, gender, phone number, and country. |
| Account Information | Provides information about how the account is identified (primary loyalty id and alternative loyalty id) and when it was created as well as when it was last active. |
| Additional Contact Information | Provides additional ways to contact the member such as email and physical address. |
| Tier Status | For each tier the member holds, the panel provides current and previous level, achievement and re-qualification date. |
| Purse Balances | Shows vested, un-vested and lifetime balances of the currencies for the program which the member has earned to date. |
Tip
You can use the arrow links in the panel headings to navigate to detailed views for panels where these links are available.
Setting Preview Flag
The ReactorCX platform allows for certain members to be allowed to preview offers before the offers are effective. This allows field staff to experience the offers before customers can see them.
- To set the preview flag, click the
Set Preview Flagbutton. - To unset the flag, click the
Unset Preview Flagbutton.
Note
The offers that can be previewed in this way would also have to have their Preview flag set within the Program Administration console.
Merging Accounts
To merge two member accounts, click the Merge Accounts button.
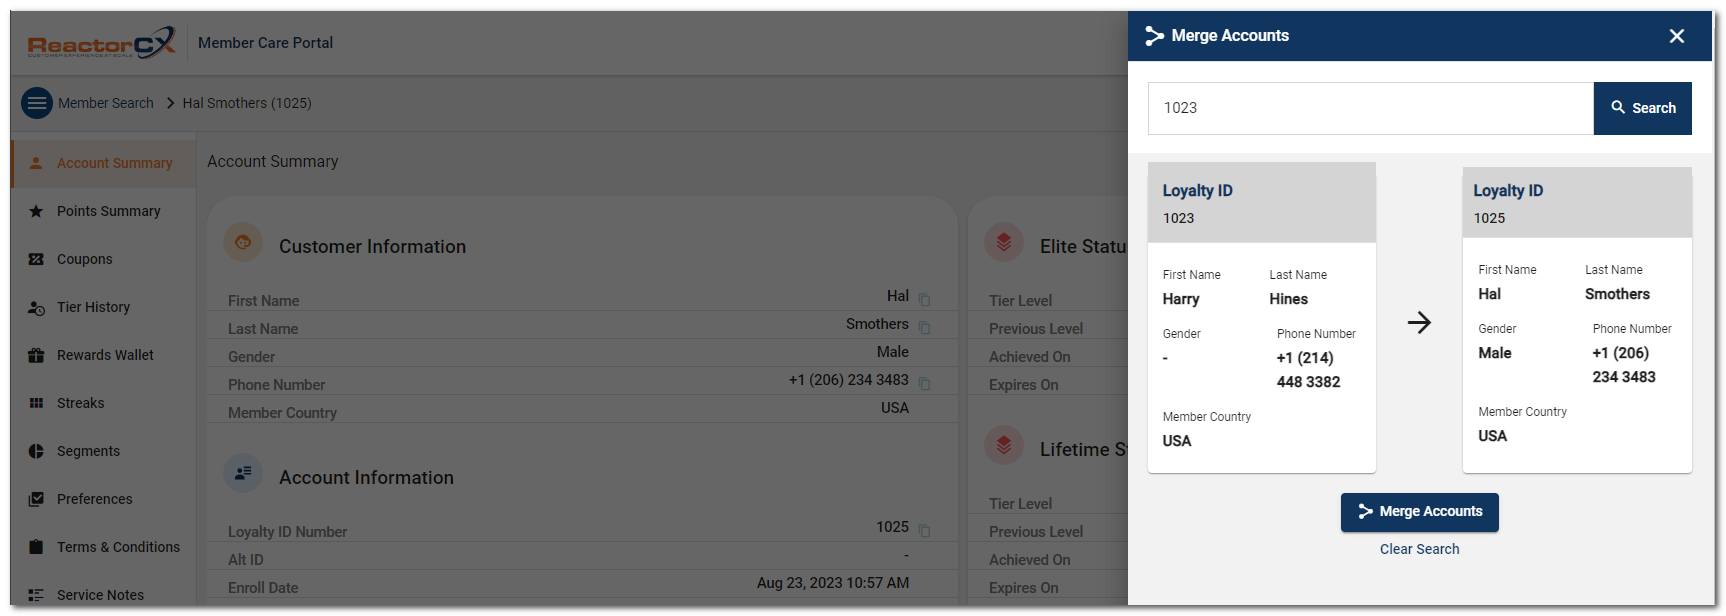
Figure 4. Merge Accounts
To merge accounts follow these steps:
- In the fly-out form, enter the loyalty id (or any alt id) of the member account that you want to merge with the current account.
- Verify the information and click the
Merge Accountsbutton. - To clear the search, use the
Clear Searchbutton.
Note
When members are merged, their balances are combined, and the higher tier levels applied to the surviving account.
Points Summary View
The Points Summary View shows the balances of all currencies in the program for the member. It also allows balance adjustments, and transfers.
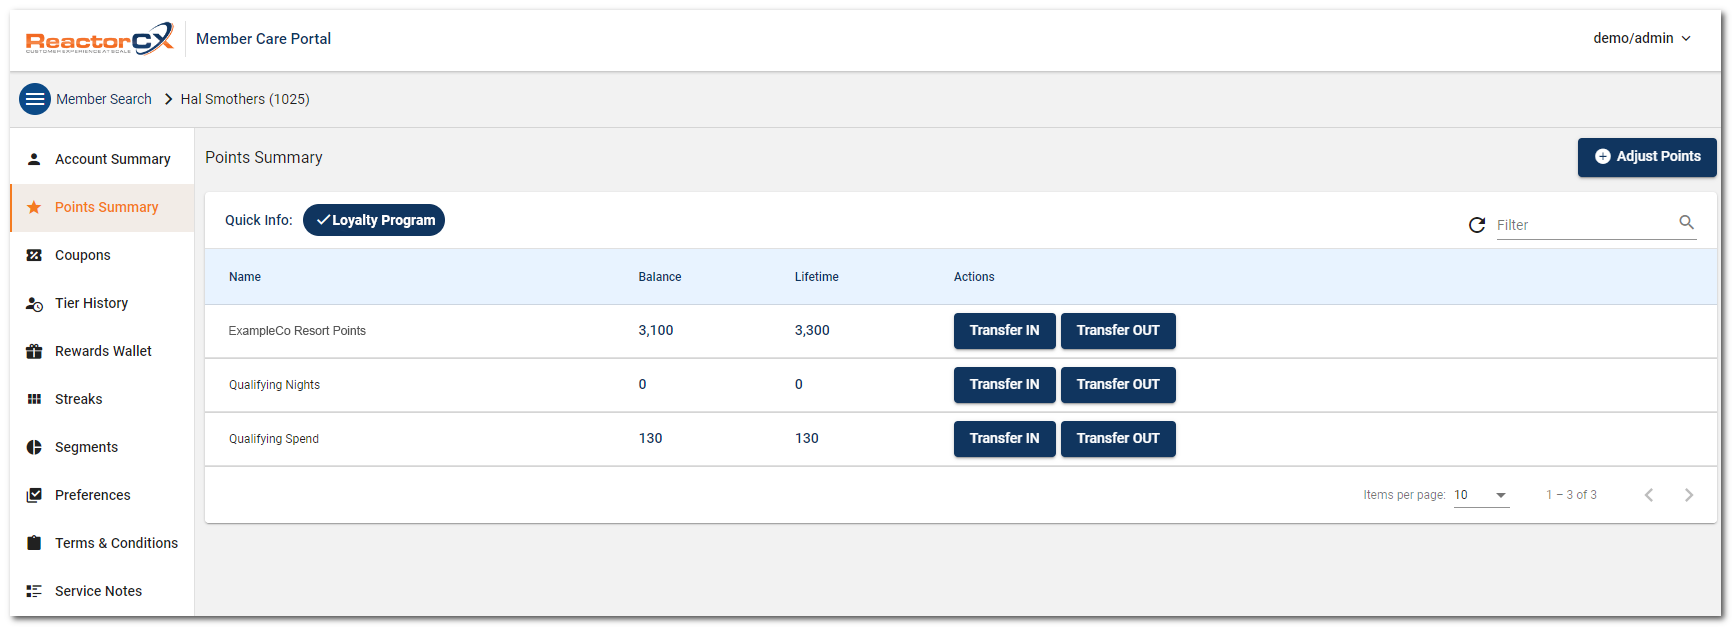
Figure 5. Points Summary
Adjusting Points
To adjust points on any of the purses, use the Adjust Points button.
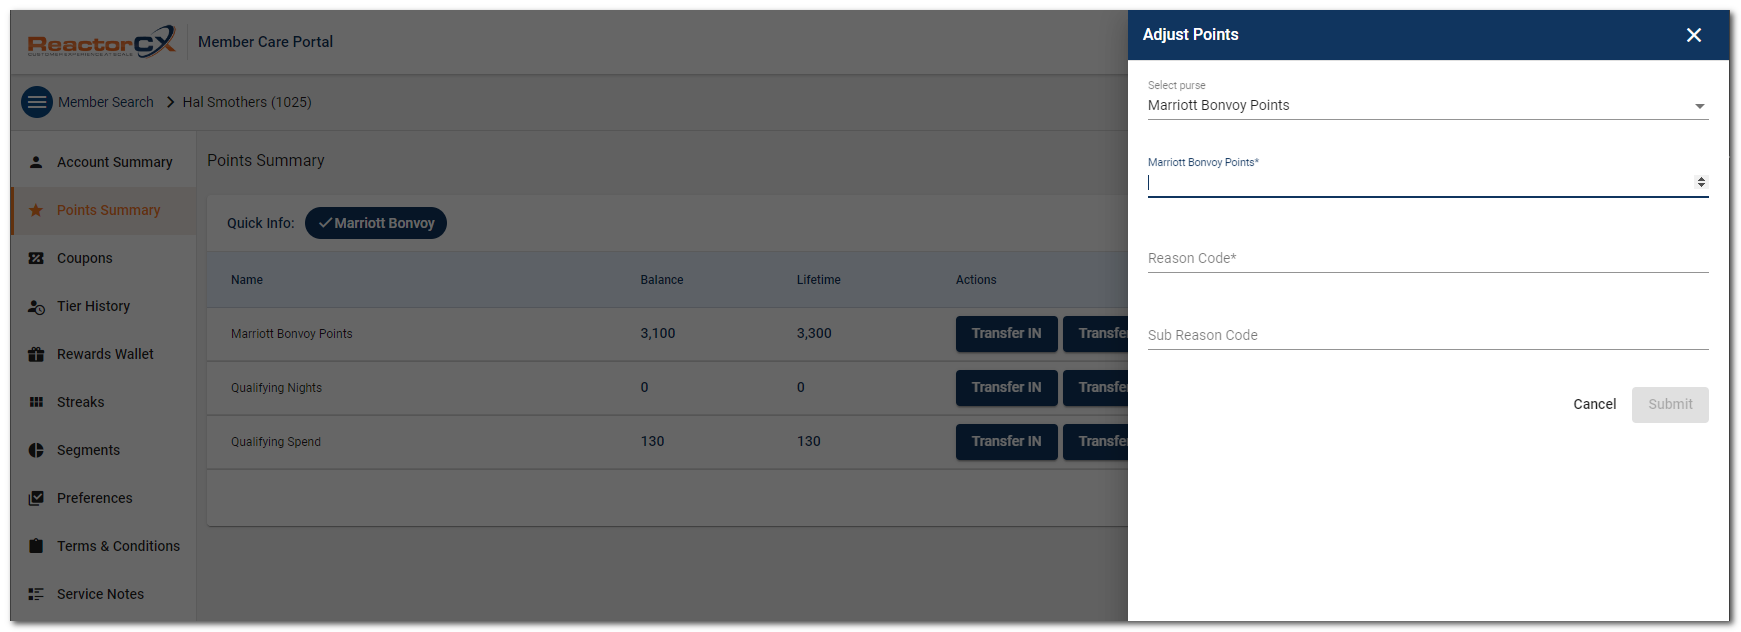
Figure 6. Adjust Points
To adjust points follow these steps:
- Select the purse you want to adjust.
- Enter the number of points to adjust. For negative adjustments, use - in front of the number.
- Select a reason code and sub-reason code if applicable.
- Press the
Submitbutton.
Transferring Points
To transfer points, use the Transfer IN and Transfer OUT buttons under the Actions column in the list of purse balances.
- Transferring IN moves points from another member's balance into this member's balance.
- Transferring OUT moves points from this member's balance into another member's balance.
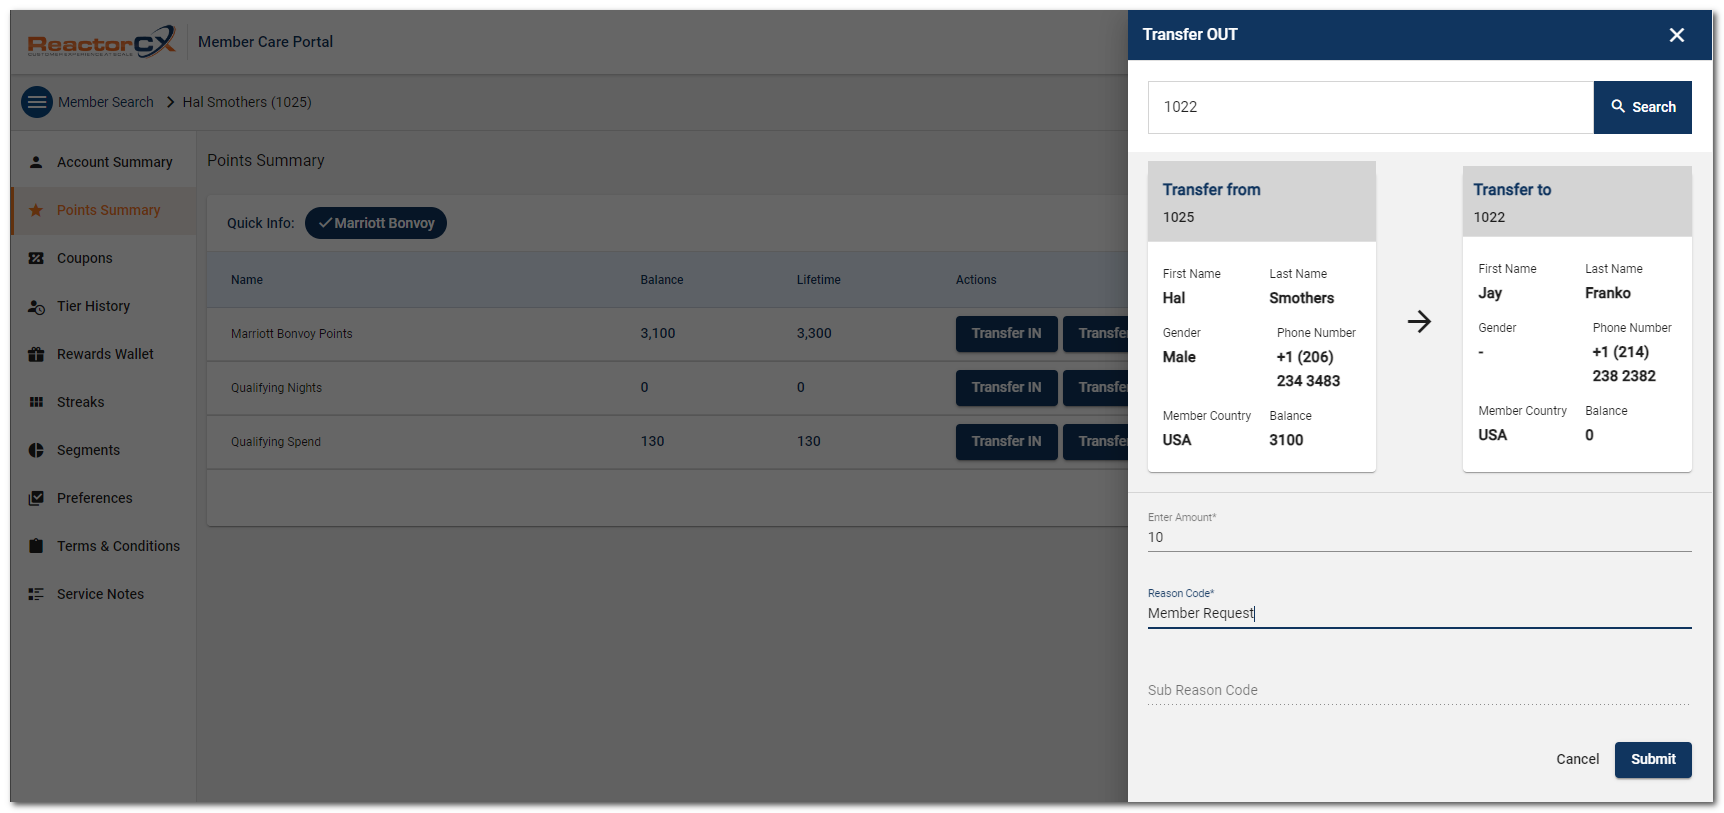
Figure 7. Transfer Points
To transfer points, following these steps:
- In the fly-out form, enter the loyalty id (or any alt id) of the member account that you want to transfer points to or from.
- Enter the amount of points you would like to transfer.
- Enter a reason code and sub-reason code if applicable.
- Press the
Submitbutton.
Tier History View
The Tier History view allows viewing and adjusting tier status for a member in the program.
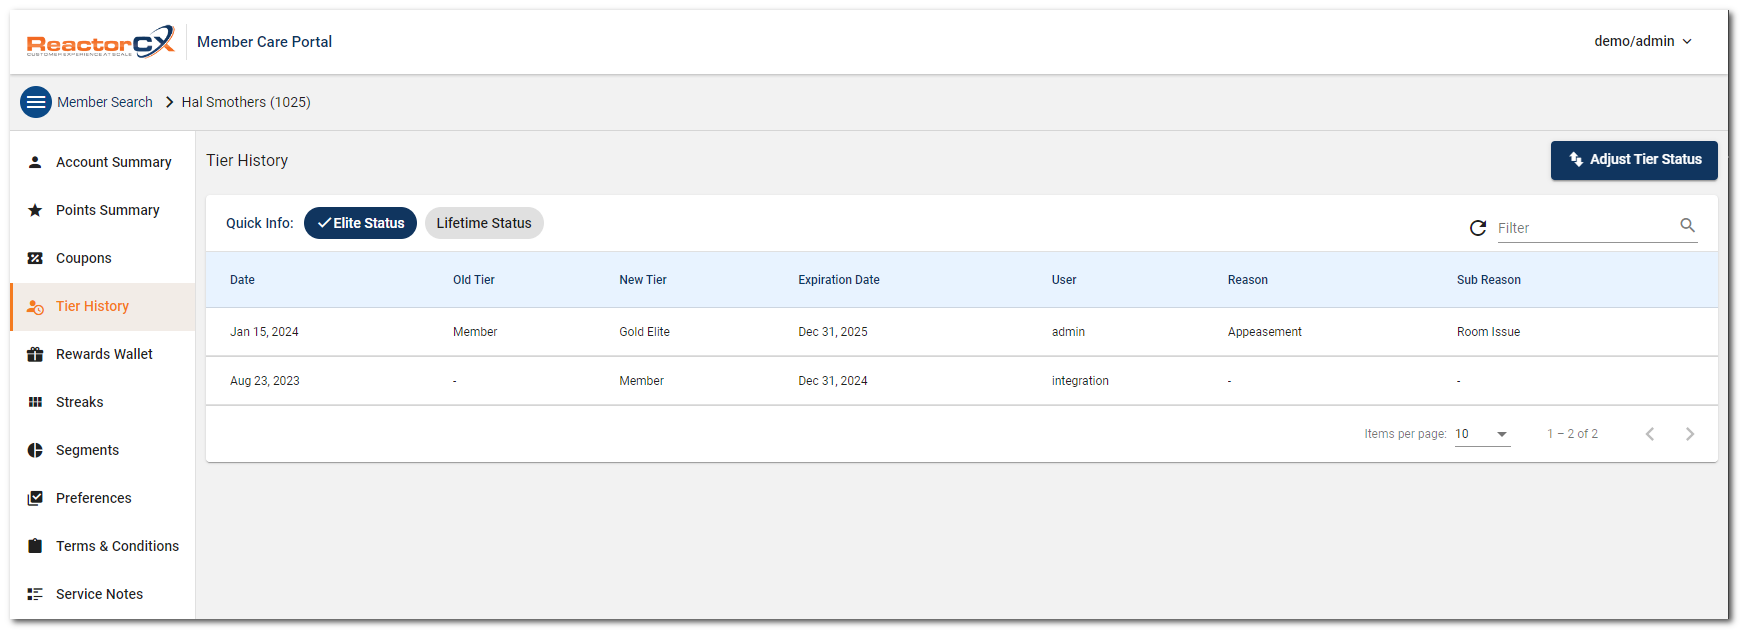
Figure 8. Tier History
To select a specific tier, use the Quick Info bar at the top of the table.
Adjusting Tier Status
To adjust tier status, clock on the Adjust Tier Status button, ensuring that the Quick Info bar has the correct tier selected if the program has multiple tiers.
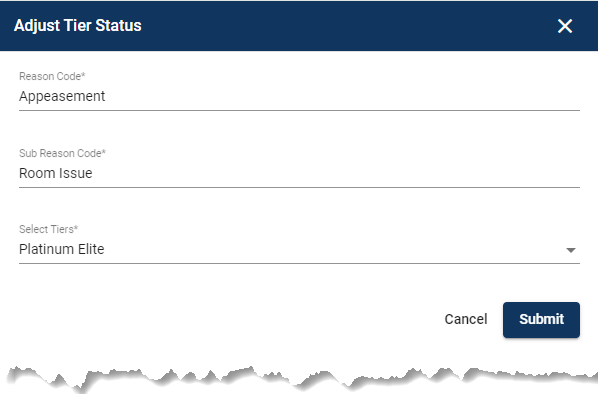
Figure 9. Adjust Tier Status
To adjust tier status, following these steps:
- Select reason code and sub-reason code if applicable.
- Select the new tier level you want to set for the member.
- Press the
Submitbutton.
Rewards Wallet View
The Rewards Wallet view shows the rewards that the member has earned to date. It also allows viewing and adjusting the rewards wallet.
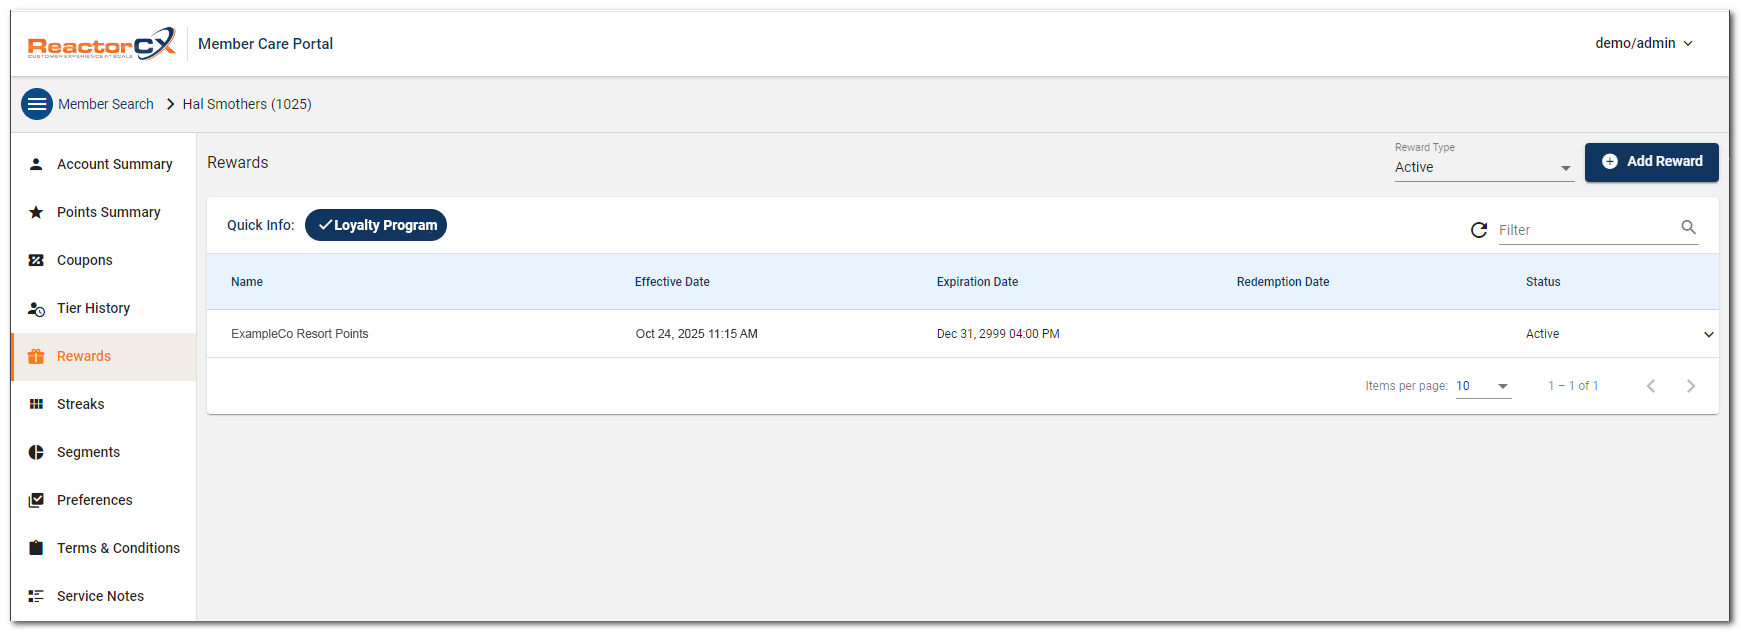
Figure 10. Rewards Wallet
To filter rewards based on their status (for example Active, Expired, and so on), use the Reward Type filter drop-down menu.
Adding Rewards
To add a specific reward to a member's Rewards Wallet, click Add Reward.
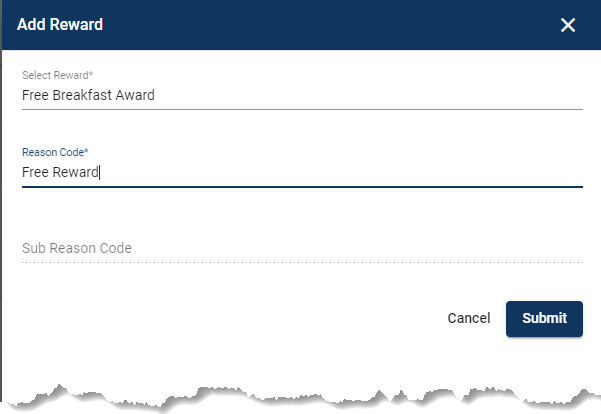
Figure 11. Add Reward
To add rewards, follow these steps in the fly-out form:
- Select the Reward you want to add from the drop down.
- Select reason code and sub-reason code if applicable.
- Click the
Submitbutton.
Streaks View
The Streaks View displays the streaks the member has participated or is participating in currently. The view displays the current status, as well as the start and end dates of the streak. The view also allows viewing the goals for the streak, towards which members are making progress.
To view the goals for a particular streak, click Expand (>) at the right of the streak in the list. For each goal, you see the goal status, start, and end dates, deadline if applicable, as well as bonus value.
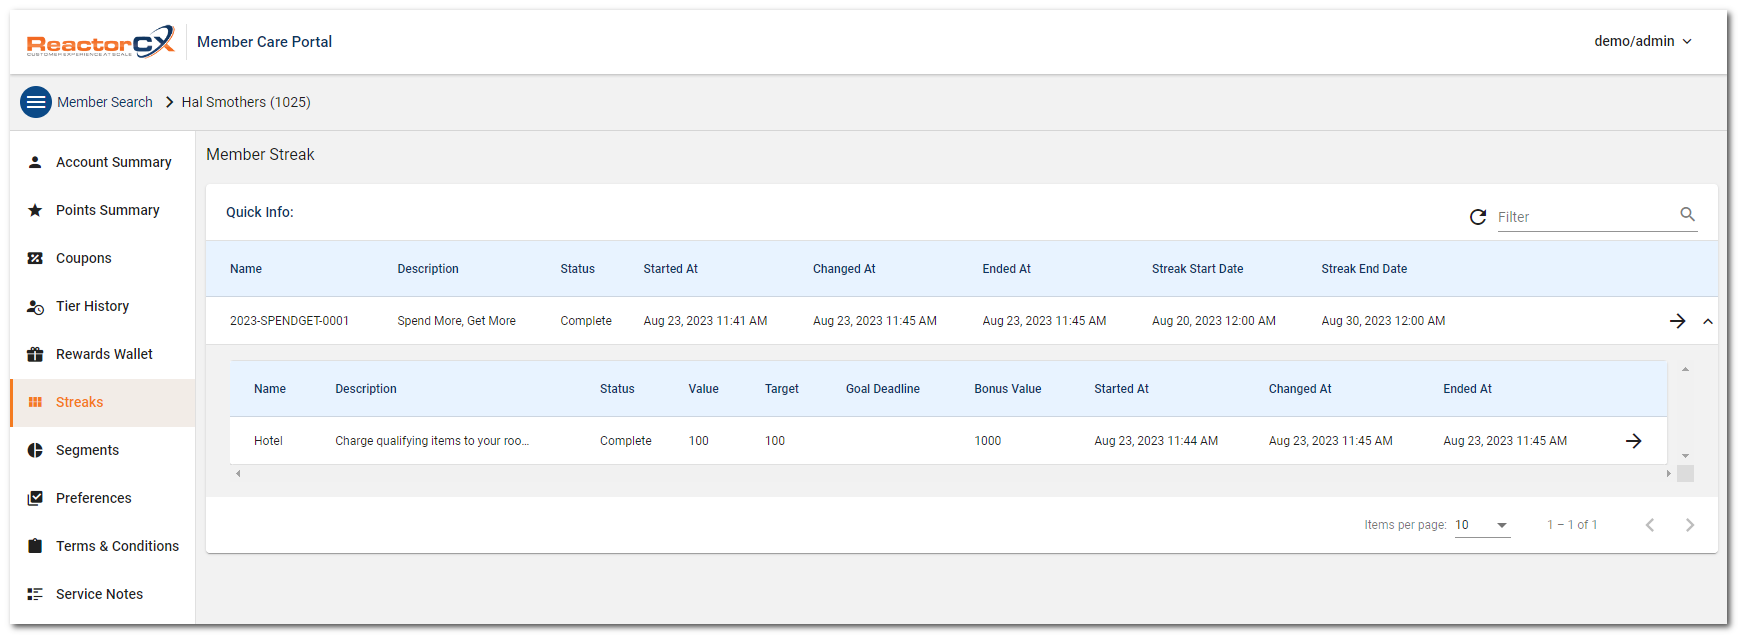
Figure 12. Streaks
Viewing Streak Details
To view the details for a particular streak, such as a more extensive description, or any legal disclaimers applicable, click the arrow at the end of the streak row in the list.

Figure 13. Streak Details
Click Disclaimer to view any legal language applicable to terms and conditions for the streak.
Viewing Goal Activities
Goals are advanced because of certain activities a member is performing over the lifetime of a streak. To view which activities (also known as events) contributed to progress for a specific goal inside a streak, use the arrow at the end of the goal row within the list of goals in the streak.
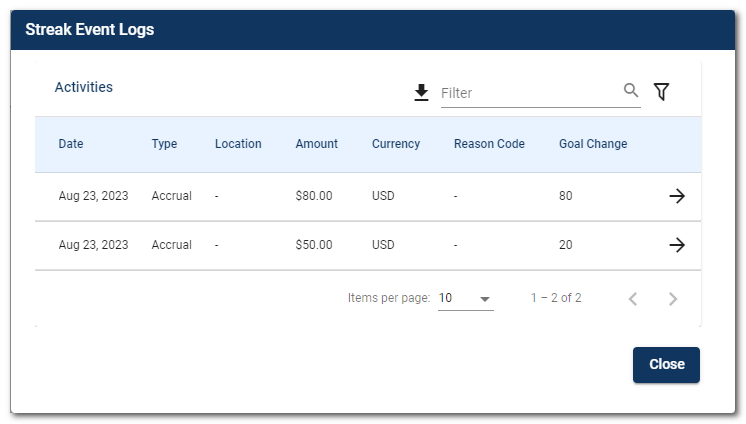
Figure 14. Goal Activities
To further drill down into each activity that contributed to the goal, click the arrow at the end of the activity row within the list of activities.
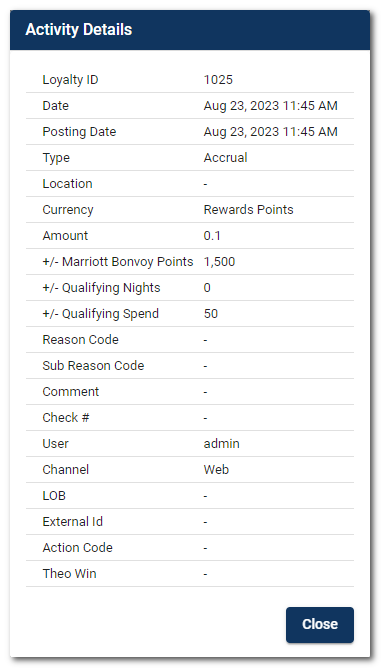
Figure 15. Activity Details
Segments View
The Segments View allows viewing which segments a member is part of, for the purposes of promotion eligibility, as well as for the purposes of identifying certain populations as Age Verified, or otherwise qualified for specific offers.
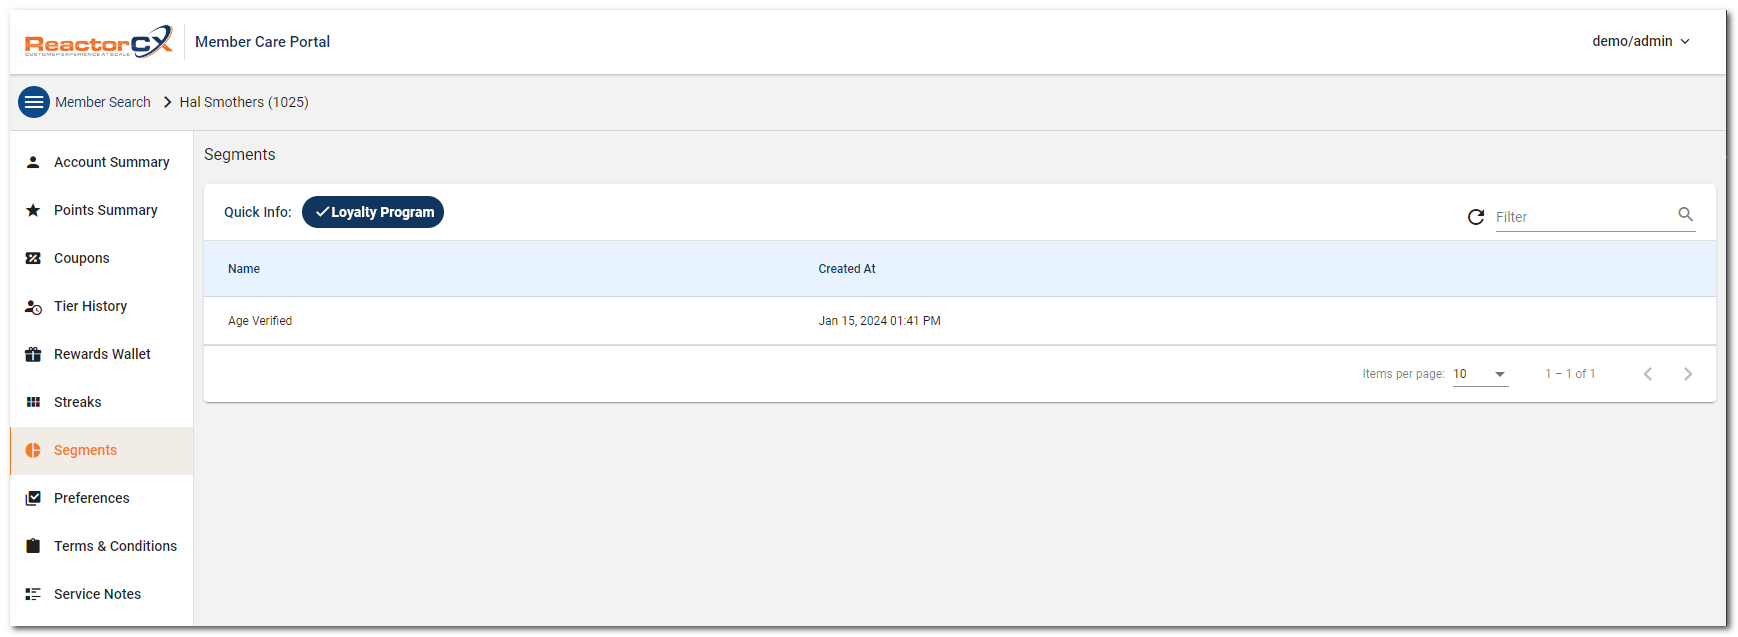
Figure 16. Segments
Activity History View
The Activity History View allows viewing the activity history of a member, and understanding how activities affect the member's points balance, as well as other aspects of the loyalty status for a member. Deeper ad-hoc analysis is available via history downloads into Excel.
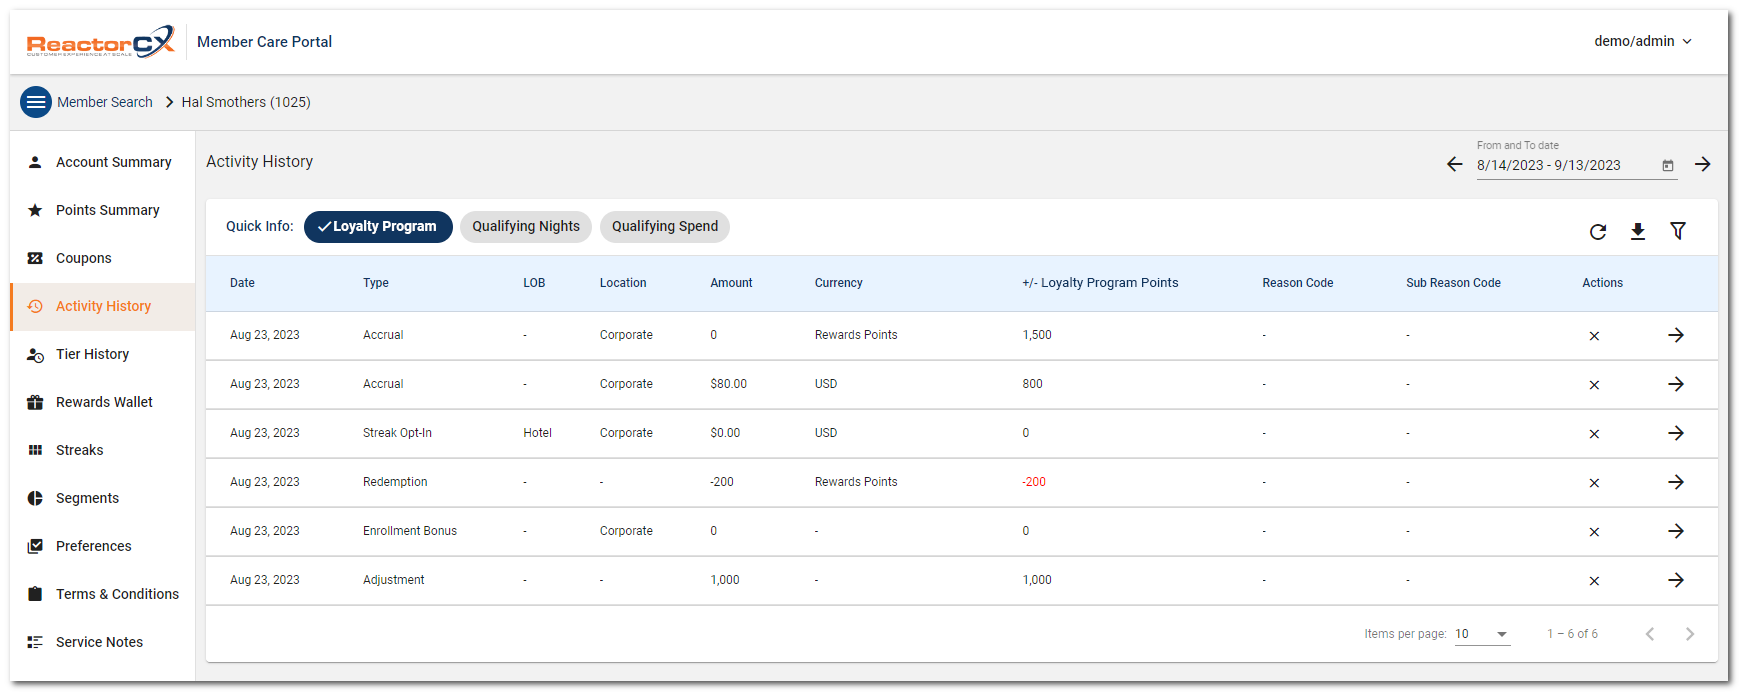
Figure 17. Activity History
Viewing Time Periods
To view a specific time period, use the From and To Date control at the top right of the activity history view.
- To advance by 1 month in the history, click the left arrow on the From and To Date control.
- To go back by 1 month in the history, click the right arrow on the From and To Date control.
Downloading History
To download the history for a specific time period, use the ( ) button at the top right of the activity history view.
A pop-up window allows selecting the time period for which to download history:
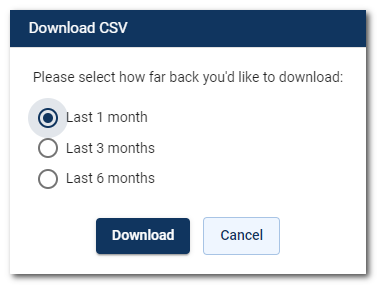
Figure 18. Download History Window
Switching Currencies
In the Quick Info bar at the top of the list, you can select any of the currencies in the program. This allows you to see the ± difference activities make to the member's points balance for the selected currency. The relationship is indicated in the screen shot below.
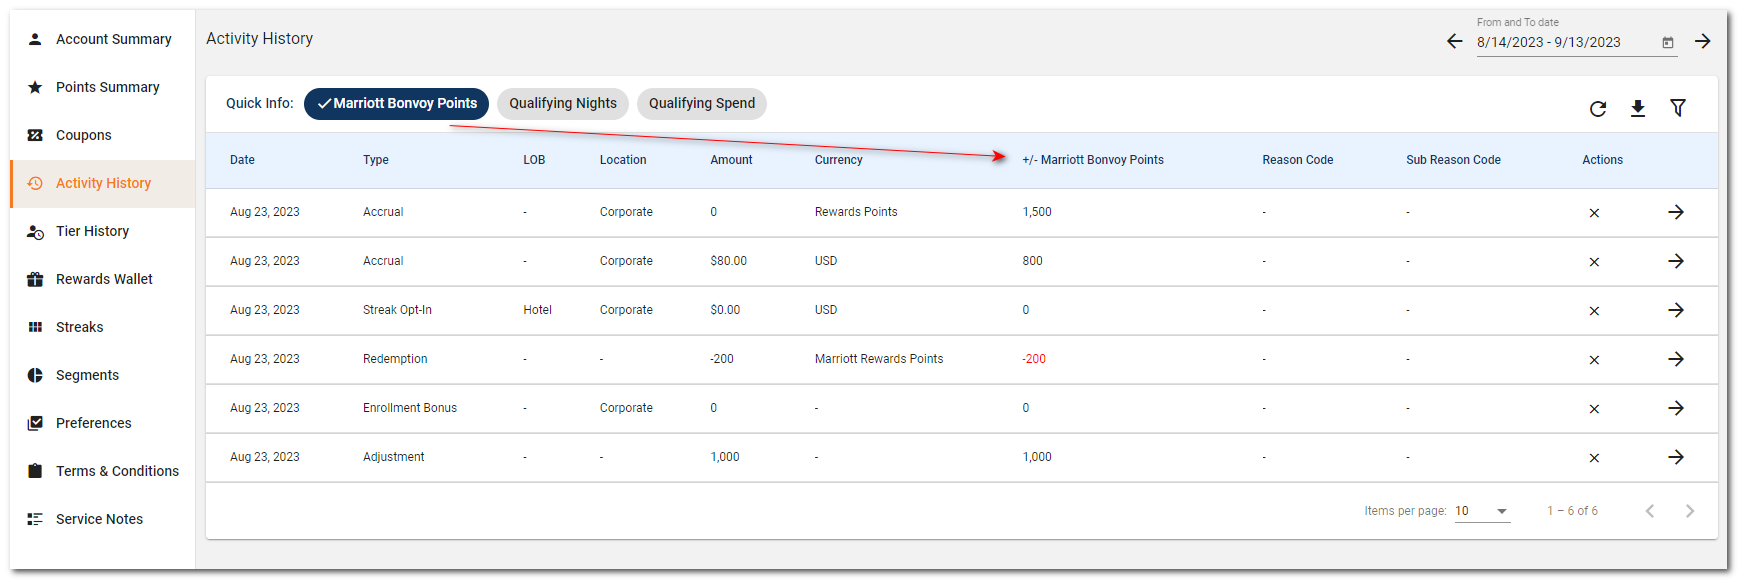
Figure 19. Currency Switching
Advanced Filtering
The activity view has an advanced filter allowing individual columns to be searched via the filter (  ) button. Using this feature displays individual text filters that can be used to narrow down the list of activities based on specific column values.
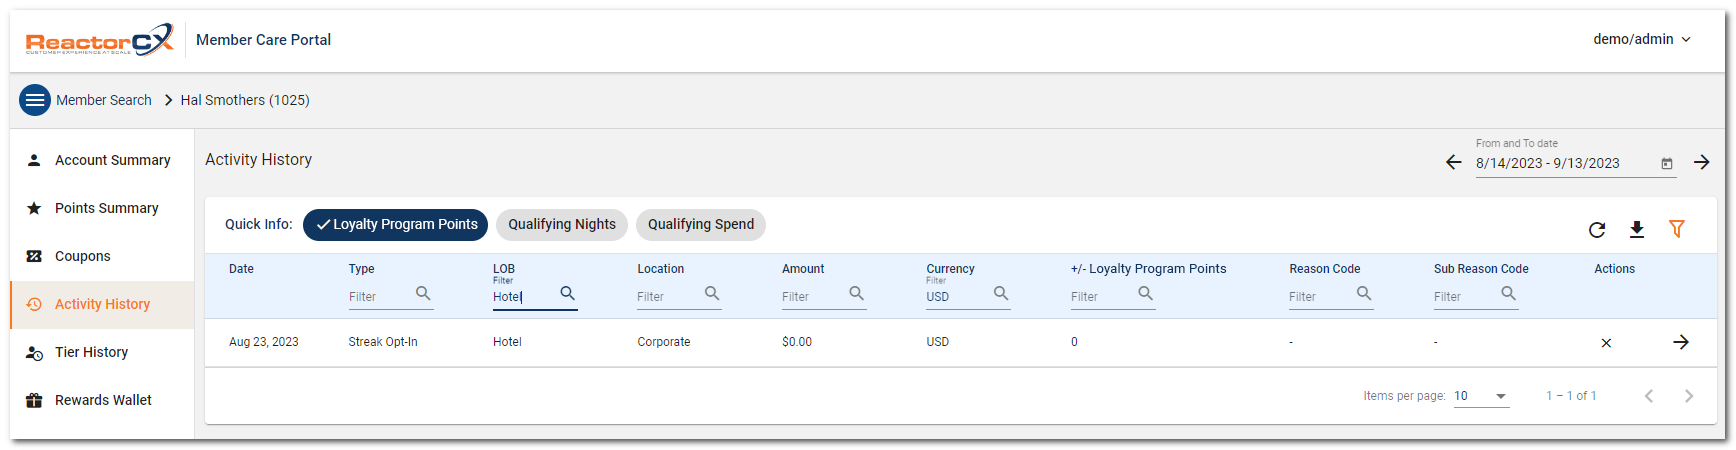
Figure 20. Advanced Filter
Viewing Activity Details
To view the details for a particular activity, click the arrow at the end of the activity row in the list. This produces a fly-out window that shows a list of important activity attributes as well as a summary of the currency impact of the activity.
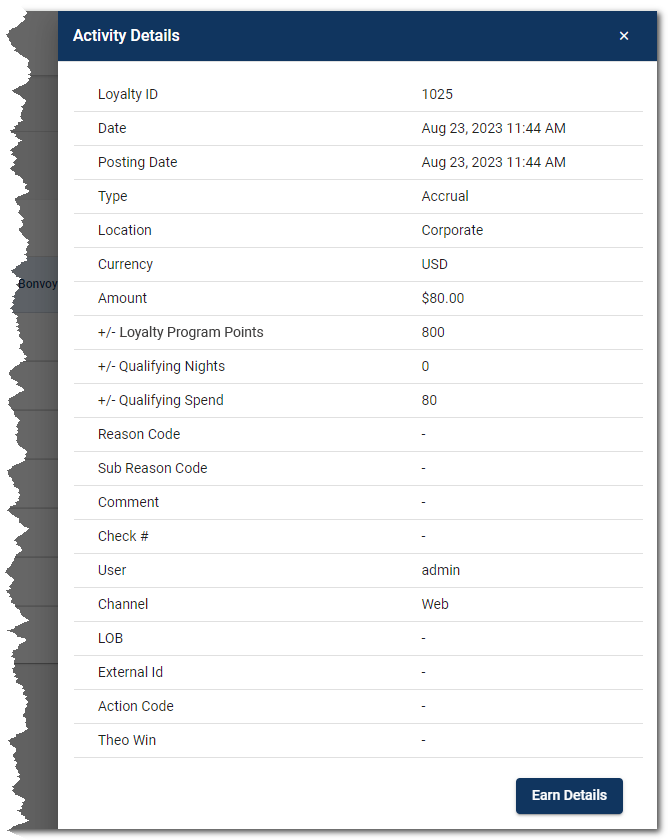
Figure 21. View Activity Details
In the details fly-out there is an Earn Details button that breaks out any specific earn, allowing a further understanding of aspects such as base vs. promotional earn on the activity in question, and differentiating this earn by currency.
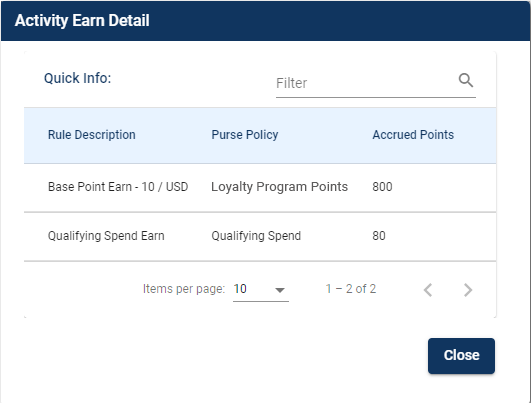
Figure 22. Earn Detail
Cancelling an Activity
The MCP tool allows cancelling activities if they were performed in error, or are found to be fraudulent.
To Cancel an activity, follow these steps:
- Locate the activity you wish to Cancel, and click the Cancel icon (X) in the Actions column.
- In the Cancel Activity fly-out, enter a reason for the cancellation and sub-reason code if required.
- Click Submit.

Figure 23. Cancel Activity
Preferences View
The Preferences View allows viewing the preferences that are set for a member. These can have an impact on earning behavior, member communication preferences, and others.
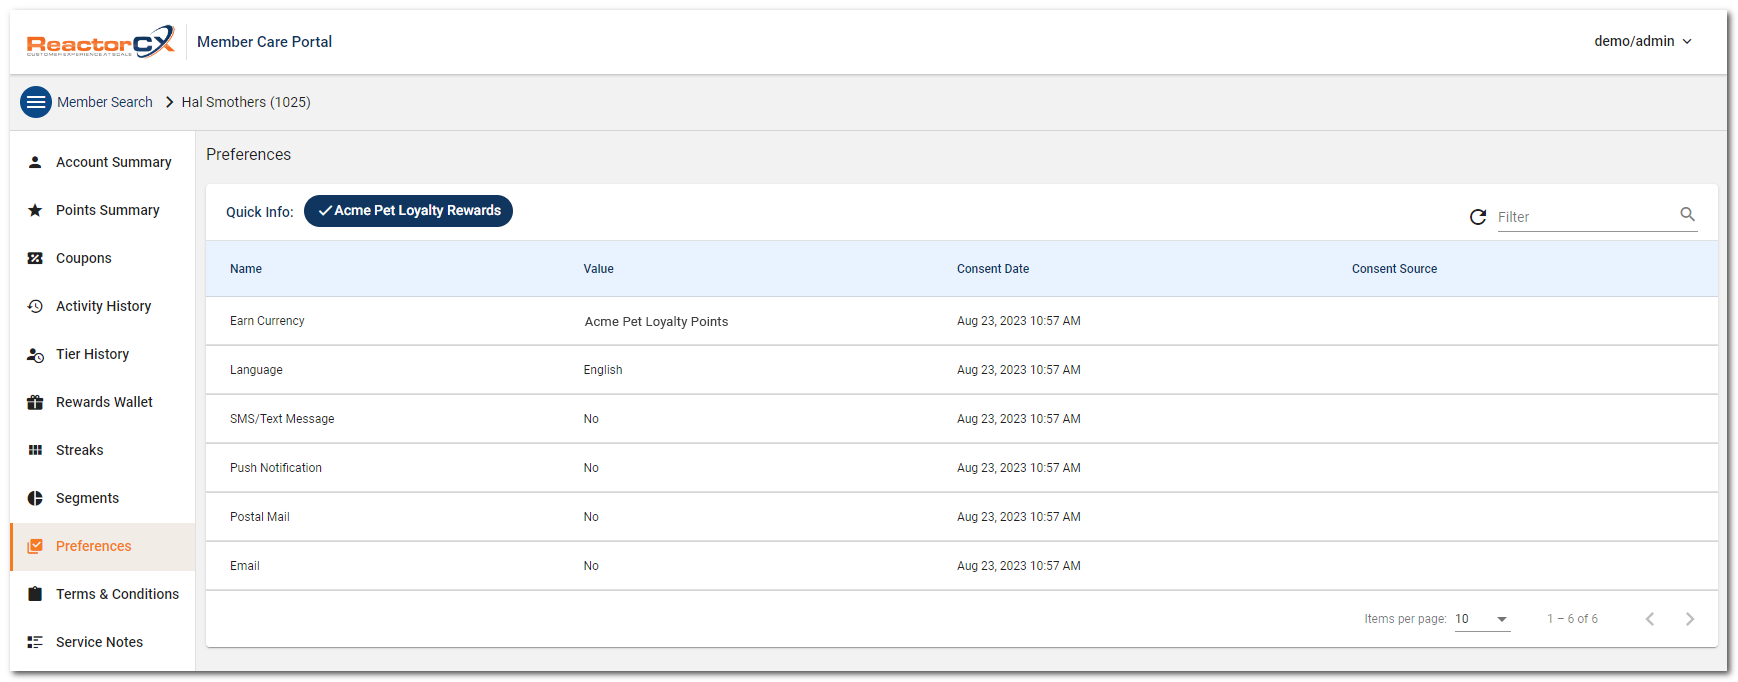
Figure 24. Preferences
Terms and Conditions View
The Terms and Conditions view is used to record consent to program terms and conditions for a member. This is particularly important, as data collection laws across geographies require consent before any tracking of activity occurs.
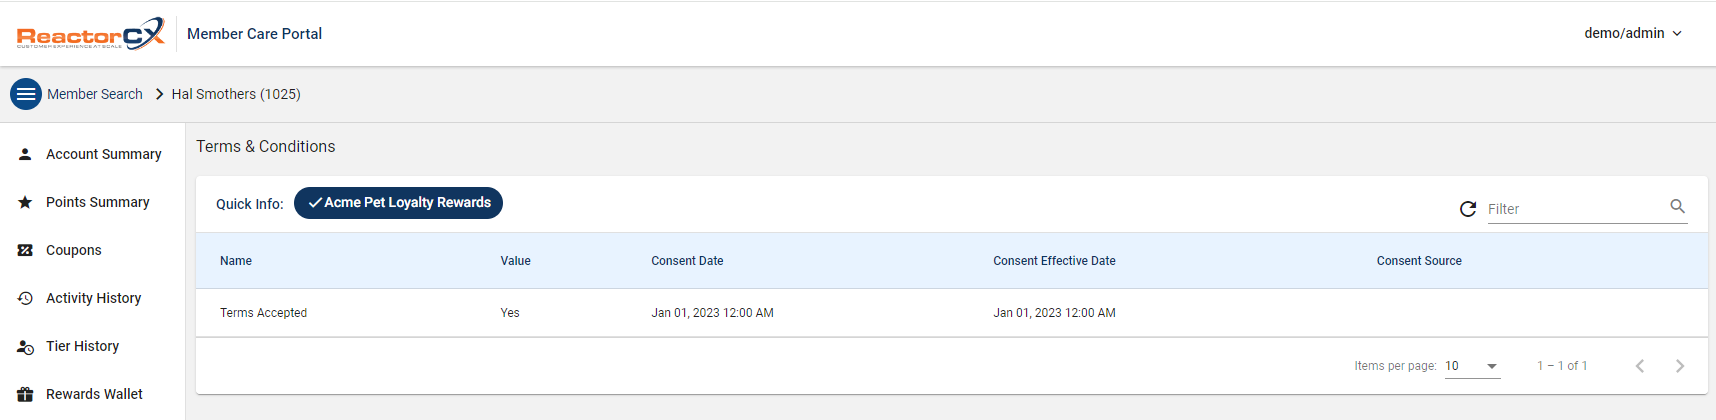
Figure 25. Terms and Conditions
Service Notes View
The Service Notes view allows staff to leave notes on specific issues related to the loyalty program and services.
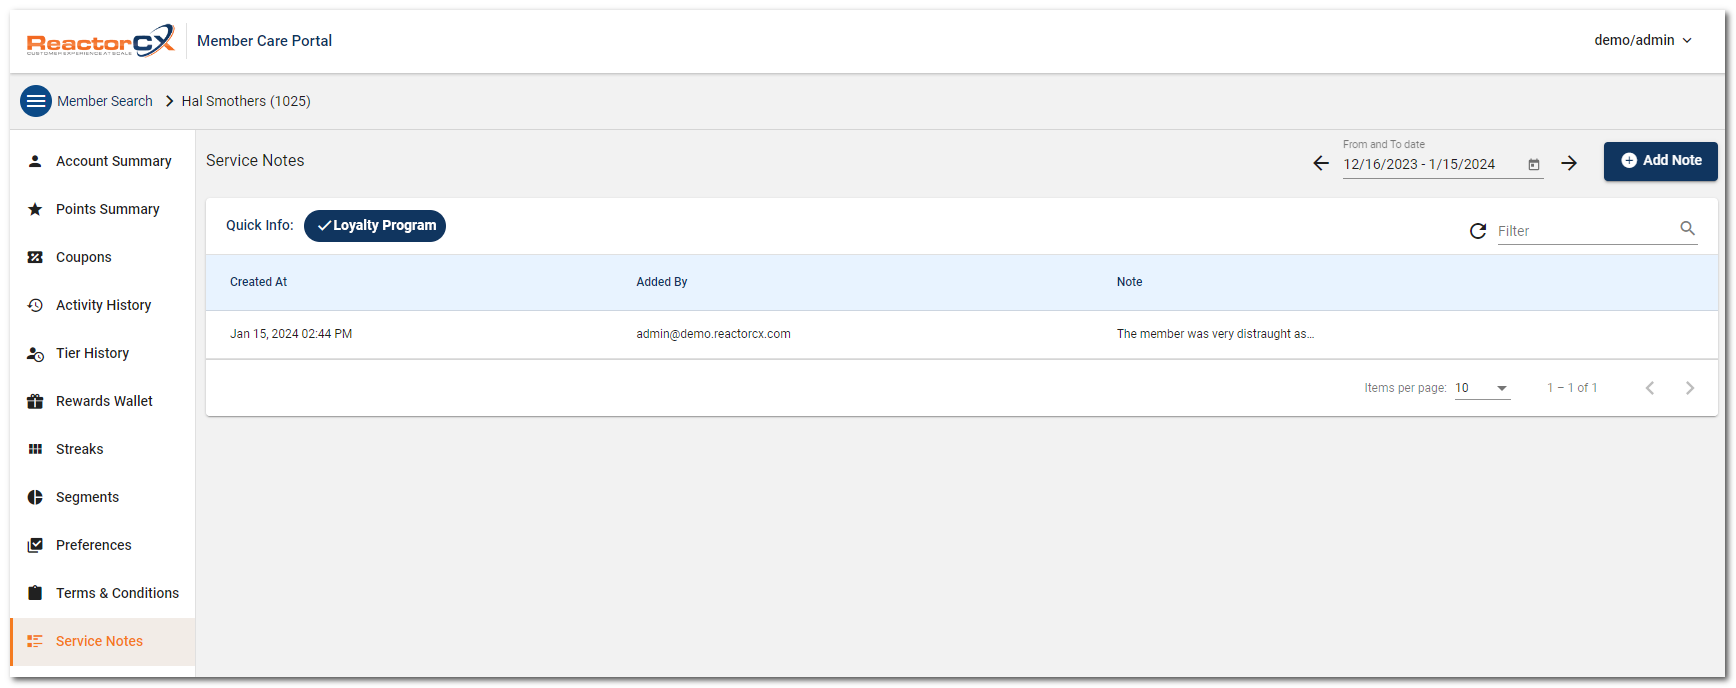
Figure 26. Service Notes
To add a new note, use the Add Note button.